Create a Timecard
Objective
To create a new timecard in the Company level Timecard tool.
Background
You can use the Company level Timecard tool to record the number of hours employees spend working on your project tasks. A timecard entry captures the Procore project, cost code, number of hours and time type. You can also indicate whether or not the entry is billable to a project, as well as enter any comments. If you have created timecard entries in the past, you can also cut down on your data entry time by copying a previous timecard entry.
Things to Consider
- Required User Permissions:
- To add timecard entries for all users in your company:
- 'Admin' level permissions on the Company level Timecard tool.
- To add a timecard entry for yourself:
- 'Standard' level permissions or higher on the Company level Timecard tool.
- To add timecard entries for all users in your company:
- Additional Information:
- If your company has enabled Procore's Timesheets tool, data entered in the Company level Timecard tool can be managed as timecard entries in the Company and Project level Timesheets tool.
Prerequisites
Steps
- Navigate to the company's Timecard tool.
- Click the GREY employee name bar. Then select the individual for whom you are creating the timecard entry from the Enter Time For drop-down list.
- Select the ending date from the For the Pay Period of the drop-down list.
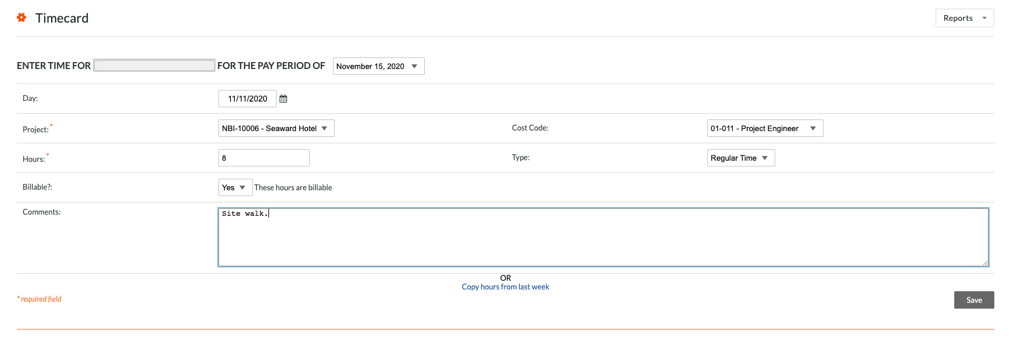
- Continue with the data entry as follows:
Note
An asterisk (*) indicates a required field.- Day: Select the date for the timecard entry. The current date is selected by default.
- Project*: Select the project that this person was working on.
- Cost Code*: Select the cost code that describes the scope of work that was done for this day/week/pay period.
- Hours: Enter the number of hours this person worked during the day/week/pay period.
- Type: Select the time type for the employee's pay. Time types can be created in the Company level Timecard tool (see Add a Custom Time Type) or the Company level Timesheets tool (see 'Manage Time Types' in Configure Advanced Settings: Company Level Timesheets).
- Billable?: If the hours are billable, select Yes. If not, select No.
- Comments: Add in an optional description of the work completed.
- Copy hours from last week: Click if you would like to add the time entries the employee worked last week.
Note: If the Timesheets tool is enabled, time entries need to be 'unapproved' to be edited.
- Click Save.
Procore saves the timecard entry in the section below the Save button.

Multiple timecard entries can be entered within a pay period. They will be added together in the Timecard for [Name] for the Pay Period of [date] section.