Edit a Funding
Limited Release
 The Funding tool is available as a limited release for Procore customers in the United States who have implemented the Procore for Owners point-of-view dictionary. To learn more, see What tool names and terms are different in Procore for main contractors, owners and speciality contractors?
Objective
To edit a project's funding.
Background
You can edit the funding's on your project at any time. Once you are ready to move forward, you can edit it to place it into the 'Approved' status.
Things to Consider
- Required User Permissions:
- 'Admin' level permissions on the project's Funding tool.
- Additional Information:
- Some fields cannot be edited when items are in the 'Approved' status. For example, you cannot edit a Bill of Quantities (BOQ) on a funding payment application or Funding Variation (FV) when it is in the 'Approved' status.
Prerequisites
- Create Fundings or (Beta) Create Fundings
- Set the accounting method for the funding. See Edit the Advanced Settings on a Funding.
Steps
Edit a Funding
- Navigate to the project's Funding tool.
- Locate the funding to work with. Then, click its Number link.
- Click Edit.
- In the General tab, under General Information, modify the following information as needed:
Notes: There are no required fields when creating a new funding. If you click Create without completing any data entry, the system saves the funding with your name listed as the creator and places it in the Draft status by default.- Sign with DocuSign©
If you are using the Procore + DocuSign© integration (see DocuSign©), a tick appears by default. Clear the tick from the box if the funding does NOT require a DocuSign© signature. - Funding #
Accept the default funding number, enter a new number for the funding or create a custom numbering scheme to use.Notes
- If you plan to create multiple fundings, Procore increments this number for you by default. For example; 1, 2, 3 and so on.
- To use a custom numbering scheme, you can enter a set of alphanumeric characters (for example, F-1 or F-01 or F-001) and Procore increments the number on new fundings.
- Title
Enter a descriptive name for the funding. - Owner/Client
Select the project owner/client from the drop-down list. - Architect/Engineer
Select the lead architect for the project from the drop-down list. - Contractor
Enter the company name of the contractor managing the construction project. If you are setting up the funding, this will typically be your company's name. - Status
Select the current status for the funding. Options include Draft, Out for Tender, Out for Signature, Approved, Complete or Terminated.
Note: To create variations and payment applications, a funding's status must be set to Approved or Complete. - Executed
Place a mark in this tickbox if the funding has been fully executed. - Make this Visible Only to Administrators and the Following Users
Place a mark in this check box to limit visibility to users with 'Admin' permission and any users designated in the 'Allow These Users to See BOQ Items' checkbox. - Allow These Users to See BOQ Items
Place a mark in this tickbox. Then select the names of any users who have been granted 'Standard' or 'Read Only' permissions on the Funding tool from the 'Select a Person' drop-down list. - Default Retention. Specify a default percentage that will automatically be applied to all line item costs for retention purposes. For example, enter: 10%
- Description
Enter a descriptive summary to provide more detail about the funding. - Attachments
Attach any relevant files to the funding. For example, an electronic copy of the signed funding.
- Sign with DocuSign©
- Under Funding Dates, do the following:
Note
A user with 'Admin' permission on the Funding tool can configure the tool to show or hide the fields marked with an asterisk (*) below. See Configure Settings: Funding.- Date Created
Shows the date the funding was created. This cannot be modified. - Start Date
Specify the project's official start date. - Estimated Completion Date
Specify the estimated date for project completion. - Substantial Completion Date*
Select the date from the calendar control. The substantial completion date refers to the date that work is considered sufficiently complete to satisfy legal requirements. It also indicates the date that the tenant can assume occupancy of all or part of a project and you are entitled to receive funding balance payment (less retention) until final completion.Note
If enabled, the substantial completion date will be updated to each Funding Variation's (FCOs) Revised Substantial Completion Date once each FV has a status of Approved. - Actual Completion Date
Select the date from the calendar control. This represents that final payments have been processed and the funding is considered closed. - Funding Date*
Select the date from the calendar control. This represents the effective date of the funding agreement. This is the date the funding goes into force. - Signed Funding Received Date
Select the date from the calendar control. This represents the date that the executed funding was received. - Execution Date*
Select the date from the calendar control. This represents the date the agreement was signed by all parties. - Issued On Date*
Select the date from the calendar control. This date represents the date the agreement was issued to both parties. - Returned Date
Select the date from the calendar control. - Letter of Intent Date
Select the date from the calendar control. A letter of intent date is the date the Letter of Intent (LOI) document outlining the agreement between parties is received before the funding is finalised. - Approval Letter Date*
Select the date from the calendar control. A letter of approval date is the date that compliance with the fees, statements and disclosures stated in the Letter of Approval (LOA) date that the funding was signed into the record. - Funding Termination Date
Select the date from the calendar control. A funding termination date is a date outlined in the funding where all parties have met all the obligations and terms.
- Date Created
- Under Additional Information, do the following:
- Inclusions. Specify any agreed-upon inclusions in the funding.
- Exclusions. Specify any agreed-upon exclusions in the funding.
- Click Save.
Add, Delete and Rearrange BOQ Line Items
- Navigate to the Funding tool.
- Click the Bill of Quantities tab.
- Click the vertical ellipsis (⋮). Then choose from the following menu options:
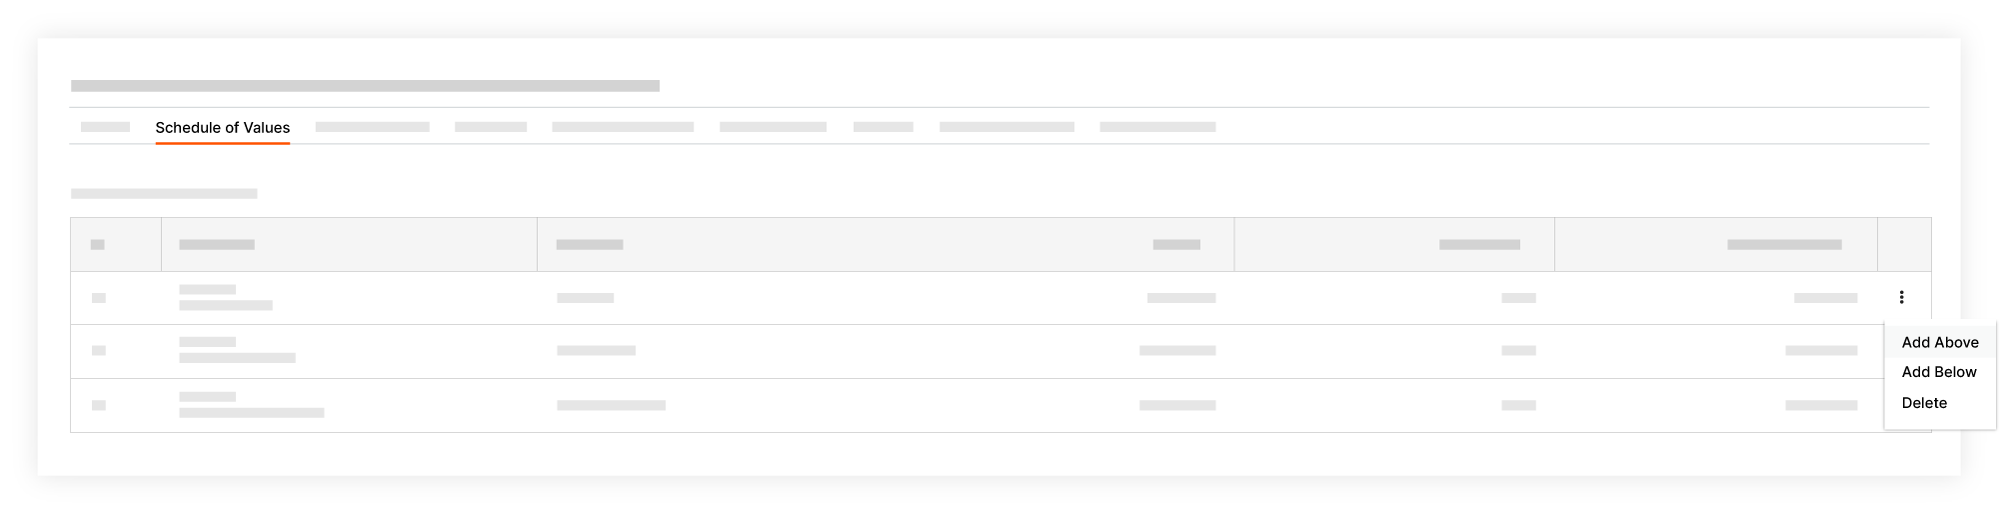
- Add Above
Select this option to add a line item above the current line item. - Add Below
Select this option to add a line item below the current line item. - Delete
Select this option to delete the current line item.Tip
To rearrange line items in the list, you can type over the numbers in the # column. This lets you specify the list order of each item on the BOQ.
- Add Above
- Click Save.