Create a Commitment Variation from a Main Contract Variation
Important
This tutorial is intended to be used by Procore users who have NOT enabled the Change Events tool on a project.Objective
To create a Commitment Variation (CV) from a Main Contract Variation (MCV) or a Main Contract Potential Variation (PV).
Background
If the project's Change Events tool is not enabled on your project, you can use the steps below to create a CV from a MCV or a Main Contract PV.
- One (1) Tier Variations:
- When the one (1) tier setting is configured on the Main Contracts tool, the change management process starts with creating MCV.
- When the one (1) tier setting is configured on the Commitments tool, you can start by creating a CV.
- Two (2) or Three (3) Tier Variations:
- When the two (2) or three (3) tier setting is configured on the Main Contracts tool, you will start by creating a Main Contract PV.
- When the two (2) or three (3) tier setting is configured on the Commitments tool, create a Commitment Potential Variation (CPV).
Things to Consider
- Required User Permissions:
- 'Admin' level permissions on the project's Main Contracts tool.
- 'Admin' level permissions on the project's Main Contracts tool.
- Additional Information:
- Use the steps below only when the Change Events tool is NOT active on the project. When the Change Events tool is active, follow the steps in Create a Commitment Variation from a Change Event.
- After creating a potential variation, you can issue and approve a commitment variation from the potential variation.
- You can also compare the commitment variation to the corresponding potential variation line item and view any variance between them.
Important
The steps below describe how to create a commitment variation from a potential variation. However, you can also use the same steps when creating a commitment variation from a main contract variation.Prerequisites
- Create a Main Contract PV and add at least one (1) BOQ line item. See Create a Potential Variation for a Main Contract.
Steps
- Navigate to the project's Variations tool.
- Locate the potential variation that you want to work with.
- Click Edit.
- Click the Bill of Quantities tab.
- Under 'Add Line Item,' do the following:
- Cost Code. Select a cost code from the drop-down list.
- Description. Enter a brief description of the change.
- Type. Select the contract type.
- Amount. Enter the amount.
- Click Add.
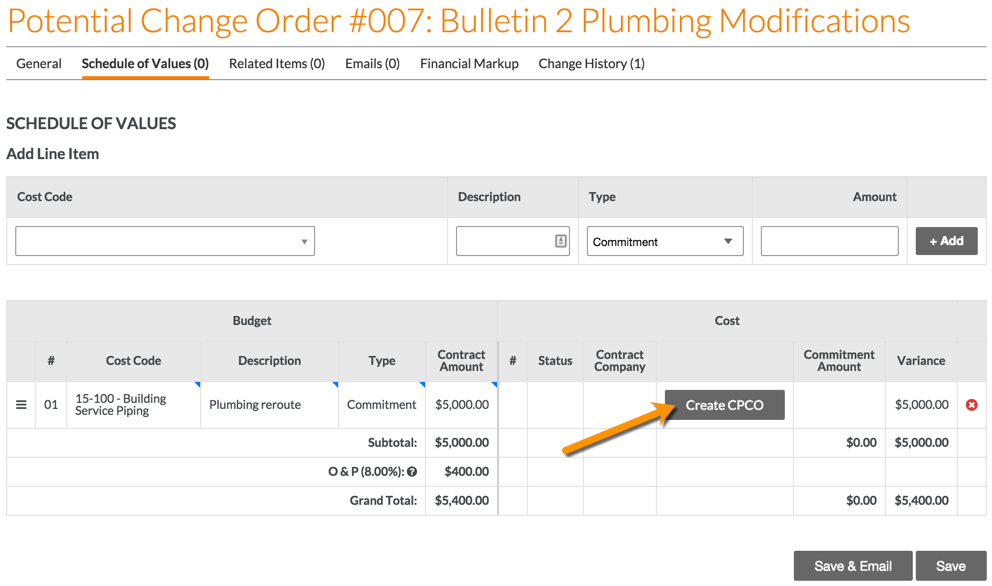
- Click Create CPV.
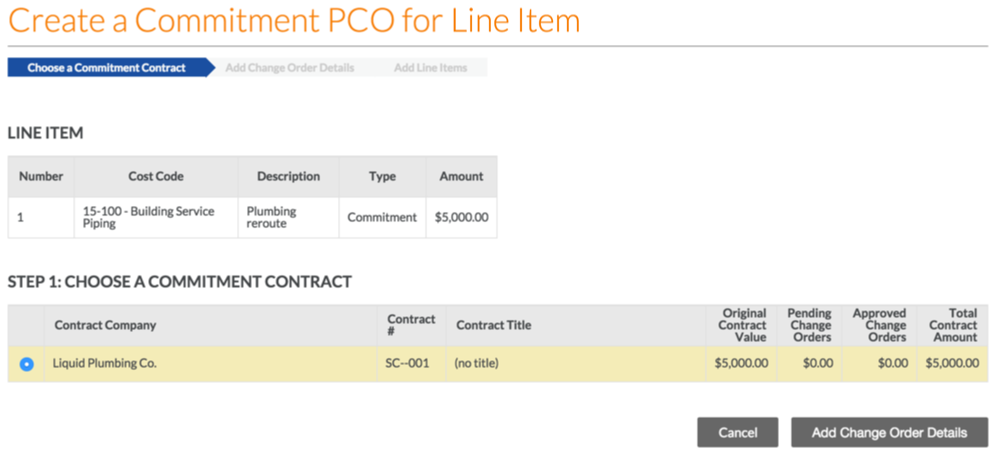
This opens the Create a Commitment PV for a Main Line Item page. - Under 'Step 1: Choose a Commitment Contract', choose the appropriate contract to associate that contract with the new Commitment PV.
Note: If you need to create a new commitment, follow the steps in Create a Commitment.
- Click Add Variation Details.
- Fill in the following information:
- Number: This field automatically populates based on the number of CVs already created. By default, the number will automatically increment by one. However, you can manually enter a different number if desired. (Note: If you manually enter a number, the next CV that's created will automatically increment by one, based upon this specific value.)
- Revision: This field displays the CV's revision number. When a CV is first created, its revision number is zero. A CV could have multiple revisions because of feedback from a reviewer/approver.
- Title: The title field will populate with the name of the PV that the CV is tied to.
- Status: Select the current state of the CV:
- Approved: The CV still needs to be approved. Costs are reflected as "Committed Costs" in the budget.
- Draft: The CV still needs to be modified before it can be submitted for review. Costs are not reflected in the budget.
- Pending - In Review: The CV is currently being reviewed by an approver. Costs are reflected as "Pending Changes" in the budget.
- Pending - Revised: The CV has been modified since its initial submission. Costs are reflected as "Pending Changes" in the budget.
- Rejected: The CV has been rejected. costs are not reflected in the budget.
- Note: These statuses reflect the budget in the ways listed above for the Procore Standard Budget View. To create or modify views, see Set up a New Budget View.
- Private: If checked, the CV will be visible only to 'Admin' users on the Commitments tool and 'Standard,' or 'Read only' that have specifically been given access to that Commitment.
- Change Reason: Select the reason for the potential variation, either Client Request, Design Development, Allowance, Existing Condition, Backcharge or any options customised by the Company Administrator. See Set Default Change Management Configuration.
- Programme Impact: Input the number of approved days to extend the contract, if any.
- Description: Enter a more detailed description of the CV.
- Click Create & Add Line Items.
- Fill out the following line item information:
- Description: Enter a description for the line item.
- Amount: Enter in an amount for the line item.
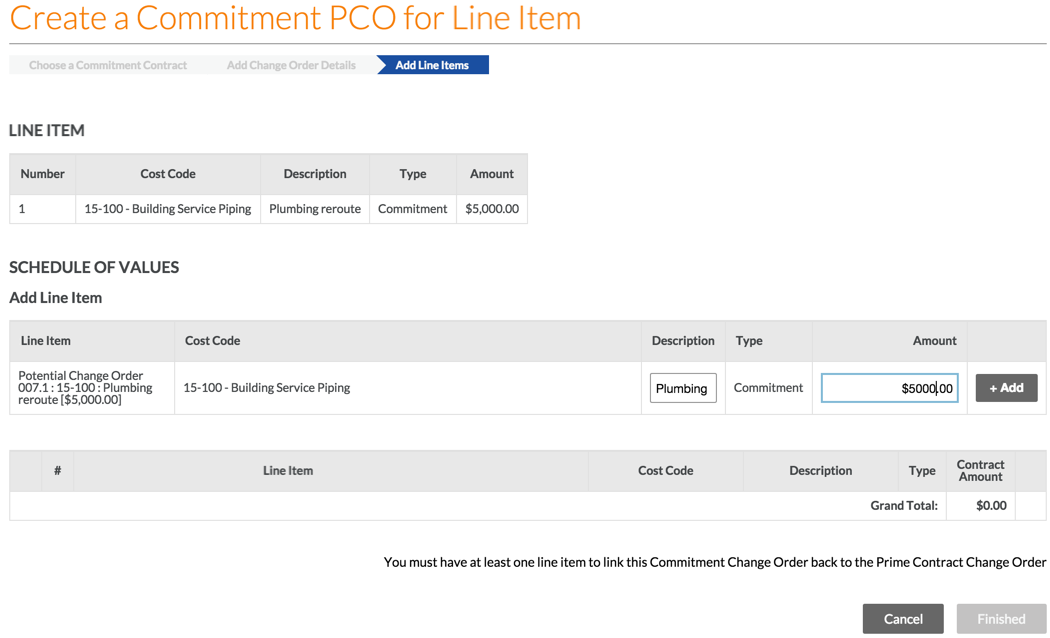
- Click +Add. If the combination of the sub job, cost code and cost type are non-budgeted, a pop-up will appear asking to confirm you want to add this line item to the budget. If OK is selected, this line item will be added directly to the Budget with a "?" next to the line item. See Add a Partial Budget Line Item.
- If you are done creating the CV, click Finished. If you want to add more line items to your CV, repeat step #11 and click Finished when you are done.