Field Productivity and Unit Quantity Based Budget: Setup Guide
Table of Contents
- Welcome
- Configure Work Breakdown Structure (WBS)
- Configure Company Time Settings
- Configure Project Settings
- Set up your Unit Quantity Based Budget
- Enter Time and Production Quantities
- View the Labour Budget to Actual Report
- View the Field Production Report
Overview
This workflow allows customers, without Procore Project Financials, to upload budgeted labour hours and production quantities without using the Budget tool.
After your hours are budgeted and production quantities are established, your site teams can use Timesheets to record time against these budgeted tasks and submit and add quantities for the units installed daily in Timesheets.
In reporting, your imported budget can be used in the Labour Budget to Actual Report, where users can compare timecard hours entered in Procore with the labour hours in your imported budget. The primary value of this report is to see the percentage of hours used for each cost code and includes calculated values like remaining hours and job to date hours.
For production quantities, your imported budget can be used in the Field Production Report, where users can compare production quantities entered in the Timesheets tool with the production quantities in your imported budget. The primary value of this report is to track the progress of products installed on site by seeing the percentage completed for each cost code. It also includes calculated values like budgeted, actual and remaining quantities. This gives the teams real-time insight into the percentage of work completed for tasks on site.
Note
These steps are for customers without Project Financials. If you have Project Financials, see Field Productivity and Project Financials: Setup Guide.Permissions
To take the steps in this guide, users need the following permissions:
Company Level
- 'Admin' level permissions in the company's Admin tool.
Project Level
- 'Admin' level permissions in the project's Admin tool.
- 'Admin' level permissions in the project's Directory tool.
- 'Standard' level permissions or higher in the project's Timesheets tool.
Some of these tasks can be performed with lower level or granular permissions. See the User Permissions Matrix for the full list of actions taken in all other tools.
Configure Company Level WBS
Add Custom Segments
- Navigate to the Company level Admin tool.
- Under 'Company Settings', click the Work Breakdown Structure link.
- In the 'Segments' table, click the Add Segment button.

- In the 'New Segment' window, do the following:
Note
An asterisk (*) in the list below indicates a required field.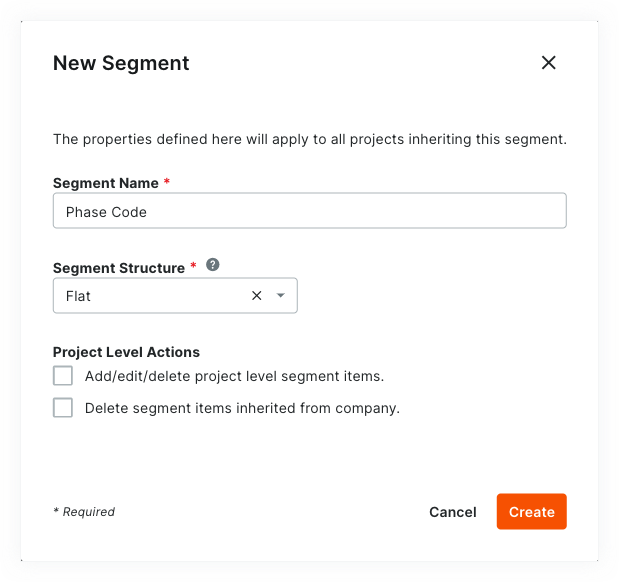
- Segment Name*. Enter a name for your new segment. This is a required field. Duplicate segment names are NOT permitted. A 'Segment Name is in use' message appears to notify if you attempt to enter a name that already exists.
Tip
Not sure what custom segments to create? To learn how other Procore clients use Work Breakdown Structure, see What custom segments should we create for our company's Work Breakdown Structure? - Segment Structure*. Select a value from the drop-down list. This is a required field. Your choices include:
- Flat. Select this option to add your segment to the list with no hierarchy.
- Tiered. Select this option to nest your segment into a tree (hierarchical) structure.
Tip
What's the difference between a flat and tiered segment? To learn the difference, see What is the difference between a flat and tiered segment in Procore's WBS?
- Segment Name*. Enter a name for your new segment. This is a required field. Duplicate segment names are NOT permitted. A 'Segment Name is in use' message appears to notify if you attempt to enter a name that already exists.
- Under the Project Level Actions section, choose one (1) or all of these options:
Note
When the 'Project Level Actions' settings are turned ON, your project administrators (users with 'Admin' level permissions on the Project level Admin tool) are permitted to perform specific tasks on segments and segment items at the project level. These settings are turned OFF by default.- Add/Edit/Delete Project Level Segment Items. Place a mark in this tickbox to provide project administrators with the ability to add, edit and delete unused segment items on a project. This setting is turned OFF by default.
Note
When this setting is turned ON, project administrators can perform these tasks:
- Delete Segment Items Inherited from Company. Place a mark in this tickbox to provide project administrators with the ability to delete segment items inherited at the Project level from the Company level Admin tool. This is useful to project administrators who don't want new segment items created at the company level to be used on a project. See Delete Unused Segment Items from a Project.
- Add/Edit/Delete Project Level Segment Items. Place a mark in this tickbox to provide project administrators with the ability to add, edit and delete unused segment items on a project. This setting is turned OFF by default.
- Click Create.
Procore adds the new segment to the bottom of the 'Segments' list. - Repeat the steps above for all of the new segments to add.
Tips
- Need to edit your new segment's settings? The best time to edit a new segment is before you start using it on a project. Once a custom segment is used to create a project budget code, you can edit it at any time. For details, see Edit Custom Segment Settings.
- Want to delete a custom segment? Its important to note that a custom segment cannot be deleted after it has been added to the budget code structure on one (1) or more projects in your company's Procore account. To learn more, see Delete Custom Segments.
- Want to add segment items? If your new segment is created, you can add new items now. For instructions, see Add Custom Segment Items.
- Ready to define your company's default budget code structure? You can arrange your segments in any order you want. This arrangement defines your company's budget code structure. For instructions, see Arrange Segments to Form the Company's Budget Code Structure.
Create Your Project's WBS
Objective
To adjust your company's Work Breakdown Structure (WBS) for a Procore project.
Background
After creating a new project in your company's Procore account, you can use the built-in WBS features to define the cost structure for Procore's Project Financials tools. When defining a project's WBS cost structure, you have two choices. If you are unsure which choice to make, contact your company's Procore Administrator for guidance:
- Apply your Company's Default WBS
This is the WBS defined by your company's Procore Administrator and you can use it exactly as it was created. - Copy the WBS from Another Project
This is the WBS defined on one of your existing Procore project templates. Keep in mind that you can create a unique WBS for each project in your company's account. In order to copy the WBS from another source project to your new target project, you must first save the source project as a project template. See Configure a Project Template.
Things to Consider
- Required User Permissions:
- 'Admin' level permissions on the Project level Admin tool.
- Additional Information:
- The Project level 'Work Breakdown Structure' page is similar to the Company level page. The primary differences are:
- You cannot add custom segments at the Project level. They must always be added at the Company level. See Add Custom Segments.
- You cannot edit the budget code structure at the Project level. The budget code structure is always defined at the Company level. See Arrange the Company Budget Code Structure.
- You cannot add sub jobs at the Company level. Sub jobs are always added at the Project level. See Enable Sub Jobs on Projects for WBS and Add Sub Jobs to a Project.
- The Project level 'Work Breakdown Structure' page is similar to the Company level page. The primary differences are:
- Limitations:
- For customers using the Company level ERP Integrations tool
The default segments in WBS are compatible with Procore's ERP Integrations tool. However, some integrations do NOT yet support custom segments. To learn more, see Things to Know about your ERP Integration. - For customers who have independently developed or purchased a third-party solution to integrate with Procore
To take advantage of the custom segment capabilities associated with WBS, any existing API integrations that you have independently developed or purchased to interact with Procore must be updated to support Procore's new WBS API.
- For customers using the Company level ERP Integrations tool
Prerequisites
Tip
Do you want to copy the WBS from an existing project to your new project? If so, a Procore user who meets the required user permissions will need to configure the source project as a project template. A source project is the project that contains the WBS you want to copy to your new one. For instructions see, Configure a Project Template. One that step is complete, you'll be able to select the 'Copy the WBS from Another Project' option detailed in the Steps below.Steps
- Navigate to the Project level Admin tool.
- Under 'Project Settings', click the Work Breakdown Structure link.
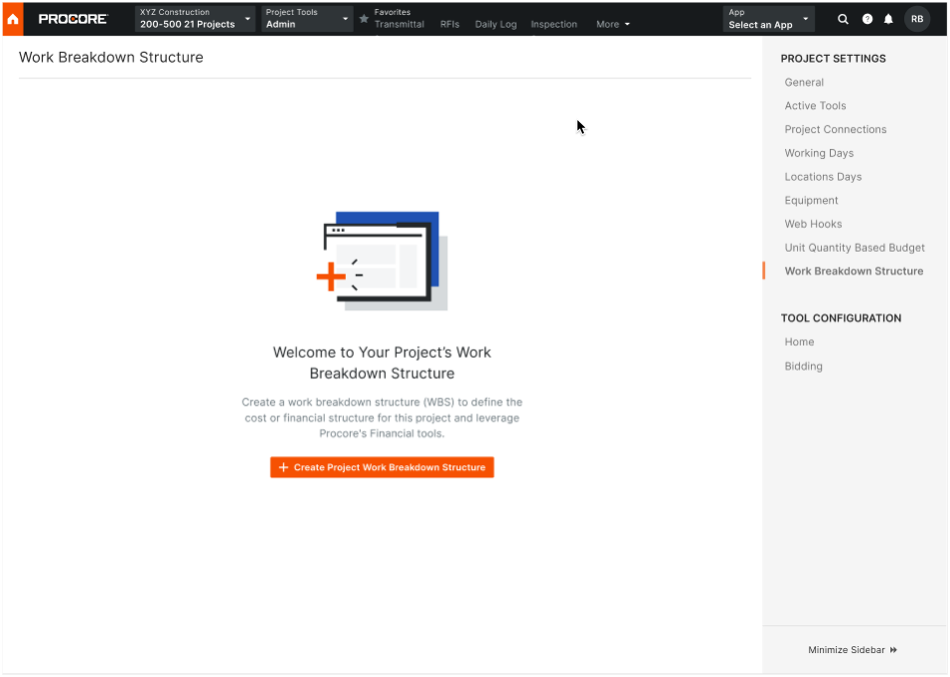
- Review the information about WBS, Budget Codes, Budget Code Segments in the dialogue box sequence. Click Next.
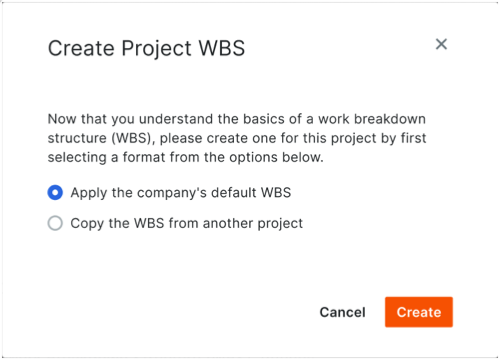
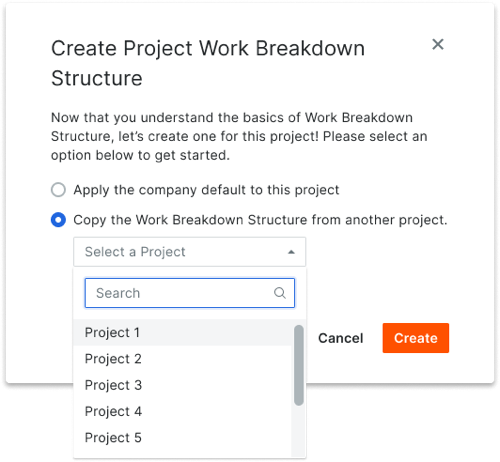
- In the 'Create Project WBS dialogue box, choose one of these optons:
- Apply the Company's Default WBS
Choose this option button if you want the project to use your company's default WBS. Your company's Procore Administrator is responsible for creating this structure.
- Copy the WBS from Another Project
Choose this option button if you want to use an existing project's WBS. Then, start typing a project name and when the match appears, choose it in Select a Project list.
- Apply the Company's Default WBS
- Click Create.
Tip
Did you know you can customise the budget code descriptions for your project? Customization is useful when your team wants to create two or more descriptions for a single budget code. Customization can also improve the readability of your codes on financial line items for your end users. To learn more, see Why and how do I create a custom budget code description for Procore's Project Financials tools?Next Steps
Enable Task Codes
Assign Default Cost Type
Add Tools to Project
- Navigate to the project's Admin tool.
- Under 'Project Settings', click Active Tools.
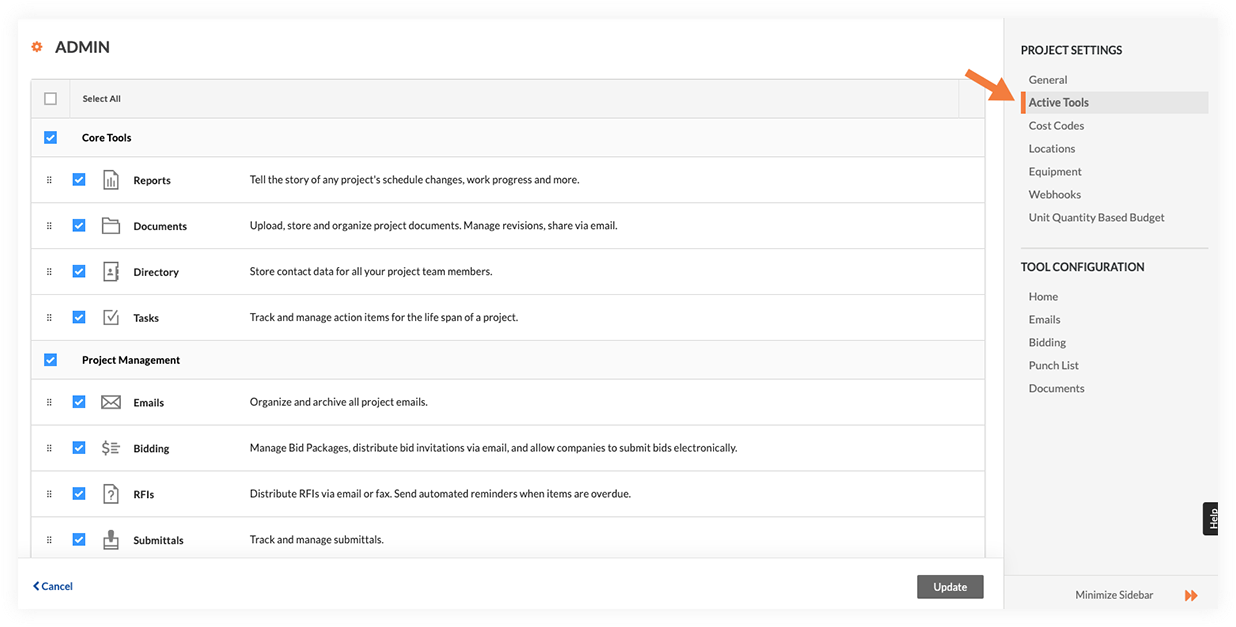
- Mark the tickboxes for to add the following tools to your project:
- Site Diary with the Timecard Log (optional)
- Timesheets
- Click Update.
Considerations
- Required User Permissions:
- 'Admin' level permissions on the project's Admin tool.
AND
'Admin' level permissions on the project's Directory tool.
- 'Admin' level permissions on the project's Admin tool.
- Supported Import File Type:
- XLSX
- XLSX
- Additional Information:
- You do NOT need to have the Budget tool enabled to import labour hours and production quantities. If you have access to the Budget tool through Project Financials, Import a Budget.
- The 'Unit Quantity Based Budget' section in the project's Admin tool is only available to those who have the Timesheets tool enabled.
Important
- It is recommended that you only import your Budgeted Hours once.
- However, if you choose to import a newer version of the Budgeted Hours, any new items will be added to the report and changes to the original Budgeted Hours will be overwritten with the most recent version.
Import your Budget
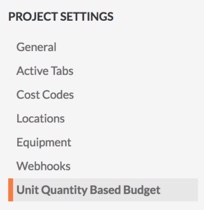
- Navigate to the project's Admin tool.
- Under 'Project Settings' in the sidebar, click Unit Quantity Based Budget.
- Under 'Import Budget Excel document', click Download Template.
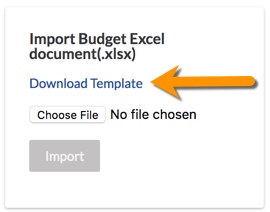
The system downloads a copy of the budget.xlsx file to the download location for your web browser. - In the XLSX file, enter your budget information into the relevant tabs.
Note
There are three tabs:
- Budget Line Items is used to budget labour or equipment hours. This will populate the pickers in the Timesheets & My Time tools so your teams know what is budgeted for the project. Add the labour and equipment hours to the Unit Qty column.
- Budgeted Production Quantities is used to budget units to install so that your team can record units installed when doing time entry in Timesheets.
- Importer Data Fields contains the data for the drop downs in the template, based on your project and company configurations.
Do NOT make the following changes to the XLSX file:
- Rename any column headings in the template.
- Add, remove or change the order of the columns in the template.
- Delete any values on the Importer Data Fields tab.
- Save your changes to the XLSX file.
Important! Always save the file in the .xlsx file format. - Navigate back to your project Admin tool's Unit Quantity Based Budget section.
- Under 'Import Budget Excel document', click Choose File.
- Select your XLSX file. Then click Open.
- Click Import.
- Check the import and verify that all budgeted hours and production quantities entered were properly imported by viewing them on the Unit Quantity Based Budget page.

Enter Time in Timesheets
- Navigate to the project's Timesheets tool.
- Select the date for which you want to create a timesheet. You can use the arrows to navigate day-by-day or select using the drop-down calendar control.
- Click Create and select New Daily Timesheet from the drop-down list.
Tip
You can also use these options to create a new daily timesheet:
- To create a new timesheet from a previous daily timesheet, see Copy a Previous Timesheet.
- To create a new daily timesheet and update its timecard entries bulk, see Bulk Enter Timecard Entry.
- Mark the tickbox(es) for the employees you want to create a timesheet for.
Notes
- To appear in this list, the person must be added to a Directory and a tick must appear in the 'Is Employee of <Your Company>' box on their profile. For more information on how to check for this setting in a user's profile, see Edit a User Account in the Project Directory.
- Employees who are only entered in the Company Directory can be selected if the 'Can Company Employees be Tracked on all Projects?' setting is enabled. See Configure Advanced Settings: Company Level Timesheets.
- With the setting "Employees Can Be Tracked On All Projects" enabled, you must have at least 'Read Only' permissions on the Company Directory tool to see all employees and workers.
- To select a crew, a crew must first be created in the Crews tool. See Create a Crew.
- Click Add.
- Select the Date.
- Optional: Click the Add Employees button to to add additional employees
- Enter the time entry information for each employee.
Note: To apply the same time entry information to multiple employees Bulk Enter Timecard Entries.- Classification: Select a classification from the drop-down list. To learn which Procore tools interact with classifications, see Which Procore tools support 'Classifications'
- Sub Job: Select from the drop-down list. The selections are added by a tool administrator. See Add 'Sub Job' Segment Items to a Procore Project..
- Cost Code: Enter or select from the drop-down menu the cost code(s) associated with the timecard entry.
Tip
The selections that are available in the 'Cost Codes' drop-down list depend on how the 'Limiting Cost Codes by Cost Types' setting is configured in your Company level Timesheets tool. See Configure Advanced Settings: Company Level Timesheets. In addition, one (1) of the following items must also be true on your project:
- The cost code/cost type combination must be included on a budget line item in the Procore project. See Add a Budget Line Item.
OR - The cost code/cost type combination must have been imported to the budget using the 'Unit Quantity Based Budget' page of the Company Admin tool. See Import a Unit Quantity Based Budget.
- Location: Select a location from the drop-down list. This should correspond to the location where the user performed the work. If you have the appropriate permissions to add a location, see How do I add a multi-tiered location to an item?
- Time Entry. Enter the hours worked.
Note: The format for time entry is configured in Advanced Settings: Project Level Timesheets. - Time Type: Select the type of pay being entered from the drop-down menu. Select from the following options:
- Regular Time
- Double Time
- Exempt
- Holiday
- Overtime
- PTO
- Salary
- Holiday
Note: Time types can be created in the Company level Timecard tool (see Add a Custom Time Type) or the Company level Timesheets tool (see 'Manage Time Types' in Configure Advanced Settings: Company Level Timesheets).
- Billable: Choose Yes or No from the drop-down list to indicate if the hours are billable to the project.
- Add Description: Click to enter additional comments to the timecard entry.
- Add Line Item: Click this option to create extra line items on a timecard entry.
Note: If using the Start and Stop 'Time Entry' method, the new line's Start Time will account for time already entered and the new line's Stop Time will reflect the default Stop Time in your settings. Any time entered after the default Stop Time will be added in one hour increments. - Click Split to reallocate a single timecard entry into multiple timecard entries. See Reallocate Time to New Timecards on the Company Timesheets Tool.
- The cost code/cost type combination must be included on a budget line item in the Procore project. See Add a Budget Line Item.
- Review the summary for the timesheet's hours and the daily and weekly hours across all projects.
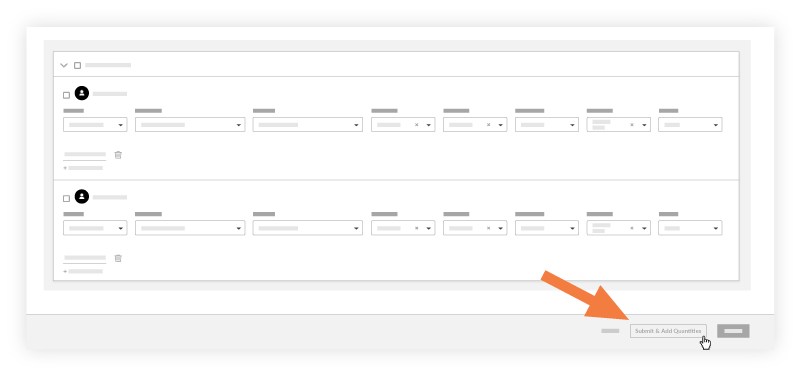
- Click Submit or Submit and Add Quantities to add the quantities to your timesheet.
Note: You can only add quantities if quantities have been uploaded to your project. See Add Quantities to a Timesheet.
Enter Production Quantities in Timesheets
Now that you have filled out your timesheet, perform the following actions before you submit:
-
Click Submit and Add Quantities.
Note: This button will be disabled if quantities have not been uploaded to the project. See Import a Unit Quantity Based Budget.
-
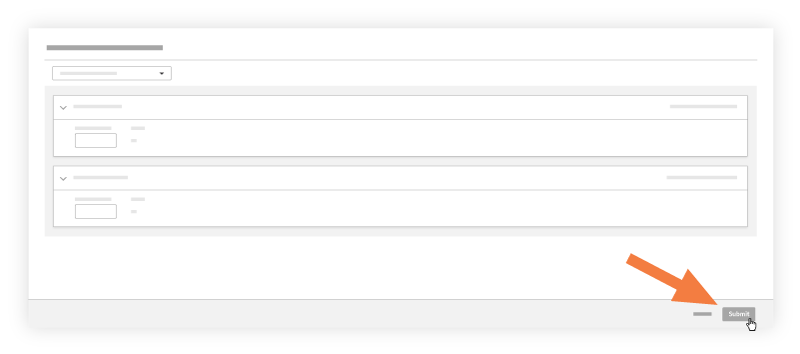
In the 'Add Quantities' page, enter an amount in the Units Installed field.
Notes
- The Add Quantities page only shows cost codes that have an imported budgeted quantity associated with it.
- If the Sub Jobs feature is enabled on your project (see Enable Sub Jobs on Projects for WBS), the 'Sub Job' associated with your 'Units Installed' entry will appear in the Add Quantities window. If Sub Jobs is disabled, the 'Sub Job' field will display the word 'None.'
- The appropriate Percent Complete (%) and Unit of Measure (UoM) and Percent Complete (%) automatically with the data that was imported. See Import a Unit Quantity Based Budget.
-
Click Submit.
View the Labour Budget to Actual Report
View a Report from the Project's Reports Tool
- Navigate to the project's Reports tool.
- Scroll to the Project Reports section.
- Click Labour Budget To Actual.
The columns in the Labour Budget to Actual Report are as follows:- % Hours Used: The percent of hours used that you have imported against the hours you have entered. Calculated as follows:
- Actual Hours ÷ Budgeted Hours = Percent Used
- Budgeted Hours: The number of Budgeted Hours you imported to Procore's project Admin tool.
- Actual Hours: The number of hours you have entered to date in Procore's labour tracking tools (Timesheets, Company Timecard and Site Diary).
- Remaining Hours: The number of hours you have remaining from the hours you imported against the hours you have entered. Calculated as follows:
- Budgeted Hours - Actual Hours = Remaining Hours
- % Hours Used: The percent of hours used that you have imported against the hours you have entered. Calculated as follows:
View a Report from the Project's Timesheets Tool
- Navigate to the project's Timesheets tool.
- Click Reports.
- Click Labour Budget to Actual.
The columns in the Labour Budget to Actual Report are as follows:- % Hours Used: The percent of hours used that you have imported against the hours you have entered. Calculated as follows:
- Actual Hours ÷ Budgeted Hours = Percent Used
- Budgeted Hours: The number of Budgeted Hours you imported to Procore's project Admin tool.
- Actual Hours: The number of hours you have entered to date in Procore's labour tracking tools (Timesheets, Company Timecard and Site Diary).
- Remaining Hours: The number of hours you have remaining from the hours you imported against the hours you have entered. Calculated as follows:
- Budgeted Hours - Actual Hours = Remaining Hours
- % Hours Used: The percent of hours used that you have imported against the hours you have entered. Calculated as follows:
View the Field Production Report
From the project's Reports tool
- Navigate to the project's Reports tool.
- Scroll to Project Reports.
- Click Field Production Report.
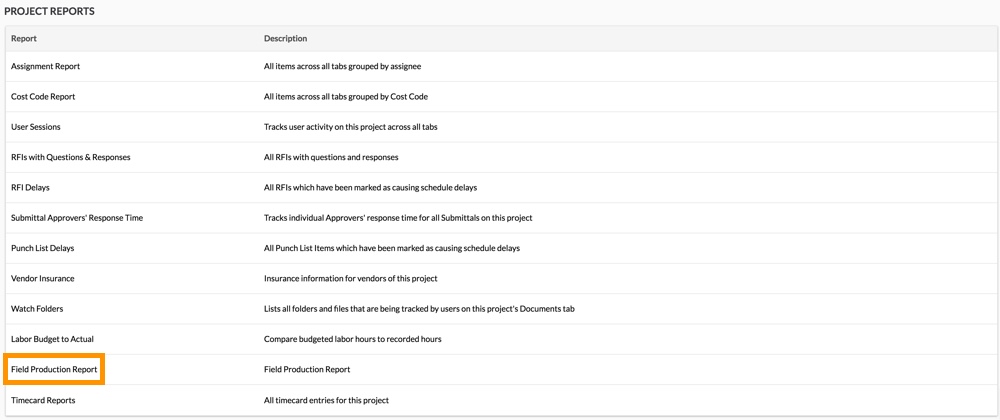
This reveals the Field Production Report. To learn about the data columns, see Which data columns are in a Field Production Report?
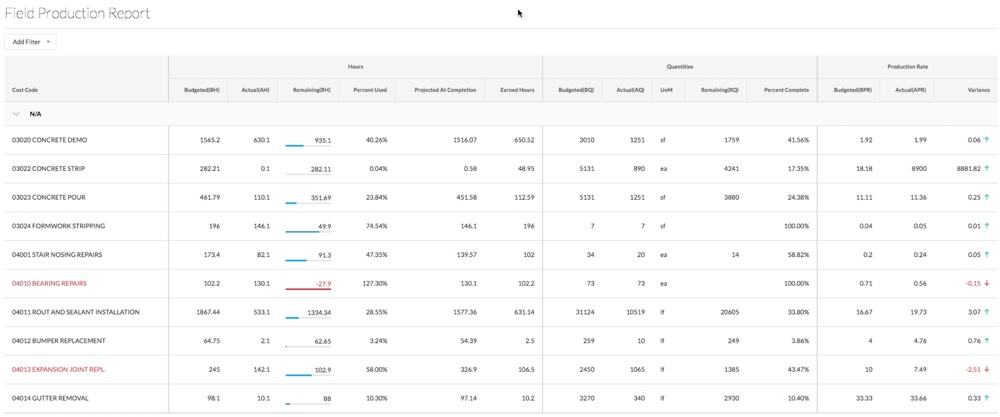
- Click Add Filter to narrow the display results.

- Select one of the following:
- Cost Code
- Sub Job Name
- Unit Of Measure
From the project's Timesheets tool
- Navigate to the project's Timesheets tool.
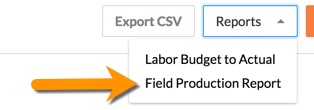
- Click Reports.
- Click Field Production Report.
This reveals the Field Production Report. To learn about the data columns, see Which data columns are in a Field Production Report?

- Click Add Filter to narrow the display results.

- Select one of the following:
- Cost Code
- Sub Job Name
- Unit Of Measure