Prepare Segment Items for Import to the Procore Imports App
Objective
To properly format your segment items so you can import them into Procore with the Procore Imports app.
Background
Use the Procore Imports app to bulk import segment items into the Company or Project level Admin tool. A bulk import prevents you from having to add each segment item one-by-one in Procore. There are two (2) default segments and one (1) optional segment available in Procore. You can also create custom segments to add to your budget code structure. Because a custom segment can be flat or tiered, ensure that you download the corresponding import template. After you update the template, you can bulk import segment items into the desired Admin tool using the Procore Imports app.
This table details the available segments and import templates to use when importing segment items into Procore.
| Segment | Default Segment? | Which import template do I download? | To learn more... |
|---|---|---|---|
| Cost Code | Yes | import-cost-codes.xlsx | See What are Procore's default cost codes? |
| Sub Job | Optional 1 | import-segments-flat.xlsx | See What are sub jobs? |
| Custom | No 2 | import-segments-tiered.xlsx or import-segments-flat.xlsx |
See What are segments and segment items? |
1 The optional 'Sub Job' segment must be enabled in the Company Admin tool. See Enable Sub Jobs for WBS. In addition, sub jobs can only be imported into the Project level Admin tool with the Procore Imports app. See Import Segment Items into your Project Level Admin Tool (Procore Imports).
2 You must first create the custom segment in Procore's Company Admin tool. See Add Custom Segments. After creating the segment, you can download the appropriate template using the steps below.
Things to Consider
- Required User Permissions:
- 'Admin' level permission on the Company level Admin tool.
Note: Granular Permissions are not supported in the Procore Imports application.
- 'Admin' level permission on the Company level Admin tool.
- Additional Information:
- The import process can be used to add segment items but cannot be used to edit or delete any existing segment items.
- This feature is only available to computers running Windows 7 or newer. See Install Procore Imports.
-
For companies using the
 ERP Integrations tool: Show/Hide
- ERP integrated cost codes are not supported in the Procore Imports App. See Configure Cost Code Preferences for ERP Integrations.
Steps
- Download the Segment Items Import Template
- Format a Tiered Segment Items Import Template
- Format a Flat Segment Items Import Template
Download the Segment Items Import Template
- Download the Tiered Segment Import Template: import-segments-tiered.xlsx
or - Download the Flat Segment Import Template: import-segments-flat.xlsx
Notes
- If you chose a tiered segment:
Procore automatically downloads the tiered segment item import template.This template must be used to import tiered segment items. An example of a tiered segment is Procore's default 'Cost Codes' segment. - If you chose a flat segment:
Procore automatically downloads the flat segment import template. This template must be used to import flat segment items. An example of a flat segment is Procore's default 'Cost Types' segment. - To learn the differences between segments, see What are segments and segment items?
Format a Tiered Segment Items Import Template
See below considerations when filling out the template.
- XLSX File Requirements:
- For general formatting considerations, see How do I prepare my data for import into Procore?
- The XLSX file must be formatted as a table.
- The first line of the table must include the header, which defines the fields in the table.
- Do not edit or add to the existing columns in the import template.
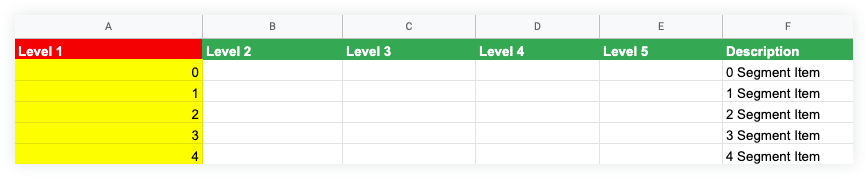
To add a Level 1 Segment Item
- Enter a value in the Level 1 column only.
- Leave all other Level columns blank (e.g., levels 2-5).
- Enter a value in the Description cell.
- Repeat steps 1-3 until all your segment items are entered.
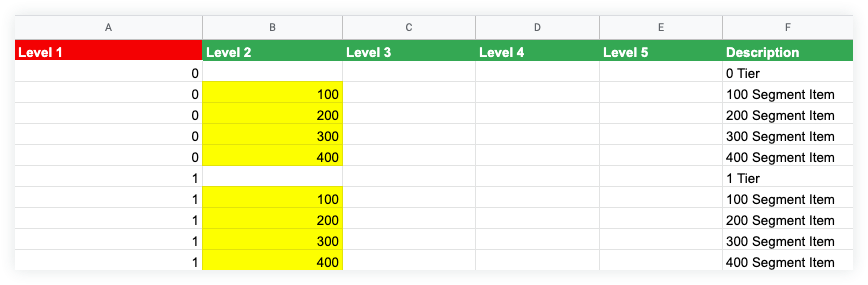
To add a Level 2 Segment Item
- Enter a value and a Description in the Level 1 and Description columns. Leave the remaining cells blank (e.g., levels 2-5).
- In the next row, complete the following:
- Enter the same Level 1 value.
- Enter a value in the Level 2 column.
- Leave the remaining Level columns blank (e.g., levels 3-5).
- Enter a value in the Description cell.
- Repeat step 2 until you have all your segment items entered for that segment level 2 set.
- If you want to create an additional Level 2 set, repeat steps 1-3.
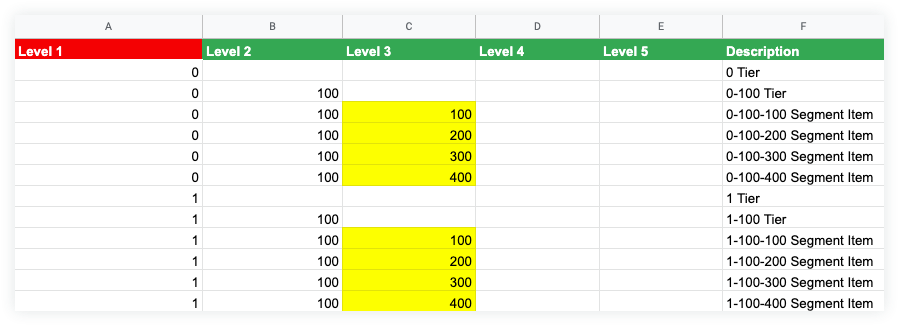
To add a Level 3 Segment Item
-
Enter a value and a Description in the Level 1 and Description columns. Leave the remaining cells blank (e.g., levels 2-5).
- In the next row, complete the following:
- Enter the same Level 1 value.
- Enter a value in the Level 2 cell.
- Leave the remaining Level columns blank (e.g., levels 3-5).
- Enter a value in the Description cell.
- In the row after, complete the following:
- Enter the same Level 1 and Level 2 values.
- Enter a value in the Level 3 cell.
- Leave the remaining Level columns blank (e.g., levels 4-5).
- Enter a value in the Description cell.
- Repeat step 3 until you have all your segment items entered for that Level 3 set.
- If you want to create an additional Level 3 set, repeat steps 1-3.
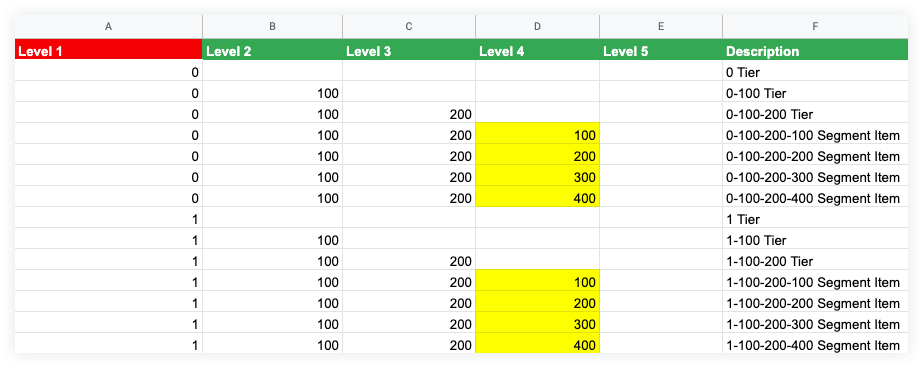
To add a Level 4 Segment Item
-
Enter a value and a Description in the Level 1 and Description columns. Leave the remaining cells blank (e.g., levels 2-5).
- In the next row, complete the following:
- Enter the same Level 1 value.
- Enter a value in the Level 2 cell.
- Leave the remaining Level columns blank (e.g., levels 3-5).
- Enter a value in the Description cell.
- In the row after, complete the following:
- Enter the same Level 1 and Level 2 values.
- Enter a value in the Level 3 cell.
- Leave the remaining Level columns blank (e.g., levels 4-5).
- Enter a value in the Description cell.
- In the next row, complete the following:
- Enter the same Level 1, Level 2, and Level 3 values.
- Enter a value in the Level 4 cell.
- Leave the remaining Level column blank (e.g., 5)
- Enter a value in the Description cell.
- Repeat step 4 until you have all your segment items entered for that Level 4 set.
- If you want to create an additional Level 4 set, repeat steps 1-4.
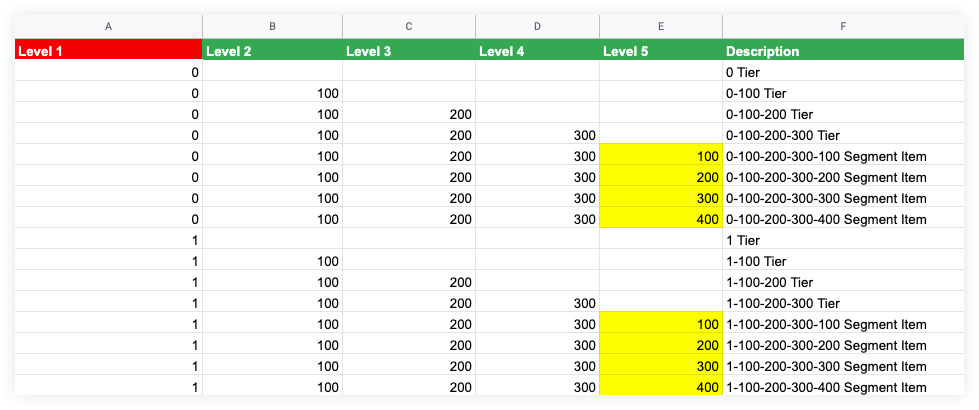
To add a Level 5 Segment Item
-
Enter a value and a Description in the Level 1 and Description columns. Leave the remaining cells blank (e.g., levels 2-5).
- In the next row, complete the following:
- Enter the same Level 1 value.
- Enter a value in the Level 2 cell.
- Leave the remaining Level columns blank (e.g., levels 3-5).
- Enter a value in the Description cell.
- In the row after, complete the following:
- Enter the same Level 1 and Level 2 values.
- Enter a value in the Level 3 cell.
- Leave the remaining segment Level columns blank (e.g., levels 4-5).
- Enter a value in the Description cell.
- In the next row, complete the following:
- Enter the same Level 1, Level 2, and Level 3 values.
- Enter a value in the Level 4 cell.
- Leave the remaining Level column blank (e.g., 5)
- Enter a value in the Description cell.
- In the row after, complete the following:
- Enter the same Level 1, Level 2, Level 3, and Level 4 values.
- Enter a value in the Level 5 cell.
- Enter a value in the Description cell.
- Repeat step 5 until you have all your segment items entered for that Level 5 set.
- If you want to create an additional Level 5 set, repeat steps 1-5.
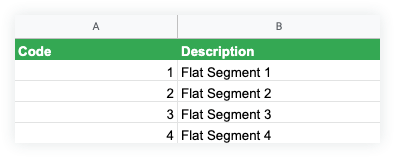
Format a Flat Segment Items Import Template
- Enter a value in row 1 of the Code column.
- Enter a description in row 1 of the Description column.
- Repeat steps 1 and 2 until you have all your flat segment items entered.