Manage and Set Tags for a File in the Project Level Documents Tool
Objective
To manage and set tags for a file in the project's Documents tool.
Things to Consider
- Required User Permissions:
- 'Admin' on the project's Documents tool.
Note: 'Read Only' or 'Standard' users can view and filter by tags, but not create or set them.
- 'Admin' on the project's Documents tool.
- Additional Information:
- This feature is only available for files in the Project level Documents tool.
- Tags cannot be imported or copied over to another project.
- Once a tag has been created for a file, it cannot be deleted from the list of tags.
Video
Steps
- Navigate to the project's Documents tool.
- Locate the file you want to add a tag to.
Note: Hover over or click once on an individual file (not a folder). - If the Information panel is not already open, click the Info
 icon.
icon. - Click File Tags to expand the section.
- Click Manage File Tags.
- The following actions are available:
Important
To save your changes after adding, applying or deleting tags, you must click Set Tags before navigating to another file or page.- To add a new tag:
- Click the Create or Select Tags drop-down menu.
- Enter a name for the tag in the text field.
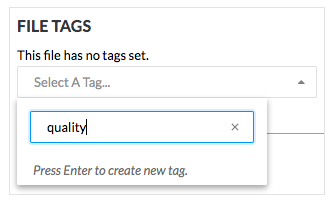
- Click Add tag: to add the tag.
- To apply an existing tag:
- Click the Create or Select Tags drop-down menu.
- Choose an existing tag to apply by browsing through the list or entering a search term.
- Click the tag you want to apply.
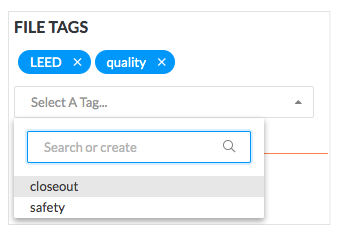
- To remove a tag from a file:
- Click the 'x' on the tag you want to remove.

- Click the 'x' on the tag you want to remove.
- To add a new tag:
- Click Set Tags to save your changes.