Set Up a New Forecasting View
Objective
To set up a new forecasting view for use in the Forecasting tab of the project's Budget tool.
Background
The project's Budget tool provides your team with the ability to create and edit forecasting views. The 'Procore Standard Forecast' view contains the same columns as the 'Procore Standard Budget' view. However, it also includes columns that let you select a Start Date, End Date and Curve from a drop-down list. This allows you to transform your data into a forecasting view that automatically spreads the line item's amounts across Month columns for any timeline that you specify.
Things to Consider
- Required User Permissions:
- 'Admin' level permissions on the Company level Admin tool.
- 'Admin' level permissions on the Company level Admin tool.
- Additional Information:
- To learn about the default forecasting view for the Budget tool, see About the Procore Standard Forecast View.
Steps
- Navigate to the company's Admin tool.
- Under Tool Settings, click Budget.
- Click the Forecasting tab.
- Click Set Up a New Forecast View.

This opens the Set Up New Forecast View window. - Continue with the following steps in the recommended order:
Set Up a New Forecasting View
Note
Procore provides new customers with a Procore Standard Forecast view that contain different columns. See About the Procore Standard Forecast View. This example shows you how to use the Procore Standard Forecast view as your starting point for customizing a budget view to fit your specific business need.- In the Set Up New Forecast View window, under Standard Views, highlight the following view:
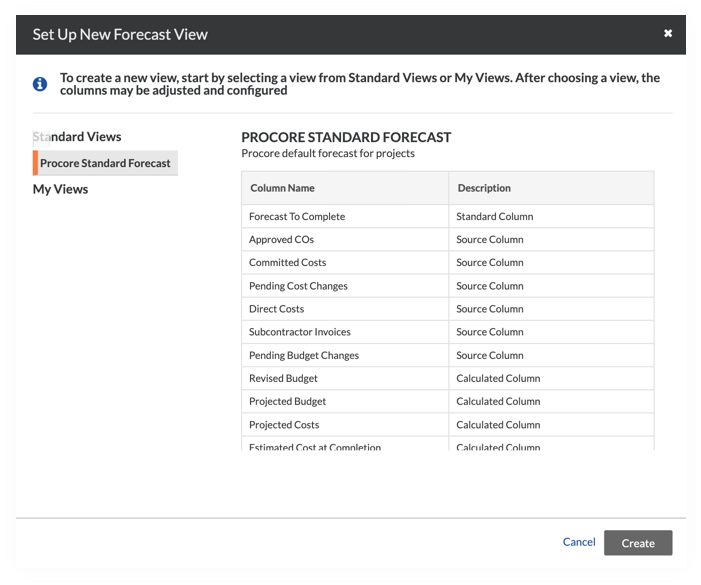
- Procore Standard Forecast
This is the default view for the Budget tool on all Procore projects. Your new view will inherit all of these columns and you can add or remove columns later: Division, Projected Over/Under, Category, Original Budget Amount Budget Modifications, Project, Sub Job, Approved COs, Direct Costs, Cost Code, Revised Budget, Projected Budget, Committed Costs, Pending Cost Changes, Projected Costs, Forecast to Complete, Estimated Cost at Completion, and Pending Budget Changes.Note
After you create a new budget view, it will appear with the name and description you give to it in the My Views area of the Set Up New Budget View window. The views are also available to use as a starting point when you create new budget views.
- Procore Standard Forecast
- Click Create.
- Continue with the next step.
Name a Forecasting View
Configure the Columns for a Forecasting View
You have several options when configuring the columns that appear in your forecasting view. These options are described below.
- Show and Hide Columns
- Create a Calculated Column
- Create a Source Column
- Edit a Column
- Delete a Column
- Complete the Column Configuration
Show and Hide Columns
There are three types of columns available for use in forecast views: Standard, Calculated, and Source.
- In the new forecasting view's window, click Configure Columns.
This opens the Configure Columns window. - Under Standard, Calculated, and Source, you have these options:
- To show a column in the forecast view, place a tick in a box to include the column in the forecast view's display.
- To hide a column from the forecast view, remove the tick from a box to exclude the column from displaying in the forecast view.
- Choose from these options:
- To save your changes and quit configuring columns, click close (x) in the top-right corner of the Configure Columns window.
OR - To continue configuring columns, continue with the sections below.
- To save your changes and quit configuring columns, click close (x) in the top-right corner of the Configure Columns window.
Create a Calculated Column
Create a Source Column
A source column pulls its values directly from a data column in one of Procore's project tools. You also have a variety of source options. Most source options also provide you with the ability to choose advanced settings for filtering and refine the data in your forecast view.
- Choose one of these options:
- Click + Create Calculated Column.
OR - Click Create in the top-right and choose Source.
- Click + Create Calculated Column.
- Under New Column Name, do the following:
- Column Name. Enter a name for your new source column.
- Column Source. Choose the source column that you want to use. Your choices include:
- Main. This option sources its data from the Main Contracts tool. You have these options:
- Main Contract. Place a tick in this box to include the Main Contract amount in the forecast view.
- Variations. Place a tick in this box to include Main Contract Variations (MCVs) in the forecast view. You can also place a tick in the following boxes to apply these filters:
- Status. To filter the data in the column to include only MCVs that match the selected status(es), place a tick in one or more boxes. To learn about each status, see Create a Main Contract Variation.
- Scope. To filter the column data by scope of the variation, place a tick in the TBD, In Scope, Out of Scope or No Scope Associated box. To learn more about scopes, see Create a Main Contract Variation.
- Main Unit Qty. This option sources its data from the Unit Qty in variations. You have these options:
- Main Contract Variations (MCVs) Unit Quantity. Place a tick in this box to include the Unit Qty from MCVs in the forecast view. You can also place a tick in the following fields to apply these filters:
- Status. To filter the data in the column to include only MCVs that match the selected status(es), place a tick in one or more boxes. To learn about each status, see Create a Main Contract Variation.
- Scope. To filter the column data by scope of the MCV, place a tick in one or more boxes. You have these options:
- TBD. This value is set on MCVs with the Change Events tool.
- In Scope. This value is set of MCVs with the Change Events tool.
- Out of Scope. This value is set on MCVs with the Change Events tool.
- No Scope Associated. Place a tick in this box when one of the following conditions is true:
- The Change Events tool is disabled on your project(s).
OR - The Change Events tool is enabled on your project(s), but your project's variation line items are NOT associated with a change event line item.
- The Change Events tool is disabled on your project(s).
- Potential Variations Unit Quantity. Place a tick in this box to include the Unit Qty from Main PVs in the forecast view. You can also place a tick in the following fields to apply these filters:
Note
In Procore, Potential Variations are only used when the Main Contracts tool is configured to use a 2- or 3-tier variation structure. To learn more, see What are the different variation tiers in Project Financials? and Configure the Number of Main Contract Variation Tiers.- Status. To filter the data in the column to include only MCVs that match the selected status(es), place a tick in one or more boxes. To learn about each status, see Create a Main Contract Variation.
- Scope. To filter the column data by scope of the variation, place a tick in the TBD, In Scope, Out of Scope or No Scope Associated box. To learn more about scopes, see Create a Main Contract Variation.
- Main Contract Variations (MCVs) Unit Quantity. Place a tick in this box to include the Unit Qty from MCVs in the forecast view. You can also place a tick in the following fields to apply these filters:
- Commitment
- By default, Variations show the value from the lowest tier.
- The 'No Scope Associated' filter should be used for either:
- Projects using the Change Events tool with a variation line item that is not associated with a change event line item.
OR - Projects where the Change Events tool is disabled.
- Projects using the Change Events tool with a variation line item that is not associated with a change event line item.
- The 'Scope' options for Variations are sourced from the Change Events tool.
- Place a tick in the Subcontracts, Purchase Order Contracts, or Variations boxes to pull the column's data from the project's Commitments tool. Then select the desired filters.
Notes:
- Direct Costs
Place a tick in the Direct Cost box to pull the column's data from the project's Direct Cost tool. - Owner Payment Application
Place a tick in the Owner Payment Application box to pull the column's data from the most recent Owner Payment Application from a main contract. You can select a 'Net' source which are the values from the 'Total Completed and Stored to Date - Currently Withheld Retention' and the values for the 'Gross' source which are the values for the 'Total Completed and Stored to Date.' - ERP Job Costs
Place a mark in the ERP Job to Date Costs or ERP Commitment Invoiced checkboxes.
Notes:- If your company has enabled the ERP Integrations tool, you may apply these options to your forecasting view.
- If the view is assigned to a project that is not ERP integrated, these columns will be blank when viewing the forecasting view in the Budget tool.
- Subcontractor Payment Applications
Place a mark in the Subcontractor Payment Applications tickboxes. You can select a 'Net' source which are the values from the 'Total Completed and Stored to Date - Currently Withheld Retention' and the values for the 'Gross' source which are the values for the 'Total Completed and Stored to Date'.
- Main. This option sources its data from the Main Contracts tool. You have these options:
- Click Create to save the new source column.
Edit a Column
- In the Configure Columns window, click the Standard, Calculated, or Source column that you want to edit.
- When the column details appear, click Edit.
- Depending on the column type, you can update the details as needed:
- Standard Columns. You can change the column name.
- Calculated Columns. You can change the column name, format and calculations.
- Source Columns. You can change the column name, column source and other advanced options as available for the selection.
- Choose from these options:
- To update the existing column, click Update.
OR - To keep the existing column and save your changes as a new column, click Save as New.
- To update the existing column, click Update.
Delete a Column
You can delete any columns that you want to permanently remove from a forecasting view. However, if you simply don't want a column to show, it is recommended that you hide the column as described in Show and Hide Columns.
- In the Configure Columns window, highlight the Standard, Calculated, or Source column that you want to remove.
Note
A column cannot be deleted if it is used in another column's calculation. A warning message appears to inform you of any conditions that exist that would prevent you from deleting a column. - Click Delete.
- In the confirmation message that appears, click Delete Column.
Complete the Column Configuration
The Column Configuration window automatically saves the show/hide setting and any arrangement that you set for the Standard, Calculated, and Source columns. When you are ready to close out of the column configuration window, simply click the close (x) symbol in top-right corner.
Choose the Column to Spread
In the Forecasting Column to Spread drop-down list, select which calculated column's value to spread out over the months you have assigned to each budget line item. By default it is the 'Projected Cost to Complete' column. However you can choose any calculated column from the list.
Preview a Forecast View
After closing the Configure Columns window, the system returns you to the new forecast view's window. Under Column Configuration, you can get an idea of how your view will look in Procore by selecting a project from the Preview with Project drop-down list.
Assign a Forecasting View to Projects
After previewing your budget view and determining that it suits your business needs, you can assign it one or more Procore projects.
-
- Place a tick in the box next to one or more of the following options:
- All Projects Selected. This assigns the new budget view all of your Procore projects.
- All Projects Using ERP Direct Costs. This assigns the new budget view to projects using the ERP Direct Costs budget view.
- All Projects Using Procore Direct Costs. This assigns the new budget view to projects using the project level Direct Costs tool.
- [Individual Projects]. This assigns the new budget view to only the project(s) that you select.
- Click Done.