

Budget & Forecast Snapshots: User Guide
Table of Contents
- Overview
- Considerations
- Key Features
- Manage Access
- For a Project
- For the Company
- More
Overview
Considerations
Key Features
Manage Access
Create a Snapshot
Create a Snapshot from the Budget Tab
In Beta
Custom statuses for project status snapshots are available for the Budget and Project Status Snapshots tools. To enable this feature for all projects and users in your company account, join the Create Custom Statuses For Project Status Snapshots beta program through Procore Explore.123Users can create a Project Status Snapshot or an Ad Hoc Snapshot from the Budget tab. Only Project Status Snapshots are saved.
DID YOU KNOW?
You can now edit a snapshot's name, type and description directly from the budget banner without needing to delete and recreate it. To learn more, see Edit a Budget Snapshot.-
Navigate to the project's Budget tool.
-
Click the Budget tab.
-
Click Create Snapshot.
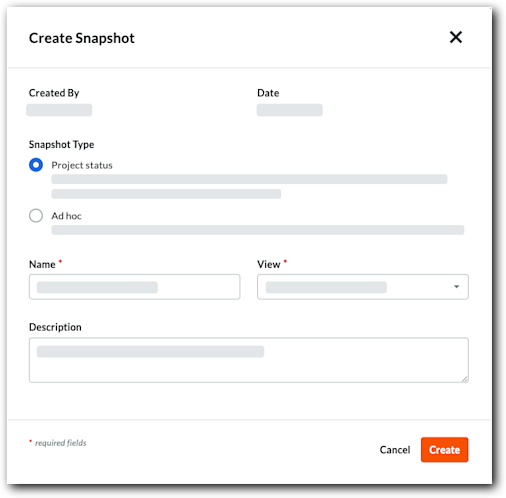
This opens the Create Snapshot window.
-
Under Snapshot Type, choose an option:
-
Project status. Choose this option for official reporting, such as a monthly report that needs review.
-
Ad hoc. Choose this option for a simple snapshot.
-
-
Enter the snapshot information:
-
Name. Enter a name for the snapshot.
-
Status. Select a standard status (Under Review or Approved).
 Select a custom status. For details on how to create a custom status, see Create a Custom Status for Project Status Snapshots.
 -
View. Select a budget view for the snapshot.
-
Description. Enter a description of the snapshot.
-
-
Click Create.
When complete, the Snapshot Created banner appears at the top of the page.

Create a Snapshot from the Forecasting Tab
Users can create an ad hoc snapshot from the Forecasting tab.
-
Navigate to the project's Budget tool.
-
Click the Forecasting tab.
-
Click Create Snapshot.
This opens the Create Snapshot window.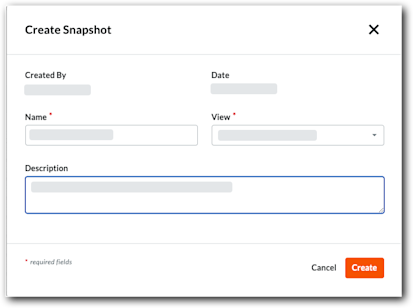
-
Enter the snapshot information:
-
Name. Enter a name for the snapshot.
-
View. Select a budget view for the snapshot.
-
Description. Enter a description of the snapshot.
-
-
Click Create.
When complete, the Snapshot Created banner appears at the top of the page.
View a Snapshot
There are different ways to view snapshots in the Budget tool.
View a Project Status Snapshot from the Project Status Snapshots Tab
Any user can view a project status snapshot tab from this tab. Ad-hoc snapshots are not saved and do not appear in this tab.
- Navigate to the Project level Budget tool.
- Click the Project Status Snapshots tab.
- In the Name column, click the snapshot to open.
- The system opens the snapshot in your web browser. A Viewing from Snapshot banner appears.

- Click the View Current Data button to return to your project's current budget data
View a Project Status Snapshot from the Project Status Snapshots Tab
Any user can view a project status snapshot tab from this tab. Ad-hoc snapshots are not saved and do not appear in this tab.
- Navigate to the Project level Budget tool.
- Click the Project Status Snapshots tab.
- In the Name column, click the snapshot to open.
- The system opens the snapshot in your web browser. A Viewing from Snapshot banner appears.
- Click the View Current Data button to return to your project's current budget data.
View a Project Status Snapshots as the Snapshot Creator
Snapshot creators can also view a snapshot immediately after it's created.
- Complete the steps in Create a Budget Snapshot.
When saved, the Snapshot Created banner displays.

- Click View Snapshot Data.
- The label on the banner changes to Viewing from Snapshot.
- Review the snapshot as needed.
- Click the View Current Data button to return to your project's current budget data.
View an Ad-Hoc Snapshot as the Snapshots Creator
Ad Hoc snapshots can only be viewed after creation. Only project status snapshots are saved.
- Complete the steps for an ad-hoc snapshot in Create a Budget Snapshot.
When saved, the Snapshot Created banner displays.

- Click View Snapshot Data.
- (Optional) See Export a Budget Snapshot if you want to save it.
Important
Ad-hoc snapshots aren't saved after the current session. You must export it if you want to see it later. - Click the View Current Data button to return to your project's current budget data.
Configure Columns
- Navigate to the Project level Budget tool.
- Click the Project Status Snapshots tab.
- Click Configure Columns.
This opens the Table Settings panel.

- Under Configure Columns, you have these choices for each available column:
- Show columns. Move the toggle switch to the right. The system's default setting is to show all available columns.
- Hide columns. Move the toggle switch to the left.
- When finished, click the Close (x) icon on the panel.
Apply a Budget View
Navigate to the project's Budget tool. Then click the Budget, Budget Details or Project Snapshot Status tab and select an option from the View menu. To add views to this menu, see Assign a Budget View to a Project.

Note
-
Procore offers company accounts several standard budget views. See What are Procore's standard budget views?
-
Your company can create custom budget views or modify existing views. For details, see Set up a New Budget View.
View a Budget Snapshot
Navigate to the project's Budget tool. Then, click the Budget or Forecasting tab and select an option from the Snapshot menu. To add snapshots to this menu, see Create a Budget Snapshot.

Analyse Variance
Analyse Line Item Variance on the Budget Tab
In Beta
An enhanced budget table is available for analysing line item variance between budget snapshots. See Analyse Line Item Variance Between Budget Snapshots (Beta).This action analyses variance by comparing a snapshot with the active budget.
-
Navigate to the project's Budget tool.
-
Click the Budget tab and select a standard or custom budget view from the View menu.
-
Click Analyse Variance.
This opens the Select Comparison Columns to Analyse Variance window. -
From the Comparison Snapshot menu, select the snapshot to compare it with your budget data.
-
Under Columns to Display, choose one (1) option:
-
Comparison Column and Variance Column. Shows both values.
-
Comparison Column Only. Shows the value from the comparison snapshot.
-
Variance Column Only. Shows the variance between the comparison snapshot and active budget.
-
-
Under Comparison Columns, mark one or more tickboxes to select the columns to analyse for variance.

-
Click Save.
Procore analyses the current budget and snapshot for variance.Example
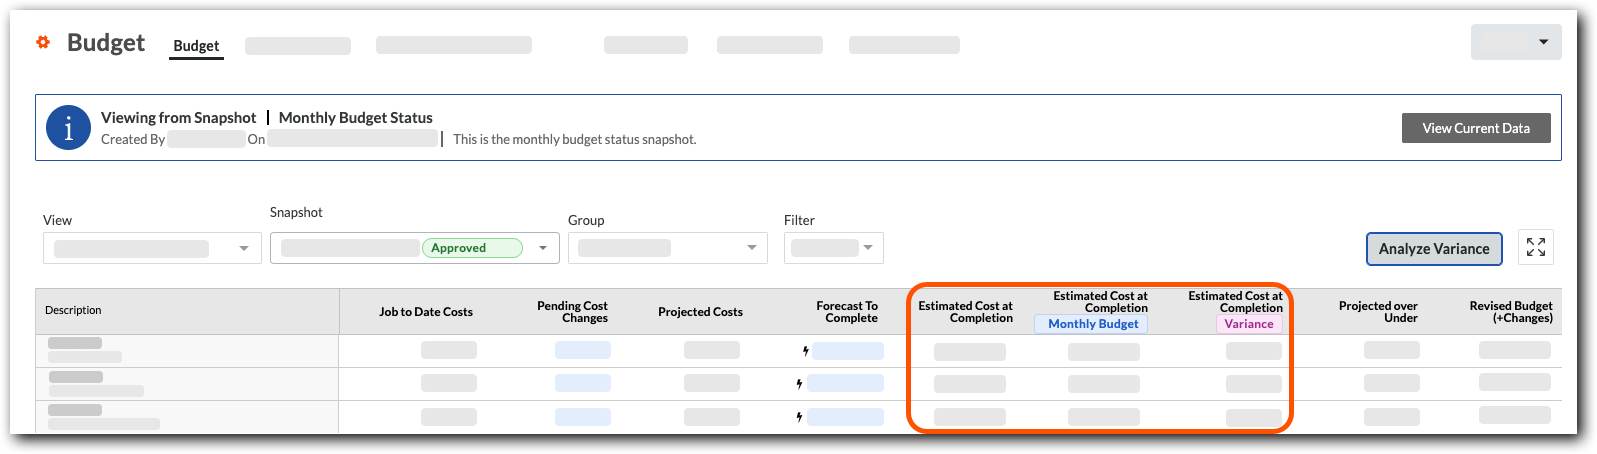
This example shows the Comparison Column and Variance Column option using Estimated Cost at Completion as the comparison column. The blue column label shows the snapshot data. The column labelled Variance shows the difference between the snapshot and your budget.
Analyse Aggregate Variance Between Snapshots on the Project Status Snapshots Tab
This action analyses the aggregate variance between two snapshots.
-
Navigate to the project's Budget tool.
-
Click the Project Status Snapshots tab and select a standard or custom budget view from the View menu.
-
Click the snapshot Name to open it.
-
On a column where it's available, click the Variance icon.
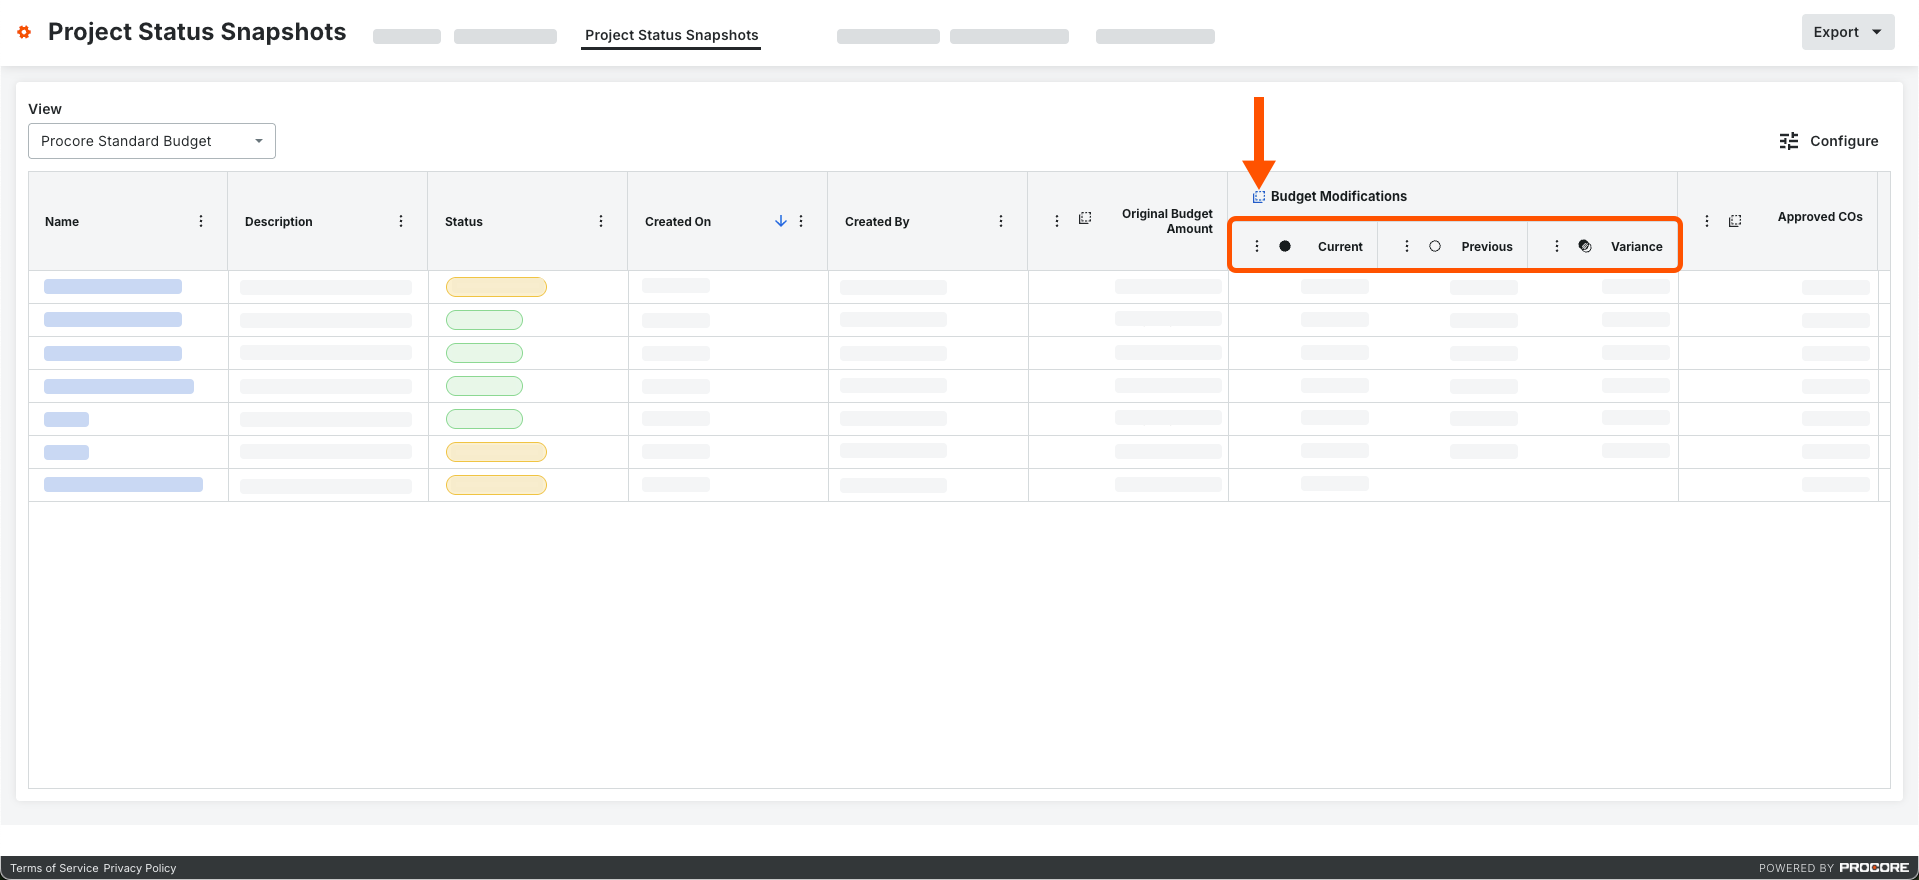
This expands the column to show the Current, Previous and the Variance between the two snapshots.Example
This example shows the Current, Previous and Variance columns that appear when you click the Variance icon on a column.
Export a Snapshot
- Navigate to the Budget tool.
- Click Budget or Forecasting tab.
- Create or view a snapshot.
Note
Ad Hoc and Project Status Snapshots are available for the Budget tab. Only Ad Hoc Snapshots are available for the Forecasting tab. - (Optional) Choose the budget view and apply any filtering or grouping options to the snapshot.
- Click Export.

Note
Because CSV is a flat file format, any applied grouping options are not included in exports to CSV. - Choose one of these options from the menu:
- CSV. This downloads a CSV file to the location configured in your web browser.
- PDF. This opens a PDF version of the file in a new browser window. To download it, use the options available in your web browser's PDF viewer.
Export a Snapshots List
- Navigate to the Project level Budget tool.
- Click the Project Status Snapshots tab.

- Modify the data table as needed. Your choices are:
- Select a standard budget view or one of your company's custom budget views from the View menu. See Set up a New Budget View.
- Click Configure Columns to show/hide columns from the display or to change the order of the column layout. See Configure Columns for the Project Status Snapshots Tab of the Budget Tool.
- Click Export and choose CSV from the menu.
This downloads a CSV file to the location configured in your web browser.
View Snapshots
- Navigate to the Company level Project Status Snapshots tool.
Tip
Want to filter the data you're viewing? See Apply Filters to the Project Status Snapshots Tool. - Locate a snapshot in the list.
- (Optional) If you want to view the snapshot, click the Open
 icon in the Project column.
Important
To see project status snapshots in specific Procore projects and their own ad hoc snapshots, grant users access to the Budget tools within those projects.

Configure Columns
- Navigate to the Company level Project Status Snapshots tool.
- Click Configure Columns.
This opens the Table Settings panel.

- Under Configure Columns, you have these choices for each available column:
- Show columns. Move the toggle switch to the right. The system's default setting is to show all available columns.
- Hide columns. Move the toggle switch to the left.
- When finished, click the Close (x) icon on the panel.
Apply Filters
- Navigate to the Company level Project Status Snapshots tool.
- Select a budget view from the View list.
- Click Filters.
This opens the Filters panel.

- Set the available filters to focus on the snapshots you want to view. Options are:
- Created By. Choose one or more snapshot creators.
- Created On. Set a time frame using the calendar.
- Project. Select specific projects to view their snapshots.
- Region. Pick a project region.
- Stage. Choose a project stage.
- Office. Select an office.
- Department. Pick a department.
- Program. Select a programme.
Change Snapshot Status
- Navigate to the Company level Project Status Snapshots tool.
- Locate the project status snapshot in the table.
- Click the snapshot's Status cell and choose the desired status.

This updates the snapshot status at both the company and project levels.
Analyse Variance
Analyse Line Item Variance on the Budget Tab
In Beta
An enhanced budget table is available for analysing line item variance between budget snapshots. See Analyse Line Item Variance Between Budget Snapshots (Beta).This action analyses variance by comparing a snapshot with the active budget.
-
Navigate to the project's Budget tool.
-
Click the Budget tab and select a standard or custom budget view from the View menu.
-
Click Analyse Variance.
This opens the Select Comparison Columns to Analyse Variance window. -
From the Comparison Snapshot menu, select the snapshot to compare it with your budget data.
-
Under Columns to Display, choose one (1) option:
-
Comparison Column and Variance Column. Shows both values.
-
Comparison Column Only. Shows the value from the comparison snapshot.
-
Variance Column Only. Shows the variance between the comparison snapshot and active budget.
-
-
Under Comparison Columns, mark one or more tickboxes to select the columns to analyse for variance.
-
Click Save.
Procore analyses the current budget and snapshot for variance.Example
This example shows the Comparison Column and Variance Column option using Estimated Cost at Completion as the comparison column. The blue column label shows the snapshot data. The column labelled Variance shows the difference between the snapshot and your budget.
Analyse Aggregate Variance Between Snapshots on the Project Status Snapshots Tab
This action analyses the aggregate variance between two snapshots.
-
Navigate to the project's Budget tool.
-
Click the Project Status Snapshots tab and select a standard or custom budget view from the View menu.
-
Click the snapshot Name to open it.
-
On a column where it's available, click the Variance icon.
This expands the column to show the Current, Previous and the Variance between the two snapshots.Example
This example shows the Current, Previous and Variance columns that appear when you click the Variance icon on a column.
Export a Snapshots List
- Navigate to the Company level Project Status Snapshots tool.

- Click the Export menu and choose CSV.
This downloads a CSV file to the configured location for your web browser.