Send a Payment Application to Accounts Payable in Portfolio Financials
Objective
To send a payment application to Accounts Payable (AP) from the Contract Room in Portfolio Financials.
Background
The 'Send to Accounts Payable' feature in Portfolio Financials allows you to send payment applications that have been submitted and approved in Procore directly to your accounts payable address. Accounts Payable (AP) addresses are set up on a per-building basis, meaning all payment applications submitted on projects within a certain building will be sent to the same AP address. If you are interested in setting up this feature on your Portfolio Financials account, please reach out to your Procore point of contact to help get you started.
Things to Consider
- Required User Permissions:
- 'Limited' access to the project or higher.
Note: Users with 'Limited' permissions must have access to the contract or access to the relevant Payment application Room.
- 'Limited' access to the project or higher.
- Additional Information:
- If you have the 'Consolidate Approval and Send to AP' feature enabled, you can approve and send your payment application at the same time. See Consolidate Approval and Send to AP in the Steps section to follow the relevant steps.
Prerequisites
- The 'Send to Accounts Payable' feature must be enabled for your organisation's account. Please reach out to your Procore point of contact if you would like this feature enabled.
- The payment application you want to send must be Approved. See Approve or Reject a Payment Application in Portfolio Financials.
Steps
- Navigate to the relevant Contract Room by clicking the name of the cost item in the project's Cost Tracker.
Note: Cost items with a Contract Room are marked with a ribbon icon.
icon. - Click the Payment Applications tab.
- Click the payment application you want to send.
- Under 'Send to Accounts Payable', click Send Now.
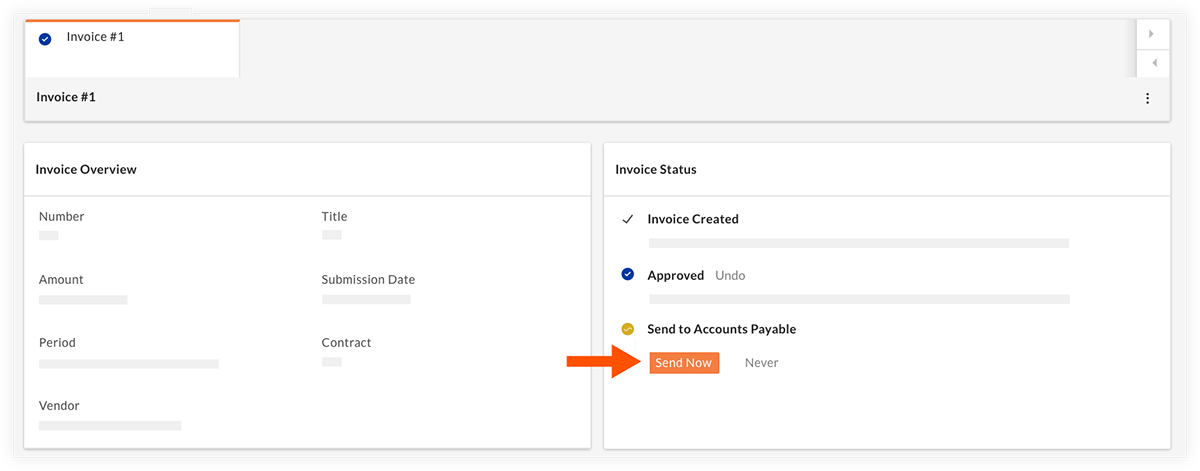
Note: If you decide you do not want to send ANY payment applications to Accounts Payable from this point on, click Never.
- Review and add documents to the package that will be sent to accounts payable. A PDF version of the payment application will automatically be included in the package along with any documents attached to the original payment application. You can drag and drop any additional documents needed into this modal.
- After the payment application is sent, the status updates to 'Sent to Accounts Payable'.
To consolidate approval and send to AP:
If your organization has the 'Consolidate Approval and Send to AP' feature enabled, you can approve the payment application and send it to AP at the same time. Follow the steps below:
- Navigate to the relevant Contract Room by clicking the name of the cost item in the Cost Tracker section of the Project Page.
Note: Cost items that currently have a Contract Room associated with them are marked with a ribbon icon. - Click the Payment Applications tab.
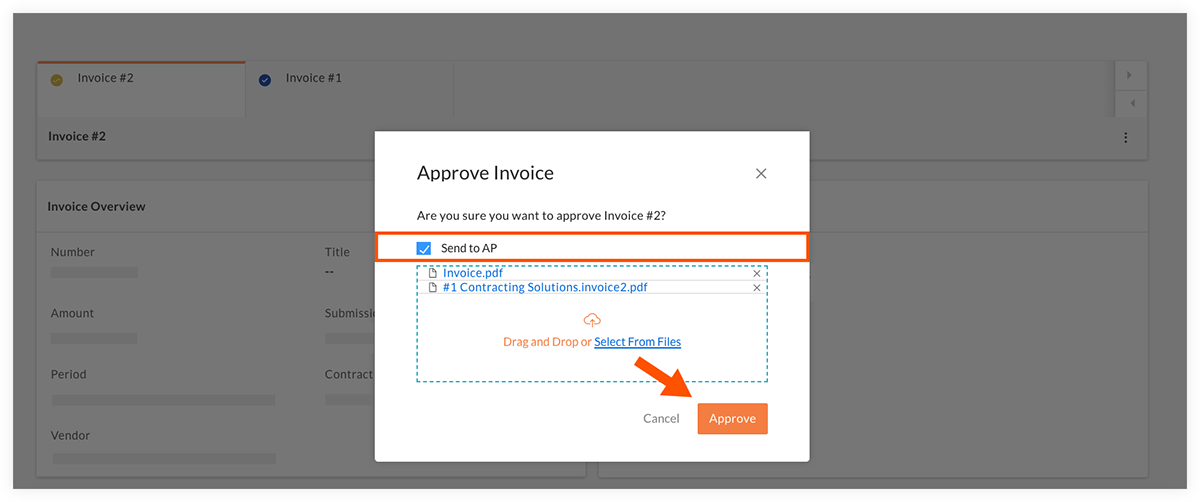
- Click the payment application you want to send.
- Click Approve.
- Review and add documents to the package that will be sent to accounts payable. A PDF version of the payment application will automatically be included in the package along with any documents attached to the original payment application. You can drag and drop any additional documents needed into this modal.
- Click Approve.
Note: Please reach out to your Procore point of contact if you would like this feature enabled.