Complete Information for Documents in the Document Management Tool
Background
After documents have been uploaded to the Document Management tool, they must have any missing attributes filled in before they can be submitted and viewed in the All Documents tab. Additional fields can be required depending on the project's and company's settings.
For information about each field, see What are the different fields in the Document Management tool?
Things to Consider
-
Required User Permissions:
-
'Standard' or 'Admin' level permissions to the Document Management tool with the 'Upload New Files' permission enabled on the permission group.
Note:* If you have 'Admin' level permissions to the Document Management tool, you can view all files that have been added to the 'Uploads' tab. Otherwise, you can only view the files that you have uploaded.* In order to submit documents, the 'Submit New Files' permission must be enabled on the permission group. See Submit Documents in the Document Management Tool.
-
Prerequisites
Steps
-
Navigate to the project's Document Management tool.
-
You can complete information for documents in the following ways:
-
From the Table
-
Bulk Edit Information
-
-
From a File
-
From the Document Viewer
-
Note
- As you complete fields, the 'Name' column will begin populating based on the data entered.
- For information about each field, see What are the different fields in the Document Management tool?
- The 'Name', 'Type', 'Status' and 'Version' fields are always required. Other fields can be hidden or required based on settings for the project and account.
- If you want to edit information for multiple documents at one time, see the Bulk Edit Information for Documents section below.
From the Table
-
Click the Uploads tab.

-
Fill out required attributes by clicking into fields to enter information or to search for desired values. Scroll to the right as necessary to access additional columns for data entry.
Tip! You can use keyboard shortcuts to quickly move through the table:Note
You can hover over the 'Missing Attributes' message in the 'Ready to Submit' column to view which fields still need to be filled in before a document can be submitted.-
Use the left, right, up and down ARROW keys to move around to different fields.
-
While a field is selected, use the TAB key to move to the right and SHIFT+TAB to move to the left.
-
Press ENTER or RETURN to select the field so that you can type or select information.
-
Use the ARROW keys to select options from drop-down menus and press ENTER or RETURN again to confirm.
-
-
If you have the 'Submit New Files' permission and you are ready to submit the documents, click Submit. See Submit Documents in the Document Management Tool.
Note: If a document has an approval workflow, that workflow starts and the document shows up in the 'In Review' collection.
Bulk Edit Information for Documents
-
Mark the tickboxes next to the files that you want to edit in bulk.
Tip!-
If you want to select all files at once, mark the tickbox at the top of the table.
-
If you want to select a range of rows at once, hold down the SHIFT key on your keyboard and mark the necessary tickboxes.
-
-
Click the edit
 icon.
icon. 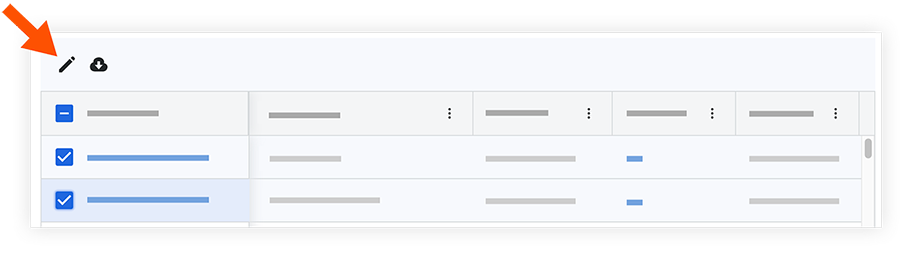 This opens the Edit Document Attributes side panel.
 -
Click into a field to enter information. See What are the different fields in the Document Management tool?
-
After you complete all necessary fields, click Apply.
-
If you have the 'Submit New Files' permission and you are ready to submit the documents, click Submit.
This moves the selected files from the 'Uploads' tab.
From a File
Complete missing information in a .csv or .xlsx file and then import that into the Document Management tool.
Note: This method will not import the 'Type' field.
-
Click the Uploads tab.
-
Click Import Metadata.
Note: The uploads tab must have at least one file. -
Click the link to download the metadata table template.
-
Open the downloaded template and fill in all required fields and any desired fields.
-
In the 'Import Metadata' window, upload the finished .csv or .xlsx file by clicking Attach File.
-
Click Import.
-
All fields in the uploads tab are automatically filled in from the imported file and any errors are highlighted for easy correction.
Note: Fields completed from the imported file have a spreadsheet icon in the cell. If the field's value is ever edited, the icon disappears.
 -
If you have the 'Submit New Files' permission and you are ready to submit the documents, click Submit. See Submit Documents in the Document Management Tool.
Note: If a document has an approval workflow, that workflow starts and the document shows up in the 'In Review' collection.
From the Document Viewer
Tip
If you have just recently uploaded documents and the 'Uploads' window is still open, you can hover over the green check-
Click the document that you want to open in the viewer.
The document loads and the Information side panel opens. You can also click the info icon to open the panel.
 -
Click into a field to enter information. See What are the different fields in the Document Management tool?
Your selection saves when you click out of the field. -
Continue to fill out information for fields as necessary.
-
If you have the 'Submit New Files' permission and you are ready to submit the documents, click Submit. Otherwise, click Next.
The viewer will automatically load the next document. You can use the arrows or drop-down menu at the top of the viewer to open a different document. -
If you want to close the viewer and return to all documents, click Close.