Add Locations to a Project
Objective
To add tiered locations to a project using the project's Admin tool.
Background
Locations give you the ability to link different Procore items (RFIs, Submittals and more) to specific locations on a job site. This helps project team members to identify the exact location on a job site where a defect was observed, where materials are to be installed or where a project variation occurred.
You can manually create your locations hierarchy, import locations or generate your locations hierarchy from drawings. In all cases, you can continue adding locations as your project changes.
Things to Consider
- Required User Permissions:
- 'Admin' on the project's Admin tool.
OR
'Read Only' or 'Standard' permissions on the project's Admin tool with the 'Manage Locations' granular permission enabled on your permission template.
- 'Admin' on the project's Admin tool.
Prerequisites
Create your locations hierarchy in one of the following ways:
Steps
Take the following steps based on how your locations were created and which tool you are using:
- Manually Created or Imported (Admin Tool)
- Generated from Drawings (Admin Tool)
- Generated from Drawings (Drawings Tool)
Add Locations to Manually Created or Imported Locations
- Navigate to the project's Admin tool.
- Under the 'Project Settings' menu, click Locations.
- If you generated locations from drawings and want to manually add new locations, click Edit Location Hierarchy and select Skip Drawings and Edit.
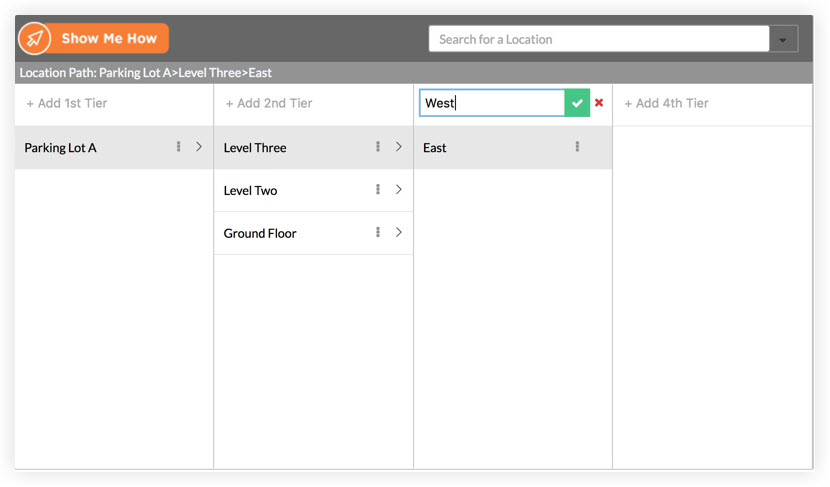
- Add a location as follows:
- To add the first tier, click +Add 1st Tier. Then type a name for the location (e.g., Parking Lot A) and click the tick or press ENTER (Note: If you make a mistake, you can alternatively click the RED 'x' to remove your entry).
- To add a second tier, click +Add 2nd Tier. Then type a name for the sub-location (e.g., Level Three).
- To add a third tier, click +Add 3rd Tier. Then type a name for the sub-location (e.g., West).
- If you want to continue adding sub-locations, click +Add 4th Tier, +Add 5th Tier and so on. You can create an unlimited number of tiers.
- Optional: Adjust Location Settings
- Only allow locations to be created in the location manager above. If this box is checked, users can only create locations in the Location Manager and are not allowed to create locations from other Procore tools within the project.
- Include Optional Code. If this box is checked, a prefix containing a code will be added to all locations for use with the naming standard for Procore's Document Management tool. This code will only be visible in the Document Management tool. If you are not using the Document Management tool, do not mark this tickbox.
Add Locations Generated from Drawings from the Admin Tool
- Navigate to the Project level Admin tool.
- Under the 'Project Settings' menu, click Locations.
- Click Edit Location Hierarchy.
- Select Add Drawings to generate locations for one (1) or more new drawings or revisions.
OR
Select Skip Drawings and Edit to edit existing locations. - Proceed with the steps for your selection:
- Add Drawings
- Mark the checkboxes next to the drawing(s) you want to submit for location extraction.
Note: Each drawing can only have one revision selected for use with locations. Selecting a different revision of a drawing that has already been used to extract locations will replace the existing drawing with the selected revision and update the related locations. - Click Submit for Extraction.
Note: This can take several minutes. You can navigate away from this page and check back later to proceed with the next step. - If prompted, click Review Drawings.
Note: This feature was built to extract locations for Architectural floor plans. If you want to create locations for different type of Drawing, keep the tickbox marked for the drawing and Procore will generate a placeholder parent location for you to manually manage locations and boundaries.- Clear the tickbox for drawings you wish to NOT extract locations.
- Click Continue Location Extraction.
- Once processing is complete, click Review Locations to review the suggested location hierarchy.
- When review is complete, click Update Locations to publish your updated location hierarchy.
Tip
Locations must have a unique name under a parent location. To resolve duplicates, scroll down the list to the location with the warningicon. Assign each location under a common parent a unique name. If needed, delete any duplicate location. See Edit Locations and Delete Locations.
- Mark the checkboxes next to the drawing(s) you want to submit for location extraction.
- Skip Drawings and Edit
- Select a location from the list to view the associated drawing, location boundaries and heat map.
- Add a location in one of the following ways:
- From the List
- Click the vertical ellipsis
 next to a location and select Add. Then click Sub Location.
Note: You cannot add boundaries around sub locations. - Enter the name of the location.
- Click the tick to confirm.
- Click the vertical ellipsis
- Drag and Drop
- Click and hold the add location
 icon.
icon. - Move the pin to the location on the drawing using a drag and drop operation.
- Enter the name of the location.
- Under 'Sub Location of', select the parent location from the drop-down menu.
- Click Save.
- Click and hold the add location
- From the List
- Add Drawings
Add Locations Generated from Drawings from the Drawings Tool
- Navigate to the project's Drawings tool.
- Click Locations and select Edit Locations.
- Select Add Drawings to generate locations for one (1) or more new drawings or revisions.
OR
Select Quick Edit to manually add locations. - Proceed with the steps for your selection:
- Add Drawings
- Mark the checkboxes next to the drawing(s) you want to submit for location extraction.
Note: Each drawing can only have one revision selected for use with locations. Selecting a different revision of a drawing that has already been used to extract locations will replace the existing drawing with the selected revision and update the related locations. - Click Submit for Extraction.
Note: This can take several minutes. You can navigate away from this page and check back later to proceed with the next step. - If prompted, click Review Drawings.
Note: This feature was built to extract locations for Architectural floor plans. If you want to create locations for different type of Drawing, keep the tickbox marked for the drawing and Procore will generate a placeholder parent location for you to manually manage locations and boundaries.- Clear the tickbox for drawings you wish to NOT extract locations.
- Click Continue Location Extraction.
- Once processing is complete, click Review Locations to review the suggested location hierarchy.
- When review is complete, click Update Locations to publish your updated location hierarchy.
Tip
Locations must have a unique name under a parent location. To resolve duplicates, scroll down the list to the location with the warning
- Mark the checkboxes next to the drawing(s) you want to submit for location extraction.
- Quick Edit
- Select a location from the list to view the associated drawing, location boundaries and heat map.
- Add a location in one of the following ways:
- From the List
- Click the vertical ellipsis next to a location and select Add. Then click Sub Location.
Note: You cannot add boundaries around sub locations. - Enter the name of the location.
- Click the tick to confirm.
- Click the vertical ellipsis
- Drag and Drop
- Click and hold the add location icon.
- Move the pin to the location on the drawing using a drag and drop operation.
- Enter the name of the location.
- Under 'Sub Location of', select the parent location from the drop-down menu.
- Click Save.
- Click and hold the add location
- From the List
- Add Drawings