Edit Main Contract Payment Applications (Beta)
Objective
To edit an owner payment application for a main contract.
Background
After creating an owner payment application, you can open it using the Project level Main Contracts or Payment applications tool to edit as needed. The steps below show you how to edit an owner payment application using the Main Contracts tool.
Things to Consider
- Required User Permissions:
- 'Admin' level permissions on the project's Main Contracts tool.
- Additional Information:
- You can only edit the most recently created payment application.
- To learn how to use group row billing, see About Group Row Billing on Main Contract Payment Applications
Prerequisites
Steps
- Open a Payment Application
Open a Payment Application
- Navigate to the project's Main Contracts tool.
- In the table, locate the contract to edit.
Tip
- Looking for a specific payment application? To quickly find a match in a long list of payment applications, start typing in the Search box. Procore narrows the list to show only the payment applications that match your keywords.
- Want to organise the payment applications in the Owner list? To organise the payment application table, use the options in the Add Group and Add Filter menus. To learn more, see Search, Filter and Group Payment applications.
- Click the contract's Number link to open it.
- Click the Payment Applications tab.
- Locate the payment application in the Payment applications (Payment Applications) tab.
- Click the Payment application Position or Payment application # link to open it.
Procore opens the payment application. You have different editing options on each card in the payment application.
Update the General Information
To update the payment application's general information:
- Scroll to General Information.
- Click Edit.
- Update these fields as needed:
Note
An asterisk (*) below indicates the field is required.
- Status
Choose a status from the drop-down list. The default status of a new payment application is Draft. See What are the default statuses for Procore payment applications? - Payment application No.
Change the payment application number, if appropriate. - Billing Period.*
Procore automatically populates the drop-down menu with the project's open billing period. If there isn't an open billing period, Procore selects the most recent billing period.Tips
Not seeing a menu option for the current billing period? To learn how to create a billing period, see Create Billing Periods. - Period Start
Procore automatically shows the start date of the selected billing period. - Period End
Procore automatically shows the end date of the selected billing period.
- Status
- Click Save.
View a Summary Preview
To preview the payment application in its finished layout:
- Scroll to the Summary Preview section.
- Click the arrow to expand it.

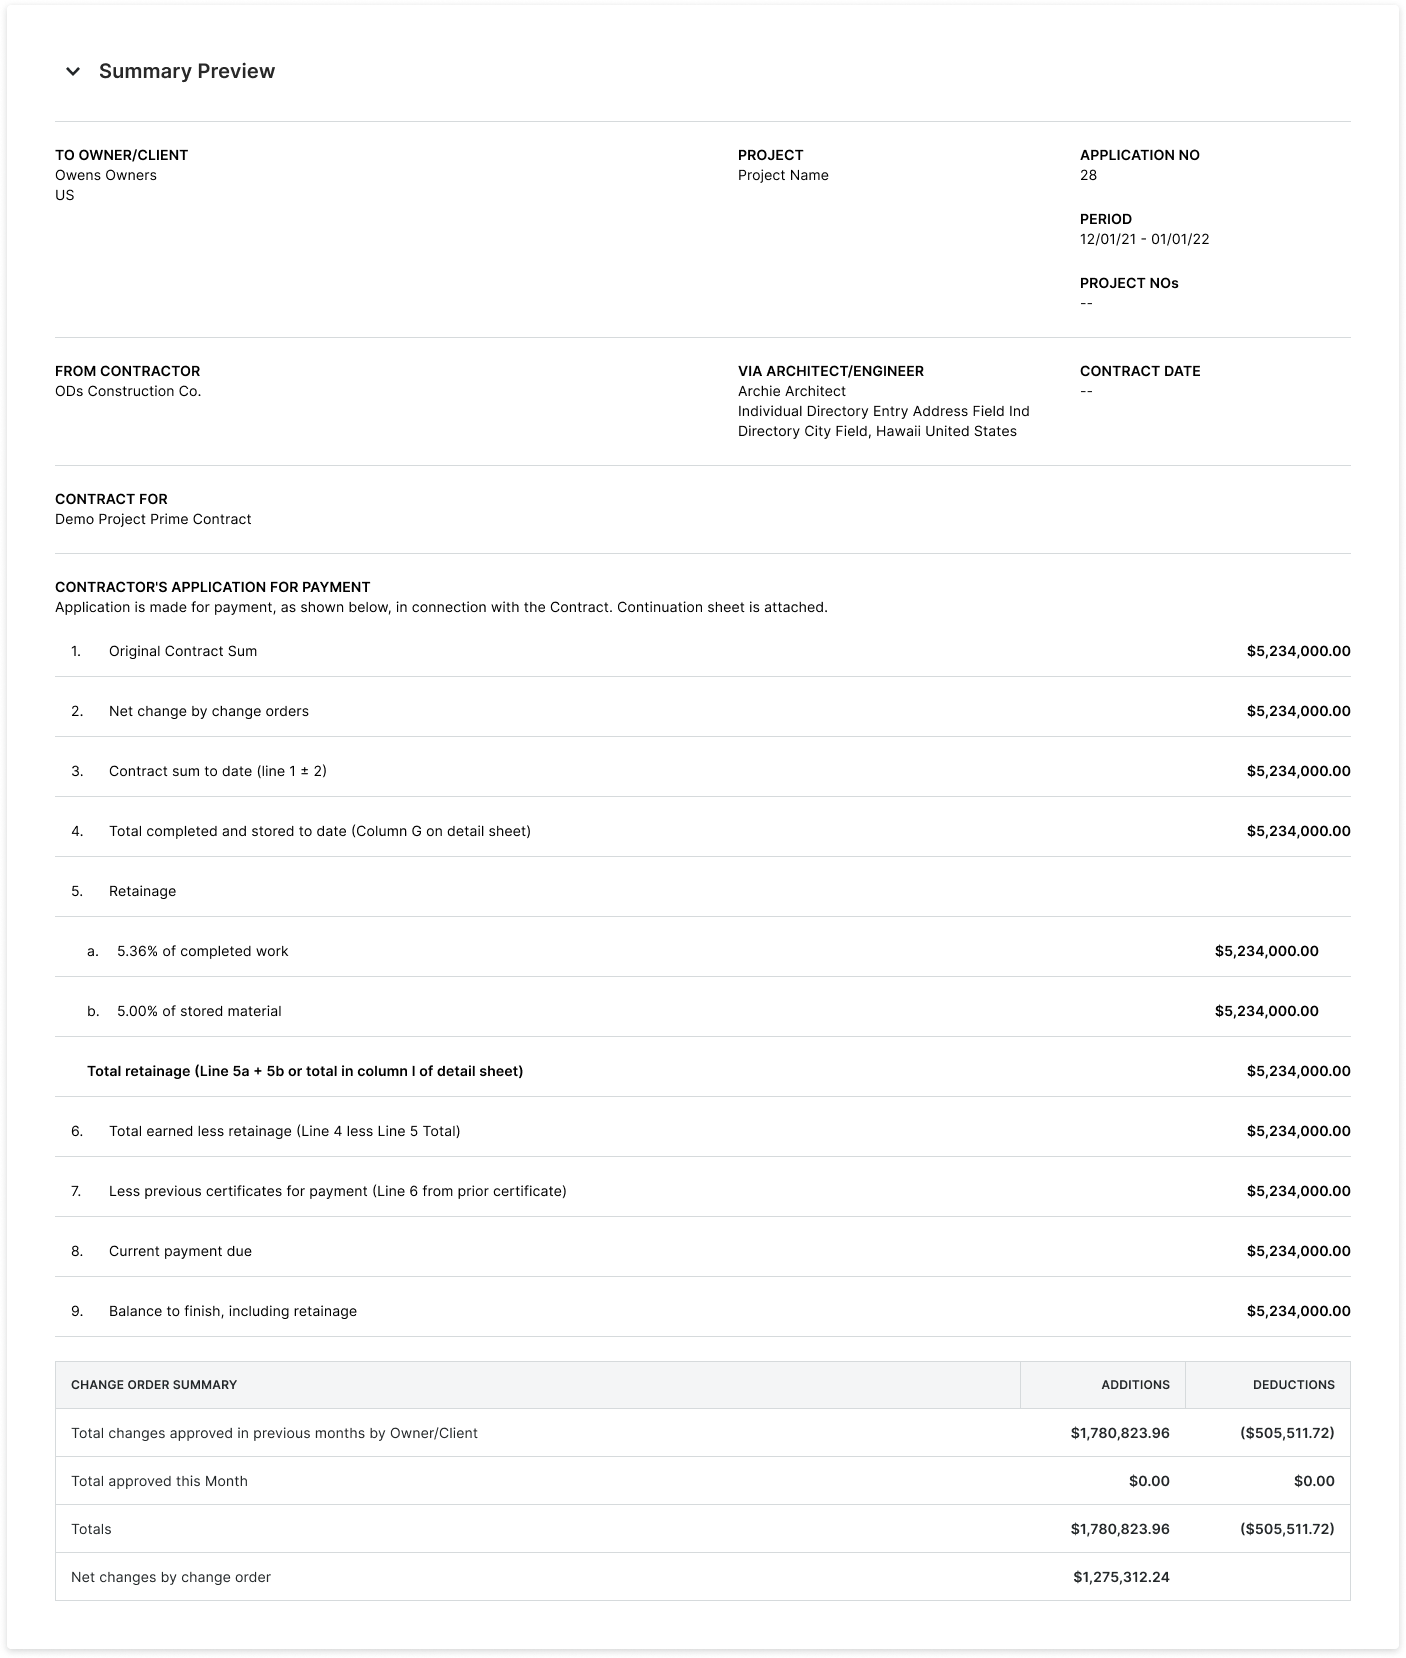
Click here to view an example of the Summary Preview.
Summary Preview: Upstream Payment application
The Summary Preview lets you view the finished layout of your upstream payment application.
Example
Below is an example of an owner payment application created with the Main Contracts tool. You'll notice slight field labelling differences, if you are viewing an upstream payment application created with one of these Project Tools:
- A MC/Client payment application is created with the Client Contracts tool.
- A funding payment application is created with the Funding tool.
The layout of a Summary Preview always matches the example below.
Summary Preview - General Information
The table below details each field in the General Information area of an owner payment application.
| Field | Description | Project Tool | Source Field(s) |
|---|---|---|---|
| To Owner/Client or MC/Client | Shows the name of the Owner/Client or MC/Client as specified in the contract or funding. | Directory, Main Contracts | Owner/Client or MC/Client |
| Project | Shows the name of the project as specified in the Project Number field in the Project Information area of the Project Details page. | Portfolio | Project Number |
| Application No. | Shows the payment application number specified on the payment application. | Payment Applications | Payment application No. |
| Period | Shows the billing period for the payment application. | Payment Applications | Valuation period |
| Project Nos. | Show the Procore project numbers. | Portfolio | |
| From Contractor | Shows the name of the primary contractor managing the project | Main Contracts | Contractor |
| Via Architect/Engineer | Shows the name of the Architect/Engineer as specified on the contract. | Main Contracts | Architect/Engineer |
| Contract Date | Shows the effective date of the contract. This is the date the contract went into force. | Main Contracts | |
| Contract For | Shows the name of the project as specified in the Project Number field in the Project Information area of the Project Details page. | Main Contracts |
Summary Preview - Contractor's Application for Payment
The table below provides details about each field in the Contractor's Application for Payment area of an owner payment application.
| Line | Field | Description | Project Tool | Source Field(s) |
|---|---|---|---|---|
| 1 | Original Contract Sum | Show the amount recorded in the 'Original Contract Amount' field in the contract. | Main Contracts | Original Contract Amount |
| 2 | Net Change by Variations | Shows the total amount of any variations in the Approved status that impact this payment application. | Main Contracts, Variations | |
| 3 | Contract Sum to Date (Line 1 ± 2) | Shows the sum or difference of the Original Contract Sum (line 1) combined with the Net Change by Variations amount (line 2). This shows the positive or negative cost resulting from any approved variations. See the Summary Preview - Variation Summary. | Main Contracts, Variations | |
| 4 | Total Completed and Stored to Date (Column G on Detail Sheet) | Procore adds the Work Completed and Materials Presently Stored values to show the cumulative sum of the cost for each line item on the payment application. | Payment Applications | |
| 5 | Retention | Shows the percentage of the payment is being withheld until the job is complete. This value is specified in the contract. Typically, the value is between 5% and 10% for each progress payment. Because some regions require variable retention, the 'Retention' amount may only be reduced once a certain percentage of the contract is complete. |
Main Contracts | |
| 5a | % of Completed Work | Shows the percentage of work completed from previous payment applications plus the work completed for this billing period. | Payment Applications | |
| 5b | % of Stored Materials | Shows the percentage of materials being stored on-site. This reflects the value of the materials that were purchased for, but not used on, the project up to the end of the payment application's billing period. | Payment Applications | |
| - | Total Retention (Line 5a + 5b or Total in Column I on Detail Sheet) | Shows the variable retention rate. A variable retention rate can represent one of two rates: (1) The amount of retention that is reduced after a certain percentage of work is complete or (2) the amount of retention that retention applies only to labour and NOT to materials. Note: If you are withholding a fixed percentage throughout the entire project, you will not use this field. |
Payment Applications | |
| 6 | Total Earned Less Retention (Line 4 less Line 5 Total) | Shows the Work Completed and Materials Stored Amount | Payment Applications | |
| 7 | Less Previous Certifications for Payment (Line 6 from Prior Certificate) | Shows all previous payments for the contract. On the first payment application, this number is zero (0). On subsequent payment applications, the amount matches line 6 on the previous payment application. | Payment Applications | Total Earned Less Retention (from previous payment application) |
| 8 | Current Payment Due | Shows the current payment due for the payment application's billing period. This calculation takes the 'Total Completed and Stored to Date' value in the payment application minus 'Retention' and any completed payments from past payment applications. | Payment Applications | Calculated |
| 9 | Balance to Finish, Including Retention | Shows the amount remaining to be paid on the contract, including the 'Retention' amount. | Payment Applications | Calculated |
Summary Preview - Variation Summary
The table below provides details about each field in the Variation Summary area of an owner payment application.
| Field | Description | Project Tool | Source Field(s) |
|---|---|---|---|
| Total Changes Approved in Previous Months by Owner/Client | Shows the total amount of any variations that were Approved during previous billing periods. | Main Contracts, Client Contracts, Funding, Variations, Payment applications, Progress Billings | Calculated |
| Total Approved this Month | Shows the total amount of any variations that were Approved during the current billing period. | Main Contracts, Client Contracts, Funding, Variations, Payment applications, Progress Billings | Calculated |
| Totals | Shows the total amount of all Approved variations. | Payment Applications | Calculated |
| Net Changes by Variation | Shows the net change to the total amount for this payment application. | Main Contracts, Client Contracts, Funding, Variations | Calculated |
Review & Add Approved Changes
If your team approves new budget changes or main contract variations after an owner payment application is created, a notification banner appears at the top of the payment application's Bill of Quantities.
If you want to add any newly approved changes to the most recent owner payment application, follow these steps:
- At the top of the Bill of Quantities, click Review & Add the notification banner.

Tips
- Don't see a notification banner? Either (1) there are no approved changes to add to the payment application or (2) the required 'Budget Changes' settings aren't configured. See Configure Settings: Budget.
- Can't click the Review & Add button? Approved changes can only be added to a main contract's most recent payment application. If you are editing an older payment application, you can't click the Review & Add button.
- Are approved changes added to new main contract payment applications automatically? Yes. Approved changes are automatically added to the Bill of Quantities on a new payment application. You do not need to add approved changes to new main contract payment applications.
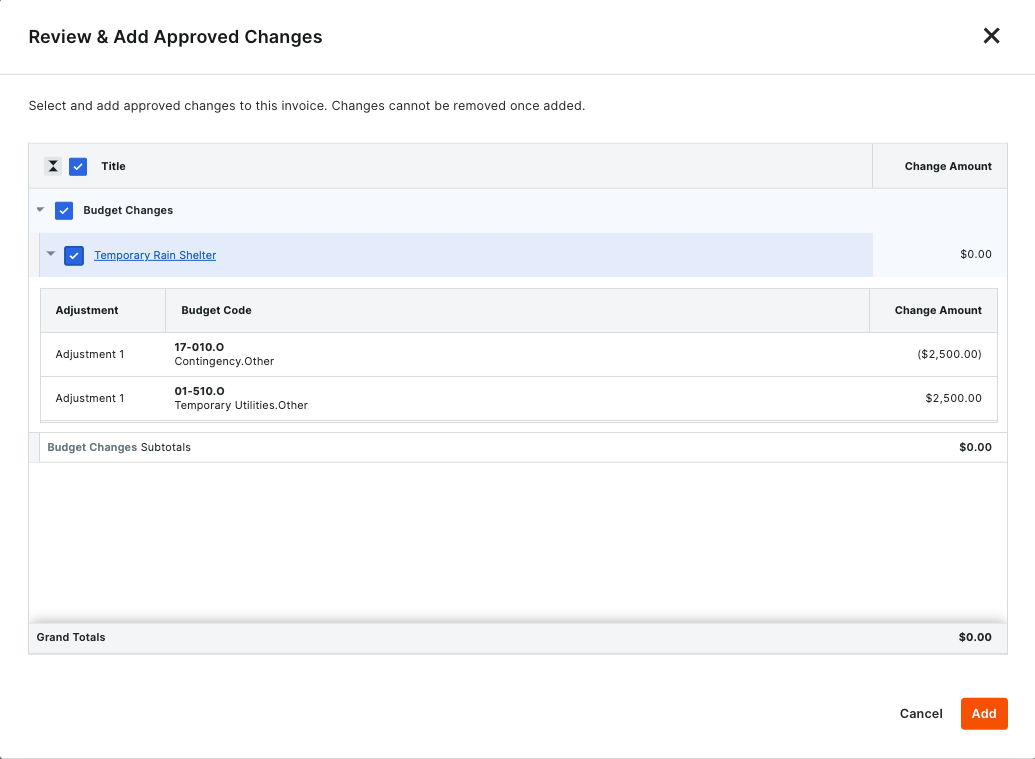
- In the Review & Add Approved Changes window, review the adjustment details.
- Mark the tickboxes next to the changes to add.
Important
Adding approved changes is a permanent action. Once added, they cannot be removed.
- Choose from the options:
- To add the selected changes, mark the tickboxes that correspond to the change and then, click Add.
A GREEN banner appears when the change is successfully added.
OR - To skip adding the changes, click Cancel.
- To add the selected changes, mark the tickboxes that correspond to the change and then, click Add.
Update the Bill of Quantities
Before updating the line items, it's helpful to understand the available editing methods. It's also important to know that the accounting method set on the main contract impacts which columns are available for data entry on the Bill of Quantities.
To update a bill of quantities:
- View the Bill of Quantities in Full Screen
- Set the Column View for PDF Exports
- Search for Matching Line Items
- Manage Custom Groups
- Manage Table Settings
- Choose Your Editing Method
- Update the Line Items Using the Contract's Accounting Method
View the Bill of Quantities in Full Screen
You can view the Bill of Quantities in full screen and close it when you finish your updates.
  |
To open or close the fullscreen view of the Bill of Quantities:
|
Set the Column View for PDF Exports
You can configure the BOQ's column view before you Export Main Contract Payment Applications.
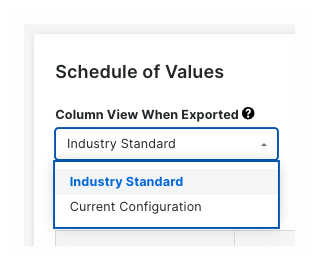 |
Choose an option from the drop-down list:
|
Search for Matching Line Items
You can search for the matching line items to edit.
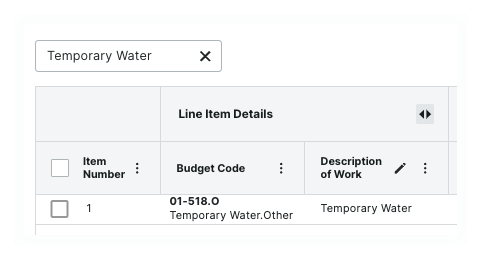 |
About the Search ScopeThe scope of a search includes:
Search for Line ItemsTo search for matching line items:
|
Manage Custom Groups
You can create, edit or delete custom grouping options. Once you've created your groups, you can apply them using the drop-down menu to the left of the 'Manage Custom Groups' button.
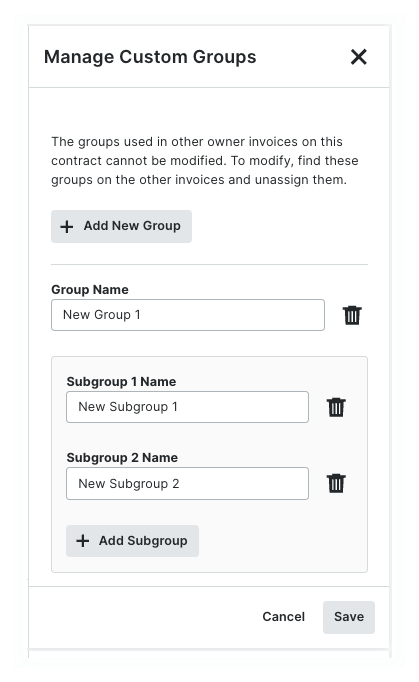 |
Add, Edit or Delete Custom Groups
|
 |
Assign Line Items to Custom Groups
|
 |
Apply Custom GroupsApply the groups to the table using the drop-down menu to the left of the 'Manage Custom Groups' button. You have these options:
|
Manage Table Settings
You can change the row height for the Bill of Quantities. You can also show or hide the columns that appear.
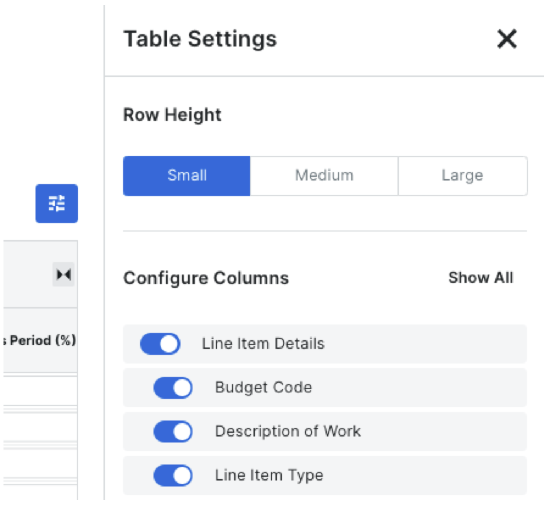 |
Set Row Height
Configure Columns
|
Choose Your Editing Method
It's helpful to understand the differences between the two (2) available data entry methods for contracts. See How do I set the accounting method for a contract? Once you know the accounting method in place, click the Edit button to place the Bill of Quantities in editing mode. You can only edit the most recent payment application. If there is a more recent payment application, an informational message appears at the top of the Bill of Quantities.
- To edit individual line items inline Show/Hide
-
Edit line items inline by typing in the text boxes that appear in the editable cells.

-
- To edit line items in bulk Show/Hide
-
To edit BOQ line items in bulk:
- Click Edit in the top right corner of the BOQ card.
This places the BOQ into editing mode. - Place ticks in the boxes to the left of each line item. You have these options:
- To select all of the BOQ line items, mark the box in the Item Number column (see 1).
- To select all of the line items in a group, mark the box in a line item group (see 2).
- To select individual line items, mark the desired boxes next to each line item (see 3).
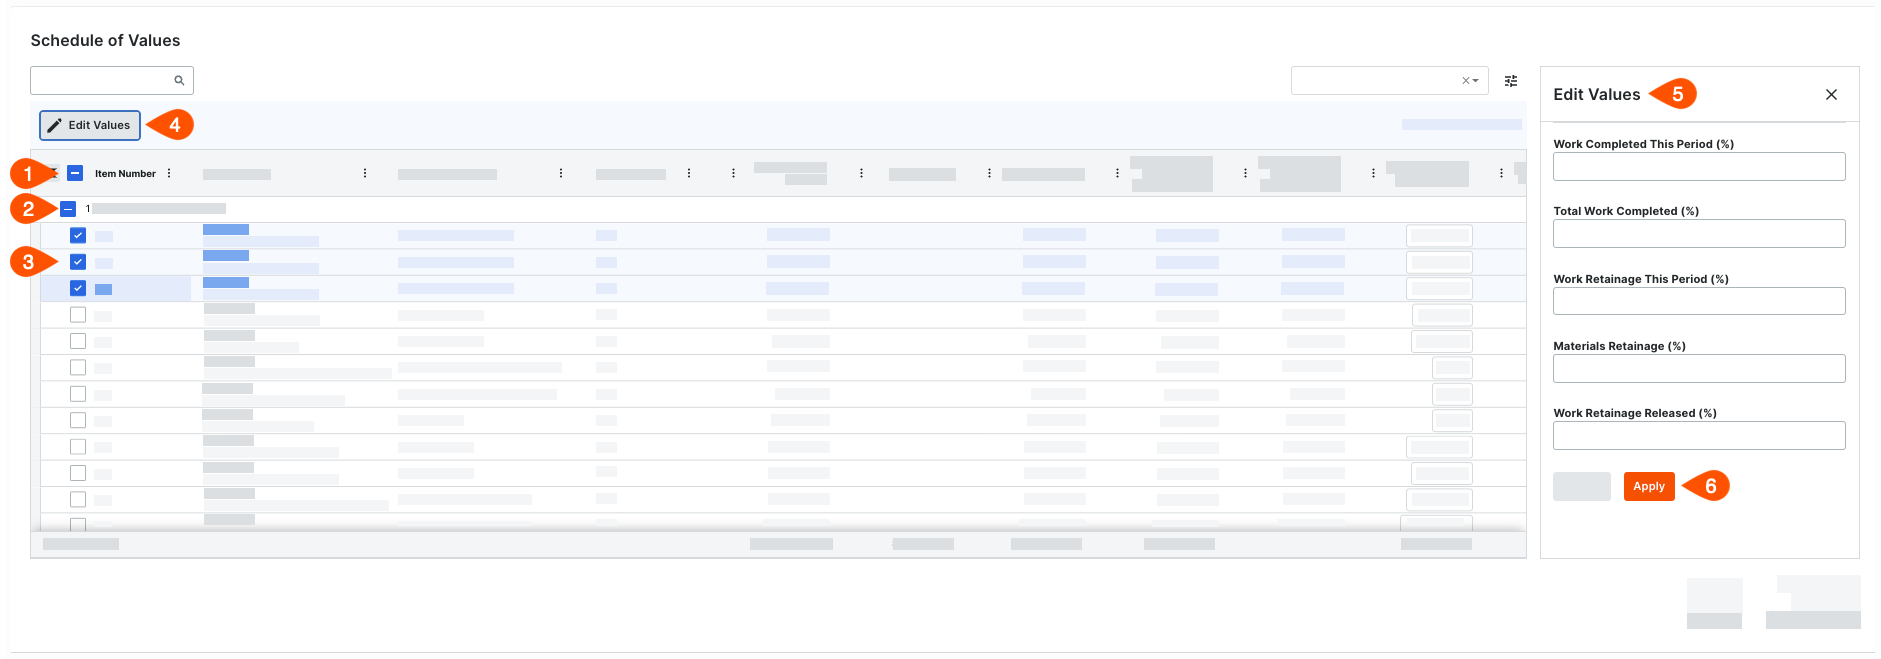
- Click the Edit Values button (see 4).
- In the Edit Values pane on the right (see 5), enter percentage values as needed.
The data entry fields in the Edit Value pane on the payment application's BOQ are different, depending on whether the contract was configured to use the amount-based or unit-based accounting method. To learn more, see How do I set the accounting method for a contract? - Click Apply (see 6).
- Click Edit in the top right corner of the BOQ card.
-
Update the Line Items Using the Contract's Accounting Method
The data entry requirements for line items on a Bill of Quantities are determined by the accounting method set on the payment application's main contract. In Procore, a main contract can be configured to use one (1) of two (2) accounting methods: Amount-Based or Unit/Quantity Based. The accounting method set on the main contract impacts which columns are available for data entry on the Bill of Quantities. Once line items are created on a contract, all payment applications for that contract use the same accounting method. To learn more, see How do I set the accounting method for a contract or funding?
Tips
How do you know which accounting method is being used? An Amount-Based contract includes columns for entering dollar and percentage amounts. A Unit/Quantity Based contract includes columns for entering a quantity and percentage amounts. Simply compare the columns in your payment application's Bill of Quantities to the ones in the examples below.
- To update line items with the Amount-Based accounting method Show/Hide
-
To update the line items on an owner payment application's Bill of Quantities (BOQ) when the main contract is using the Amount-Based accounting method:
- Scroll to the Bill of Quantities.
Each line item on an owner payment application's BOQ corresponds to a contract line item. - Click Edit.
This places the Bill of Quantities into edit mode. - Enter values in these fields as needed:
The columns in your BOQ may be different. To show and hide columns, click the Table Settings icon. To learn more, see Manage Table Settings.
- Work Completed This Period (%)
Enter a percentage to represent the monetary value of work completed for this billing period.
Note: If the user who created the payment application marked the 'Populate the Bill of Quantities with Costs from the Selected Billing Period' tickbox, Procore automatically populates the entry in the hidden 'Work Completed This Period (£)' column with values from subcontractor payment applications, direct costs and commitment variations. - Total Work Completed (%)
Enter a percentage to represent the work completed to date through this billing period. Procore uses this entry to display the '% of Completed Work' (line 5a) in the Summary Preview.
Note: This number represents the cumulative amount of work completed from the first payment application on the contract through the current billing period for this payment application. - Work Retention This Period (%)
Enter a percentage to represent the work retention to release this billing period.
Note: An entry in this cell lets Procore automatically calculate the currency value in the 'Work Retention This Period (£)' column of the Bill of Quantities. - Materials Retention (%)
Enter a percentage to represent the material retention for this billing period.
Note: An entry in this cell lets Procore automatically calculate the currency value in the 'Materials Retention This Period (£)' column. - Work Retention Released (%)
Enter a percentage to represent the material retention that you are requesting to be released for work completed this billing period.
- Work Completed This Period (%)
- Scroll to the Bill of Quantities.
-
- To update line items with the Unit/Quantity Based accounting method Show/Hide
Upload Attachments
When creating a payment application, users have the option to place a mark in the Include backup from direct costs and payment applications in the selected billing period box. The experience you see will depend on whether the setting is turned ON or OFF.
- Include Backup from Direct Costs and Payment applications in the Selected Billing Period
- Upload Attachments
include backup from direct costs and payment applications in the Selected Billing Period
If the Include backup from direct costs and payment applications in the selected billing period setting is turned ON.
- Scroll to Attachments.
- Click Edit.
Scroll to the Attachments card.Note
When the Include backup from direct costs and payment applications in the selected billing period setting is turned ON, the Attachments card contains these sections: Uploaded Attachments, Attachments from Subcontractor Payment applications and Attachments from Direct Costs.
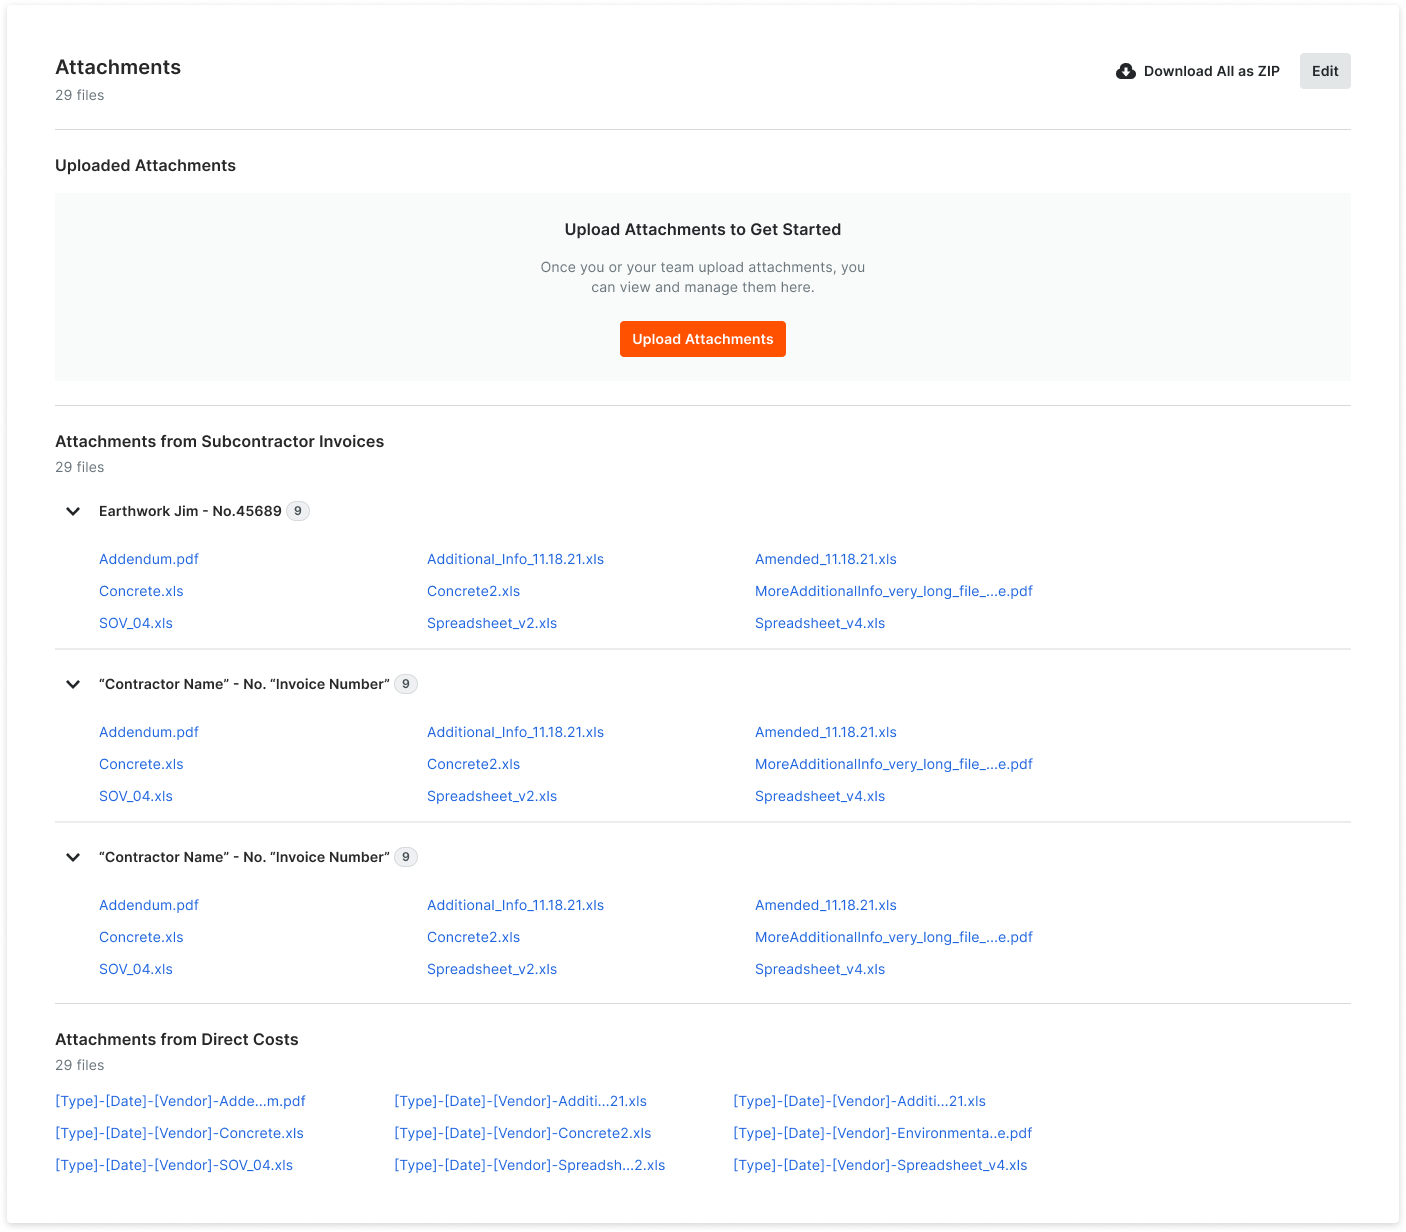
- In the Uploaded Attachments section, click the Upload Attachments button.
- Upload the desired attachments.
Upload Attachments
If the Include backup from direct costs and payment applications in the selected billing period setting is turned OFF in the payment application.
- Scroll to Attachments.
- Click Upload Attachments.
- Upload the desired attachments.