Create a Subcontractor Payment application for the Release of Retention (Legacy)
Objective
To create a subcontractor payment application for the release of retention.
Background
The first step in releasing retention on a project is to create a subcontractor payment application. There are two ways to create a payment application in the Commitments tool:
- A payment application administrator Create a Payment Application on Behalf of a Payment Application Contact.
- A payment application administrator can Send an 'Invite to Bill' to a Payment Application Contact. Next, the payment application contact follows the steps in Submit a New Payment application as a Payment Application Contact.
The steps below summarise how to create and submit a payment application for releasing retention.
Important
When creating a payment application to release retention, it is important to ensure the payment application is in the 'Draft' status before you enter the retention amounts on the payment application's Detail tab.Things to Consider
- Required User Permissions:
- To create a payment application and to set and release retention before, during or after the current billing period, 'Admin' level permissions on the project's Commitments tool.
- To create a payment application and to release retention during the current billing period only, 'Standard' level permissions on the project's Commitments tool and you must be the designated 'Invoice Contact' on the contract. Payment application contacts are automatically added to the 'Private' drop-down list on the contract.
- Additional Information:
- To set the same percentage of retention on all line items in the payment application, enter a value to apply to all line items in the payment application.
- To release retention on all line items, enter a value to apply to all line items. This moves the desired percentage from the 'Currently Retained' column to the 'Released This Period' column.
- For customers in Australia
 , you can also manage withholding using the sliding scale retention feature. To learn more, see What is sliding scale retention?
Steps
- Step 1: Create a 'Draft' Payment Application
- Step 2: Update the Retention Amounts Released this Period
- Step 3: Sign the Payment Application PDF
- Step 4: Save and Submit the Payment Application
Step 1: Create a 'Draft' Payment Application
- Navigate to the project's Commitments tool.
- Under the Contracts tab, locate the contract in the table. Then, click the Number link to open it.
- Click the Create Payment application button.
- In the 'Create New Payment application' page, do the following:
- Billing Period: Select a billing period from the drop-down list. By default, Procore displays the current billing period if it has been created. To learn how to create a billing period, see Create Manual Billing Periods and Create Automatic Billing Periods.
- Payment application #: Enter a payment application number in this box. This is a free-form text field, so you can enter any combination of alphanumeric characters that you want.
- Payment application Start: Select a date from the calendar control. By default, Procore displays the start date set for the current billing period.
- Payment application End: Select a date from the calendar control. By default, Procore displays the end date set for the current billing period.
- Billing Date: Select a date from the calendar control. By default, Procore displays the billing date set for the current billing period.
- Status: Select a status from the drop-down list. By default, new payment applications are assigned the 'Draft' status.
- Payment Date: Select a payment date from the calendar control.
- Submitted: Select a date from the calendar control to represent the date the payment application was submitted for payment.
- Contract Company. Displays the 'Contract Company' assigned to the contract associated with this payment application. To change this field, you must edit the date in the contract.
- In the 'Attachments' field, choose from these options:
- Attach Files. Click this button to add any attachment(s) using the appropriate option in the shortcut menu.
- Drag and Drop File(s). Use a drag-and-drop operation to attach any files from your computer to the payment application.
- Click Save.
Step 2: Update the Retention Amounts Released this Period
Important
Remember that when creating a payment application to release retention, it is important to ensure the payment application is in the 'Draft' status before you enter the retention amounts on the payment application's Detail tab. If you are a subcontractor who has been invited to submit a payment application and navigating to that payment application from the invitation, always check to make sure the payment application is in the 'Draft' status.- Click the Detail tab in the subcontractor payment application.
- Click Edit.
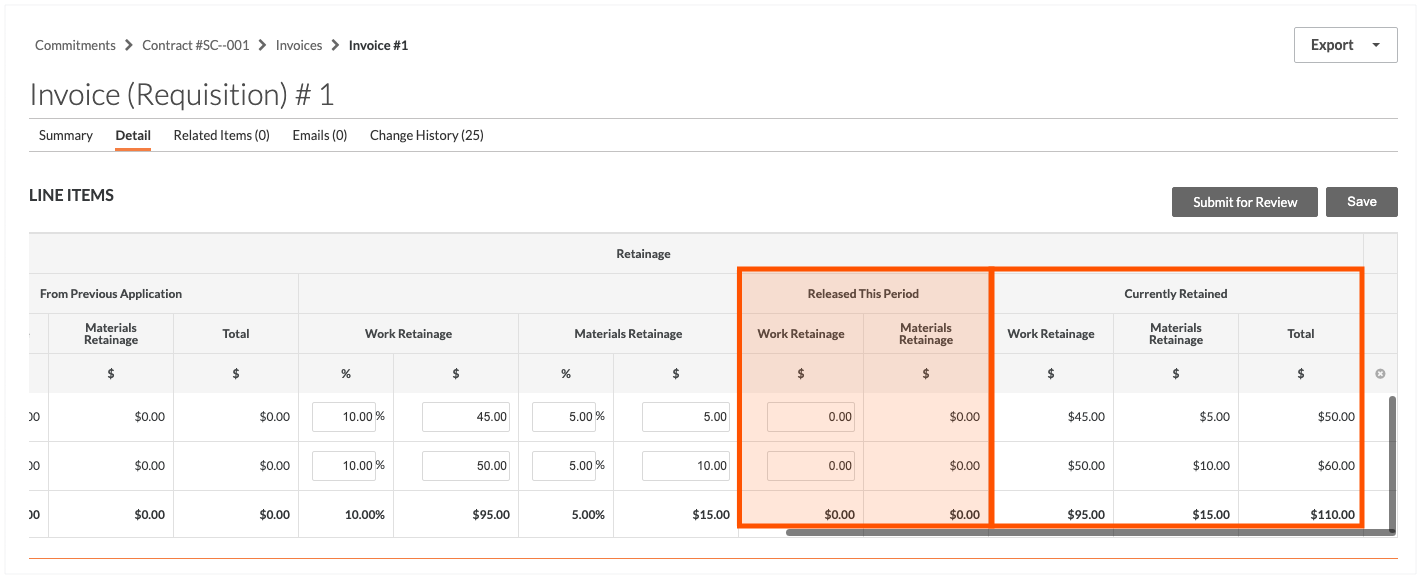
- Scroll to the 'Retention' section on the right side of the table.
- Under the 'Released this Period' section, do the following:
- Work Retention. Enter the amount that you are requesting to be released during this billing period using the currency format.
- Materials Retention. Enter the amount that you are requesting to be released during this billing period using the currency format.
Note
- The 'Work Retention' and 'Materials Retention' columns under the 'Currently Retained' section show the amount of money that the upstream contractor is currently withholding from the downstream contractor.
- When you enter amounts in the 'Released this Period' columns, notice that Procore automatically adjusts the values that appear in the 'Currently Retained' columns for you.
- Optional: If the upstream contract has enabled the 'Show Amounts Subcontractors Claim' setting in the Commitments tool, you will have the ability to enter amounts for the work being claimed for the billing period in the Proposed Amount column.
Note
The 'Show Amounts Subcontractors Claim' setting was designed for Procore clients in Australia and New Zealand. This provides construction businesses with the ability to create payment programmes to facilitate payment application approvals and claims of work performed by contractors. To learn more, see Create a Payment Programme. - Click the Save button.
Step 3: Export and Sign the Payment application Detail PDF
If the upstream contractor requires you to sign the 'Detail' information in the payment application,
- In the payment application, click the Detail tab.
- Click Export and choose the PDF option from the drop-down list.
- Provide your signed subcontractor payment application to the contracting party as per your contract terms.
- Optional. If you would like to include a copy of your signed payment application as an attachment, do this:
- Click the Summary tab.
- Click Edit.
- Scroll to the Attachments area and upload a copy of your signed payment application. You may also attach supplemental documentation related to your payment application, such as any lienwaivers.
- Click Save to save the payment application as a 'Draft.'
Step 4: Save and Submit the Payment Application
Caution
- Before submitting your payment application, it is important to review it for accuracy and completeness. To learn how, see Review Payment applications as a Subcontractor.
- Once you submit the payment application, you will NOT be able to make changes without contacting the contracting party to change your payment application's status to Revise & Resubmit.
When you are ready to submit your payment application, click Submit for Review. This changes the payment application's status to Under Review.
If you would like to learn more about Procore's commitments software and how it can help your business, please visit our construction financials tool product page  .
.