Create a Subcontract (Legacy)
Legacy Content
This tutorial details Procore's legacy experience for creating a subcontract. The information on this page will be replaced with updated content when the redesigned commitments beta experience is generally available. To learn about this release and its timeline, see Project Financials: Modernized Experience for Commitments.
Important! If you are using the commitments beta experience, please see the Create Subcontracts tutorial instead of the information below.
Objective
To create a subcontract in Procore using the project's Commitments tool.
Background
Subcontracts can be awarded during both the preconstruction and construction phases of a project and are typically created and tracked in Procore by project management. After a main contract award, the project manager creates purchase orders and subcontracts for specific trades to secure materials and subcontractor services for a project.
Things to Consider
- Required User Permissions:
- To create a subcontract and see/enter data on the Bill of Quantities (BOQ) tab:
- 'Admin' level permissions on the project's Commitments tool.
OR - 'Standard' level permissions on the project's Commitments tool and the 'Allow Users to See BOQ Items' setting must be enabled and your name must be selected in the 'Select a Person' drop-down list
- 'Admin' level permissions on the project's Commitments tool.
- To create a subcontract only, 'Read Only' or 'Standard' level permissions on the project's Commitments tool with the 'Create Work Order Contract' granular permission enabled on your permissions template.
- To create a subcontract and see/enter data on the Bill of Quantities (BOQ) tab:
- Additional Information:
- An alternative way to create a subcontract is to award a winning tender and convert it into a subcontract. See Award a Winning Tender and Convert it into a Subcontract.
- To set the accounting method for the subcontract, see How do I set the accounting method for a contract or funding?
- After creating a subcontract, you have these options for creating variations:
- If your subcontract is configured for 1-Tier Variations. Continue with Create a Commitment Variation.
- If your subcontract is configured for 2-Tier Variations. Ensure the subcontract is in the 'Approved' status and continue with Create a Commitment Potential Variation from a Change Event.
- If your subcontract is configured for 3-Tier Variations. Ensure the subcontract is in the 'Approved' status and continue with Create a Commitment Potential Variation from a Change Event.
-
For companies using the
 ERP Integrations tool: Prerequisites, requirements, limitations, and considerations might apply depending on the ERP system your Procore account is integrated with. Visit Things to Know about your ERP Integration for details.
Prerequisites
- Configure Advanced Settings: Commitments
- To use the Procore + DocuSign® integration to request signatures on a contract, see Enable or Disable the DocuSign® Integration on a Procore Project.
Steps
Step 1: Create a Subcontract
- Navigate to the project's Commitments tool.
- Click +Create and select Subcontract from the drop-down menu.

- In the 'General' tab under 'General Information', do the following:

- Sign with DocuSign®
If you have enabled the Procore + DocuSign® integration (see Enable or Disable the DocuSign® Integration on a Procore Project), a tick appears in this box by default. If you do NOT want to collect signatures with DocuSign®, remove the mark. - Number #
Accept the default number, enter a new number or create a custom numbering scheme.For companies using the
ERP Integrations tool: - In order to send the commitment to the ERP Integrations tool to be accepted for export by an accounting approver:
- Your integrated ERP system may impose a maximum character limit.
- Prerequisites, limitations, and considerations might apply depending on the ERP system your Procore account is integrated with. Visit Things to Know about your ERP Integration for details.
Tip
How are numbers assigned? To learn how Procore assigns numbers and to understand your custom numbering options, see Can I customise the numbering system for financial objects in Procore? - In order to send the commitment to the ERP Integrations tool to be accepted for export by an accounting approver:
- Title
Enter a descriptive title for the subcontract.Notes
- If your company has enabled the ERP Integrations tool, be aware that some integrated ERP systems impose character limits on the 'Title' field when data exported from Procore is imported into their system.
- For details about character limits, see What is the maximum character length for a commitment's 'Title'?
- Contract Company
Select the company responsible for completing the work on the subcontract (for example, American Construction Co.).
Notes:- To appear in this list as a selection, add the company to the Project Directory. For details, see Add a Company to the Project Directory or Import Users & Vendors into your Project Level Directory Tool (Procore Imports).
- You must select a contract company before you can name an payment application contact.
- Payment application Contacts
Select one (1) or more employees of the 'Contract Company' to designate as the payment application contact(s). After saving the subcontract, any users added here will be added to the 'Private' list. You must select a 'Contract Company' before you can select payment application contacts. - Status
Assign a status to the subcontract. To learn about the available statuses and which commitment statuses reflect contract amounts in your project's budget, see What are the default commitment statuses in Procore? - Executed. Mark this tickbox to denote that the subcontract was fully signed and executed.
Notes
- Many Procore users choose to place a tick in the Executed box when placing the commitment into the 'Approved' or 'Complete' status.
- The time at which your project team places a tick in the Executed box should always be aligned with your project's unique business process
- Private
Mark the tickboxes and choose any project users or collaborators from the 'Select a Person' list. To learn more about the privacy options, see Change the Privacy Settings for a Commitment.- Make this visible to only administrators and the following users
Mark this tickbox to limit the visibility of the purchase order to users with 'Admin' on the project's Commitments tool and users specified in the 'Select a Person' drop-down list. - Allow these users to see BOQ items
Mark this tickbox in this box to limit the visibility of the Bill of Quantities (BOQ) items on the purchase order to users with 'Admin' on the project's Commitments tool and users specified in the 'Select a Person' drop-down list.
- Make this visible to only administrators and the following users
- Default Retention
Specify the percentage amount of retention to withhold on the first subcontractor payment application. For example, it is a common practice to enter 5 or 10% in this field.Notes
- The 'Default Retention' amount set on the subcontract will only affect the amount on the first subcontractor payment application.
- Editing this value after creating the first subcontractor payment application will NOT affect the retention amount on subsequent payment applications.
- In order to set or release the retention amount on a subsequent payment application, complete the steps in Enable Retention on a Commitment. Next, use one of these Procore tools to set or release retention on that payment application:
- Commitments. Set or Release Retention on a Subcontractor Payment application.
- Payment applications. Set or Release Retention on a Subcontractor Payment application.
- If you would like to set up retention rules that automatically adjust withheld amounts on your subcontractor payment applications, see Enable Sliding Scale Retention Rules on a Commitment's Payment applications.
- Description
Provide additional information, as necessary. - Attachments. Attach any related materials such as pricing quotes, receipts, signed purchase orders and so on. You may attach files that have been uploaded to your project or drag and drop files from your local computer.
- Sign with DocuSign®
- Scroll to the Contract Dates section and enter the following:
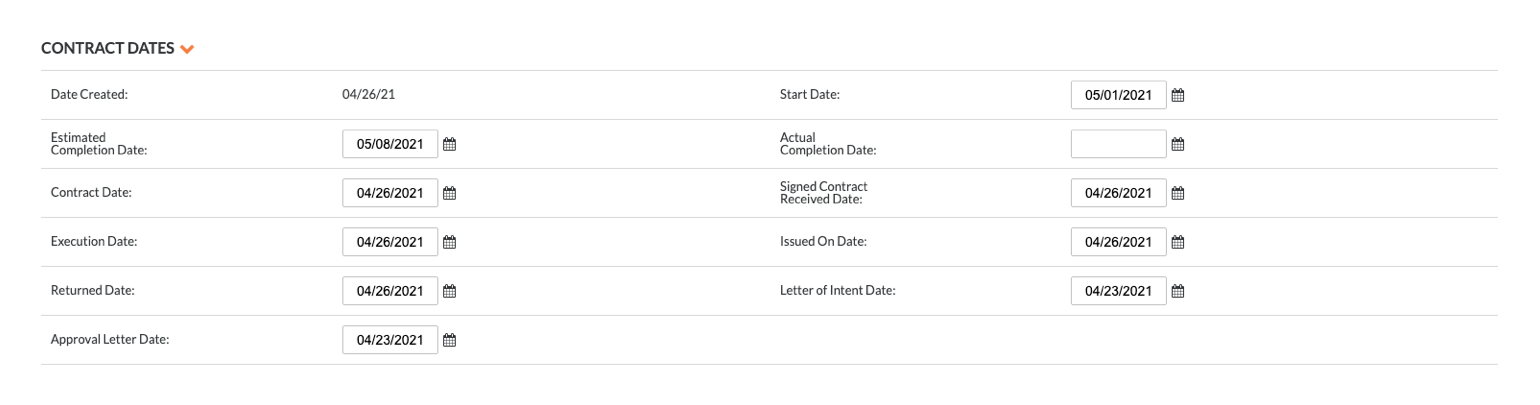
- Start Date. Select the date when the scope of work will begin on the job site.
- Estimated Completion Date. Select the estimated date of when the scope of work will be finished.
- Signed Contract Received Date. Select the date when the subcontract was officially signed.
- Actual Completion Date. Select the date when the scope of work was deemed complete.
- Scroll to the Additional Information section and enter the following:
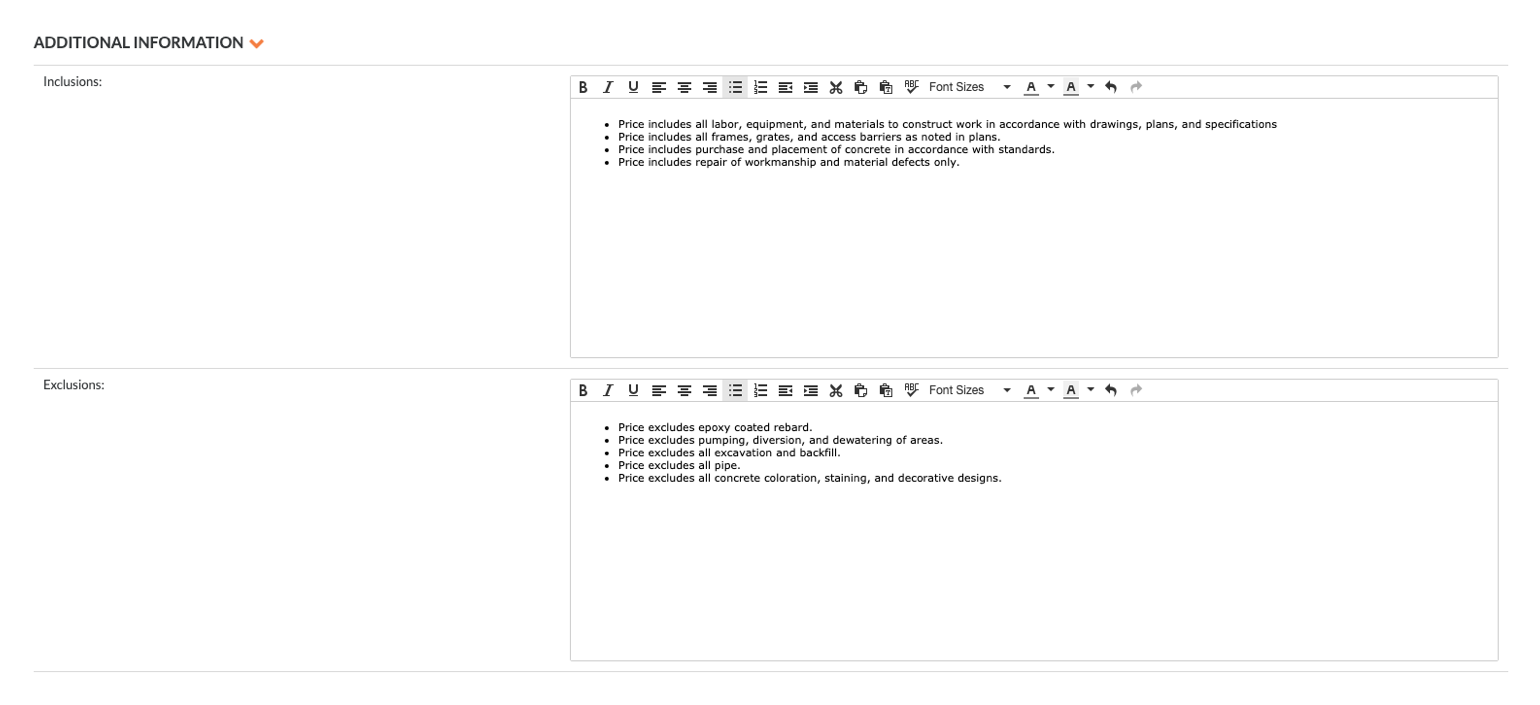
- Inclusions. Disclose any inclusions that may not be clearly stated in the related contract documents.
- Exclusions. Disclose any exclusions that may not be clearly stated in the related contract documents.
- Click one (1) of these buttons:
- Create. Click this button to save the new subcontract and return to the 'General' tab in view mode.
- Create & Enter BOQ. Click this button to save the new subcontract and jump to the 'Bill of Quantities' tab in edit mode. Continue by entering the BOQ.
- Complete with DocuSign®. Click this button to complete the subcontract with the DocuSign® integration. See Complete a Commitment Contract with DocuSign®.
Step 2: Enter the Bill of Quantities (BOQ)
There are two ways to enter the Bill of Quantities (BOQ) on a subcontract:
Add Line Items to the BOQ
Notes
- If your company is using the Procore + Integration by Procore integration and your Integration by Procore system is configured to use the Calculated Method, Integration by Procore will NOT allow the use of Lump Sum (LS) as a unit of measurement.
- If you are using the 'Override Subtotal', you must ONLY input the Subtotal Amount. The Integration by Procore integration will then create an 'LS' item in Integration by Procore.
See Also
- Award a Winning Tender and Convert it into a Subcontract
- How do I set the accounting method for a contract or funding?
- Edit the Advanced Settings Tab on a Commitment