Add a Crew to a Timesheet
Objective
To add a crew to a timesheet in the project's Timesheets tool.
Background
Procore's Timesheets tool is integrated with the Crews tool, which enables users to leverage existing groups of laborers organized into "crews" when creating a timesheet. This allows for faster and more accurate Timesheet creation.
Things to Consider
- Required User Permissions:
- 'Standard' or 'Admin' on the project's Timesheets tool.
AND
'Read-only' or higher permissions on the project's Crews tool.
- 'Standard' or 'Admin' on the project's Timesheets tool.
Prerequisites
Steps
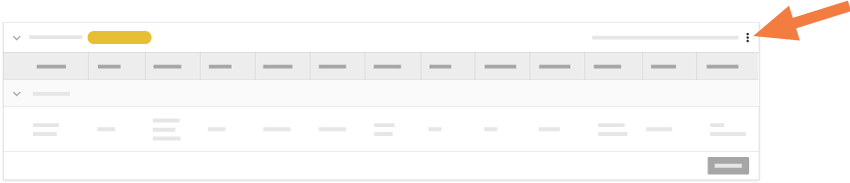
- Navigate to the project's Timesheets tool.
- Click Create.
- Click New Daily Timesheet.
- In the 'Add Employees' window, select a crew from the left column.
- Mark the checkbox next to the crew members you want to add to the timesheet.
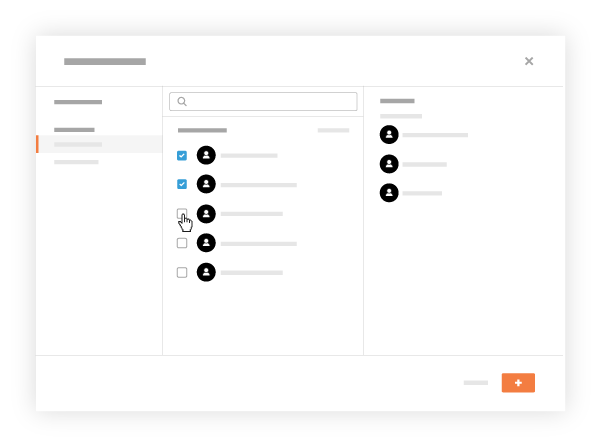
- Click Add.
- Choose your Select Date.
Note: The Select Date defaults to the current date. - Click Add Employees to include additional employees on the timesheet that were not selected in the 'Add Employees' window.
- Click Bulk Time Entry to apply the same information to multiple workers on the Timesheet.
See Bulk Enter Time Entry for more information. - Enter the following information:
Notes:- An asterisk (*) denotes a required field.
- Optional fields can be enabled/disabled in the Configure Settings. See Configure Advanced Settings: Timesheets.
- Classification: Select the employee classification from the drop-down menu associated with the time entry.
- Sub Job: Select from the drop-down menu the sub job associated with the time entry.
- *Cost Code: Enter or Select from the drop-down menu the cost code(s) associated with the log entry.
Note: If you are an admin on the Company Admin tool, you can limit the cost code selections that appear in this list. To learn more, see Manage Time Tracking Settings. - Location: Select from the drop-down menu the location where the work was performed by that user.
- *Start Time: Enter or Select the time the user began working.
- *Stop Time: Enter or Select the time the user stopped working.
Note: You will only see the Start and Stop fields if you have configured your settings to show these fields. See Configure Advanced Settings: Timesheets. - Lunch Time: Select from the drop-down menu the amount of time taken for a lunch break. Select from the following options:
Notes:- The amount of time selected will be subtracted from the Total Time.
- This field will only be available if Start Time and Stop Time is enabled.
- 0 min (Default)
- 30 min
- 45 min
- 60 min
- Time Type: Select from the drop-down menu the type of pay being entered. Select from the following options:
Note: If you are an admin on the Company Admin tool, you can add custom time types and/or exclude time types in this list. See Manage Time Tracking Settings for more information.- Regular Time
- Double Time
- Exempt
- Holiday
- Overtime
- PTO
- Salary
- Holiday
- Billable: Select from the drop-down menu if the hours are billable by clicking Yes or No.
- Add Description: Click to enter additional comments to the time entry.
- Add Line Item: Click this option to create extra line items on a time entry.
- Click Submit and Add Quantities if you would like to add quantities to your timesheet.
Note: This button will be disabled if quantities have not been uploaded into your project. See Add Quantities to a Timesheet for more information. - Click Submit.
A banner will appear at the bottom of the page confirming the timesheet was successfully created.