Document Management - Getting Started Guide
Table of Contents
- Welcome
- Introduction to Document Management
- Document Fields
- Naming Standard
- Upload Requirements
- Document Permissions
- Document Approvals with Workflows
- Document Organisation with Saved Views
- Document Distribution with Correspondence
- Conclusion
Welcome

This guide helps you set up Procore's Document Management tool for the first time by providing the following:
- An introduction to the Document Management tool and processes.
- Topic overviews, best practices, examples and action items.
- Videos and step-by-step instructions.
We recommend starting with a test project using Procore's defaults while becoming familiar with the tool.
Prerequisites for this Guide
- Your company is part of the Document Management Limited Release (Beta).
- The Document Management tool is enabled for a project.
- The following permissions are enabled in Procore:
- Company Admin permissions:
- 'Admin' level permissions to the Company level Directory tool.
- Document Management tool permissions:
- 'Admin' level permissions to the Document Management tool.
- Added to a permission group with the 'Upload New Files' and 'Submit New Files' permissions enabled.
Note: Procore provides a default 'Document Controller' permission group that you can add yourself to.
- Optional: Workflows and Correspondence tool permissions:
- For configuring and starting workflows for documents, 'Admin' level permissions to the Company level Workflows tool.
- For attaching documents to correspondence items in a project's Correspondence tool:
- 'Standard' or 'Admin' level permissions on the item's correspondence type.
OR
'Read Only' level permissions on the item's correspondence type with the 'Create Item' granular permission enabled on the permissions template.
- 'Standard' or 'Admin' level permissions on the item's correspondence type.
- Company Admin permissions:
Next Lesson: Introduction to Document Management
Overview
About the Tool
Procore's Document Management tool is a document management system that automatically organises your documents according to their attributes. Quickly find the documents you need with confidence that you're opening the latest approved revision and that only people who should see it have access.
This tool is designed for companies needing a unified, configurable solution for managing information and approvals across all stages of a construction project.

With the Document Management tool, companies can:
- Configure document permissions based on each revision's attributes such as status, type or discipline.
- Help team members access, review, approve and manage documents in a streamlined way from one centralised system.
- Have the same benefits as gained with the original Documents tool in Procore, while adding features such as document approval workflows with markup, more precise permissions, metadata tagging and enforceable naming conventions.
For tutorials, videos and additional resources, see Document Management (Web) | (iOS) | (Android).
Video
View the Features
General Tool Process
Once settings are configured (as explained later in this guide), the general process for using the Document Management tool is the following:
Note
Additional topics such as tool settings and permissions, saved views and approval workflows are covered later in this guide.Workflow Diagram
|
|


Uploading, Reviewing And Submitting Documents
Video
Uploading Documents
The Document Management tool uploads documents in a similar way to Procore's original Documents tool. However, the Document Management tool uses machine learning on the contents of the document and file name to automatically populate data, such as the document type, drawing number and drawing description.
Note: You’ll set up your fields, naming standards and upload requirements in the next section of this guide.

Reviewing And Completing Document Attributes
Once uploads process, any remaining required fields are reviewed and completed so they can be submitted to the project for broader access. You will set up these requirements in a later section of this guide.

Submitting and Approving Documents
Documents with required fields completed are submitted to the project so they can be accessed on the 'Documents' tab.

Reviewing Documents with workflows
If documents have approval workflows set up with the Workflows tool, users can access them in saved views such as 'Assigned to Me' so they can review, provide comments and respond with an approval outcome.
Viewing, Downloading and Sharing Documents
After documents are submitted to the project, people with the appropriate permissions can view, share and download the documents that they need.
Note: Document permissions are set up later in this guide.
Video
Viewing Documents
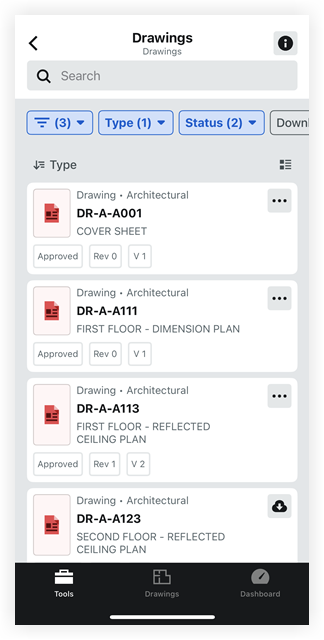
Submitted documents are accessed via the ‘Documents’ tab. Document information can be viewed in the table or opened in Procore's document viewer. Depending on how the admin configured the project's collections and which saved view you are viewing, the latest revision within a given document container may be shown by default, but previous revisions can be quickly accessed as well.

Documents are also easily accessed and viewed on Procore's mobile application for iOS and Android.
|
|
Video - View on mobile Device |
Downloading Documents
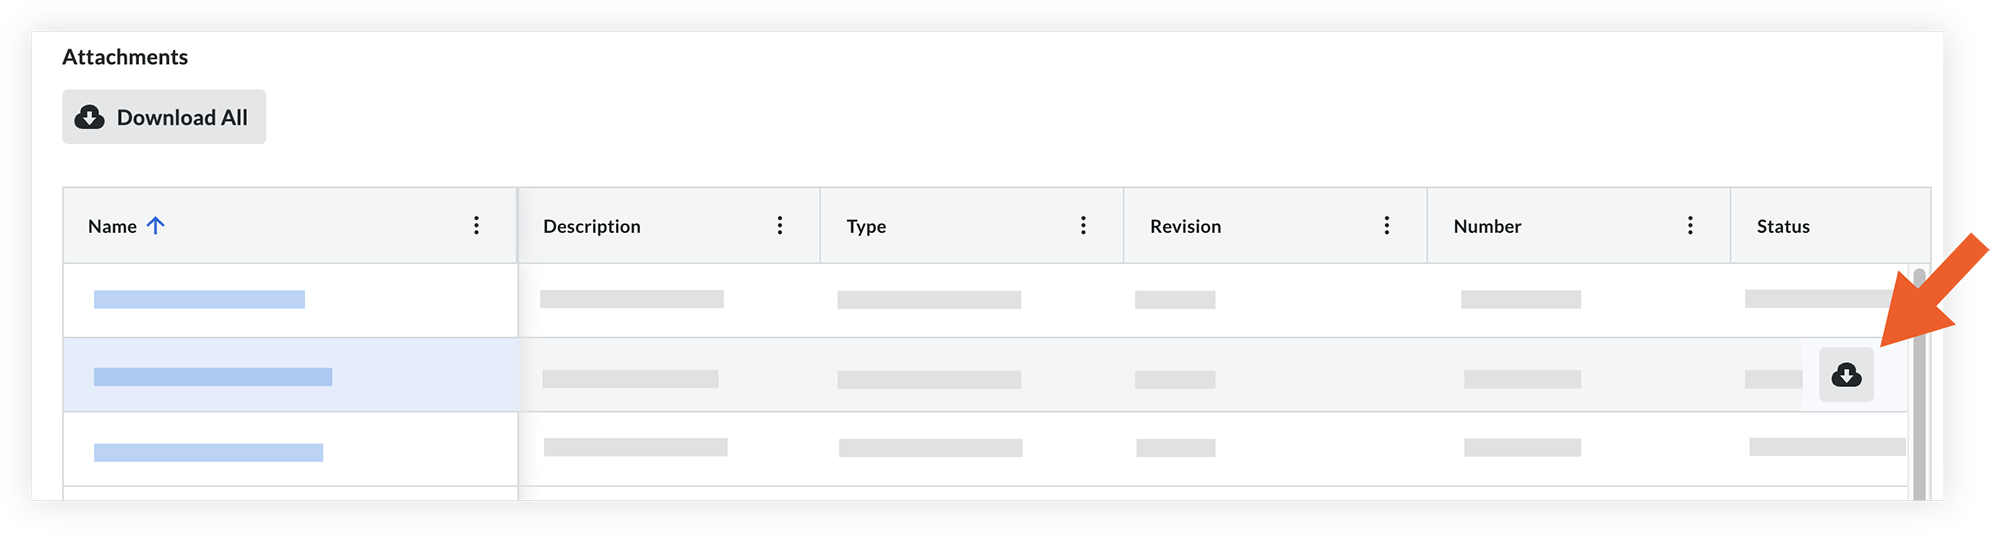
Documents can be downloaded individually from the table or viewer and in bulk from the table on Procore's web application.

Sharing Documents
Documents can be added as attachments for items (such as transmittals) in the Correspondence tool.

The documents can then be viewed and downloaded by recipients of the correspondence who have permission to those documents in the Document Management tool.
Next Lesson: Document Fields - Overview
Overview
Background
In construction, mistakes and rework are often caused by outdated project files that were duplicated across a number of folders or tools. To mitigate this risk, Procore's Document Management tool automatically organises and controls access to files automatically based on the attributes (document fields) of each document revision. This is why it's especially important to set up these field values before getting started with the tool.
How it Works
Procore's Document Management tool uses metadata and document fields to automatically grant access to and organise document revisions, making them easier to find. A project's document fields are configured in the Company level Admin tool through configurable fieldsets. Field options can be shown or hidden from the Document Management tool's Configure Settings page.
Note: Required fields for every document: Name, Type, Status and Version.

Important
It's important to have your naming standard and upload requirements set up for the Document Management tool before uploading documents. This ensures standardization and compliance and helps populate fields automatically. See What data can Procore automatically populate when uploading files to the Document Management tool?Note: You'll configure which fields should be required for each document, by document type, in the Upload Requirements section of this guide.
Fieldsets and Field Options for Documents
Company Admins can manage custom fields, configurable fieldsets and default field options on the Document Management tool page of the Company level Admin tool.
Create custom fields
Consider creating custom fields in the Document Management tool and adding them to fieldsets, the naming standard, upload requirements, permission groups and more.
Manage Configurable Fieldsets
Create new fieldsets or edit existing ones and then assign them to your projects. This allows you to set which fields should be required on documents across all of your projects.

Manage Default Field Options
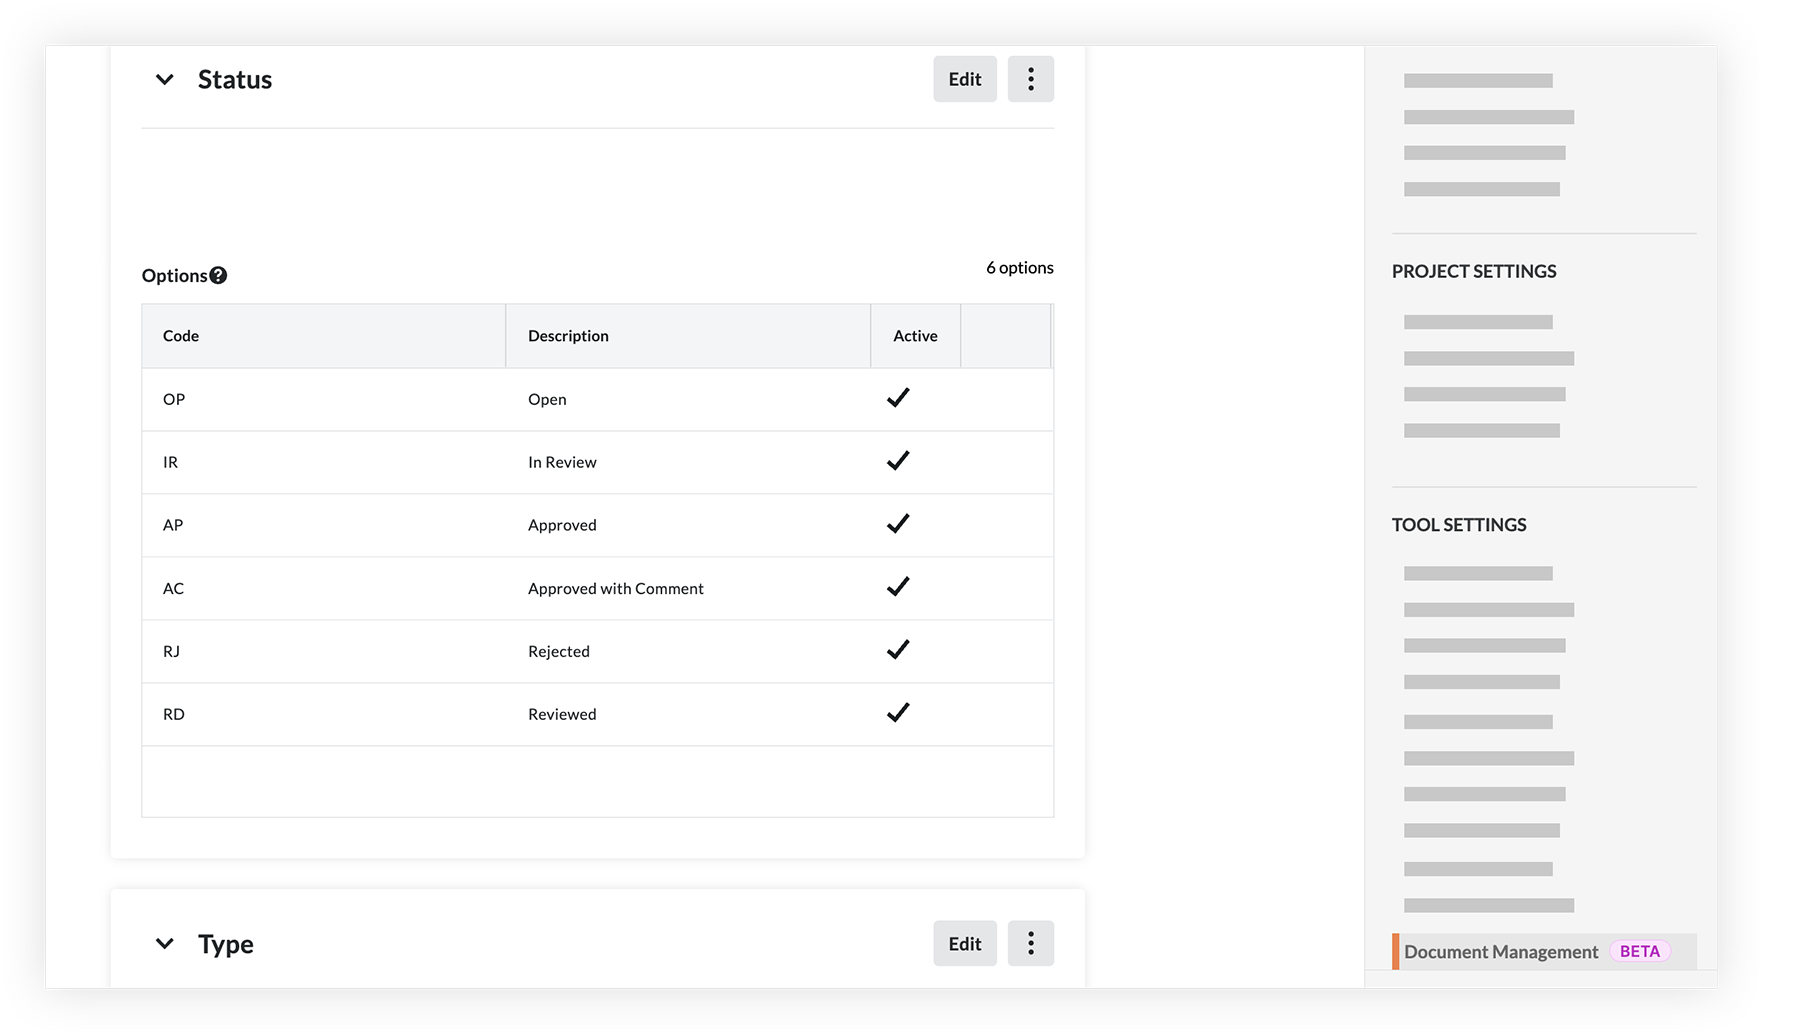
You can configure default field options for the following Document Management fields:
- Classification
- Discipline
- Status
- Type
- Volume / System
Note
Most fields have a code that can automatically populate at the beginning of the field. The code is based on the naming standard. For example, a Drawing Type document would populate with 'DR' in the Type field. As information is entered, the codes are automatically sequenced together to create a new Name field for the document.
You'll set up your document naming standard in the 'Naming Standard' section of this guide.
Show or Hide Field Options Within a Project
You can choose to show or hide field options for single-select dropdown fields (such as Status, Type and Discipline) at the Project level on the Document Management tool's Configure Settings page.


Additional Fields in Procore
The following fields are used for the Document Management tool but are configured in other areas of Procore (shown on the 'Set it Up' page for Document Fields):
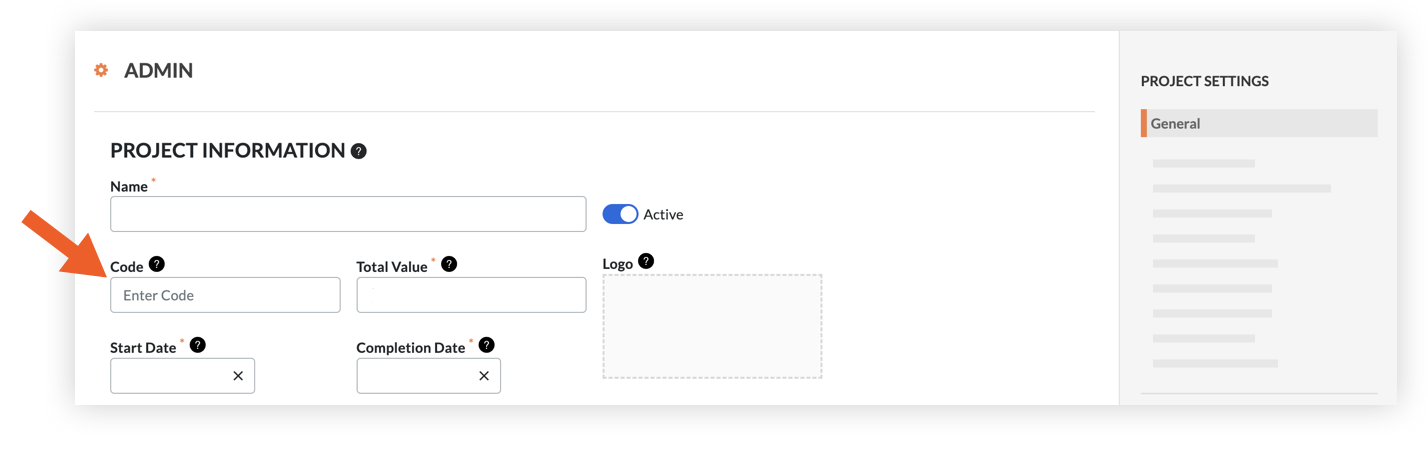
- Project: The Project Code should be an abbreviation of the project's name, such as 'VTX' for Vortex Business Centre. The 'Code' field in the Project level Admin tool populates the 'Project' field for documents.
- Originator: Field signifying who a document originated from. For example, A person associated with 'ABC Company' in the Directory uploads a document, so 'ABC Company' should be selected for the Originator field. The 'Abbreviated Name' field for companies in the Company or Project level Directory tool show as options for the 'Originator' field.
- Location: This field represents the location associated with a document. Locations added in the Project level Admin tool show as options for the 'Location' field for documents.
- Stage: This field represents the phase of construction that a document was created for. 'Project Stages' on the 'Defaults' page of the Company level Admin tool show as options for the 'Stage' field for documents.
Best Practices
Before setting up document fields for the Document Management tool, consider the following:
- Which fields matter for your document management needs?
- Should field requirements vary by project or are they consistent across your entire company?
- For required fields (like 'Status' and 'Type'), what values should be available for them?
- What "codes" should be associated with each field value (like 'DR' for Drawing) so that they are recognizable in your document naming standard?
Next Lesson: Document Fields - Set it Up
Set it Up
Now that you've learned about document fields in the Document Management tool, you're ready to complete the following actions in Procore:
Video
1. Create custom fields
In the Company level Admin tool, consider creating custom fields for your project. Depending on the field type selected, you can add a custom field to fieldsets, the naming standard, upload requirements, permission groups or column configuration in search results and data exports.
![]() VIEW THE STEPS
VIEW THE STEPS
2. Create Configurable Fieldsets
In the Company level Admin tool, create a new configurable fieldset for the Document Management tool that you'll apply to your project. This allows you to set which fields should be required on documents across all of your projects.
Note: You can add new custom fields to the fieldsets and hide fields you don’t plan to use.

3. Edit Default Fields
In the Company level Admin tool, decide which values you want available for document fields like status, document type and document discipline. These field options will apply to all files in the Document Management tool across your company's projects.
4. Optional: Review Field Options for a Project
Document Management tool Admins have the option to hide certain field values within individual projects. To do this, go to the Document Management tool's Configure Settings in a project, review options for fields and hide any that you don't want available for selection.
5. Set Up Additional Procore Fields
Depending on requirements for your projects, there may be a few additional fields you want to set up before you get started. If you plan to use a document naming standard, the Project code and Originator code are especially important.
Project Code
Enter a code for the project in the 'Code' field of the Project level Admin tool. This will be used in the 'Project' field for documents.
![]() VIEW THE STEPS
VIEW THE STEPS
Originator Code ('Abbreviated Name' Field)
In the Project or Company level Directory tool, add 'Abbreviated Name' codes for any company that project documents could originate from. These abbreviated company names will be available to select for the 'Originator' field. 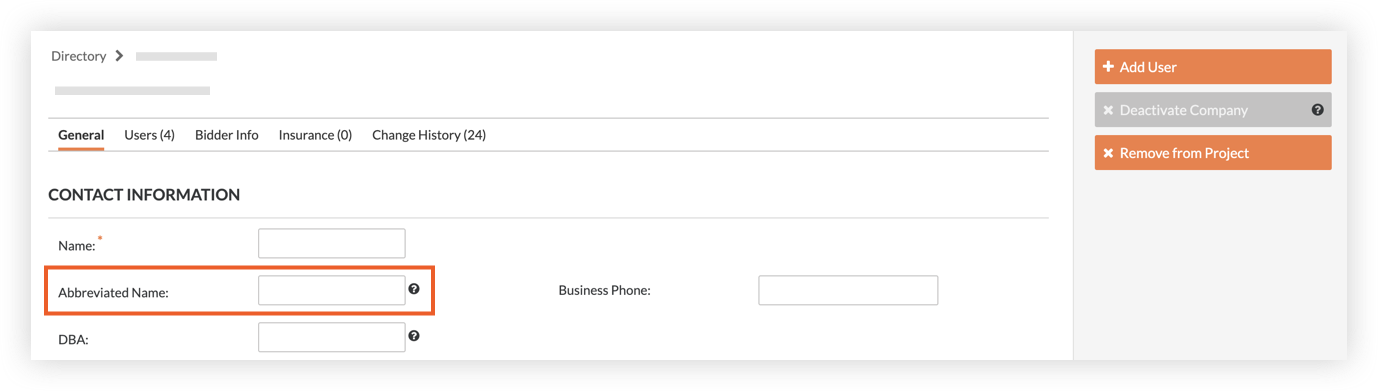
![]() VIEW THE STEPS
VIEW THE STEPS
Location Code
On the Locations page of the Project level Admin tool, add or manage locations and codes for the project as needed. These will show as options for the 'Location' field.
Make sure to:
- Select the 'Include optional code' setting.
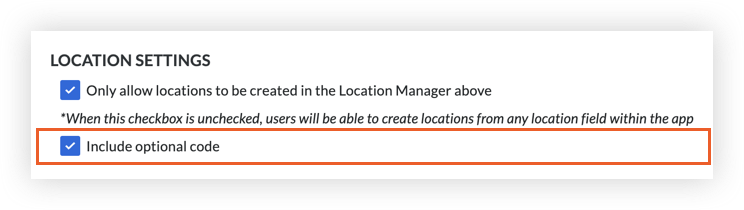
- Add a code for each location.

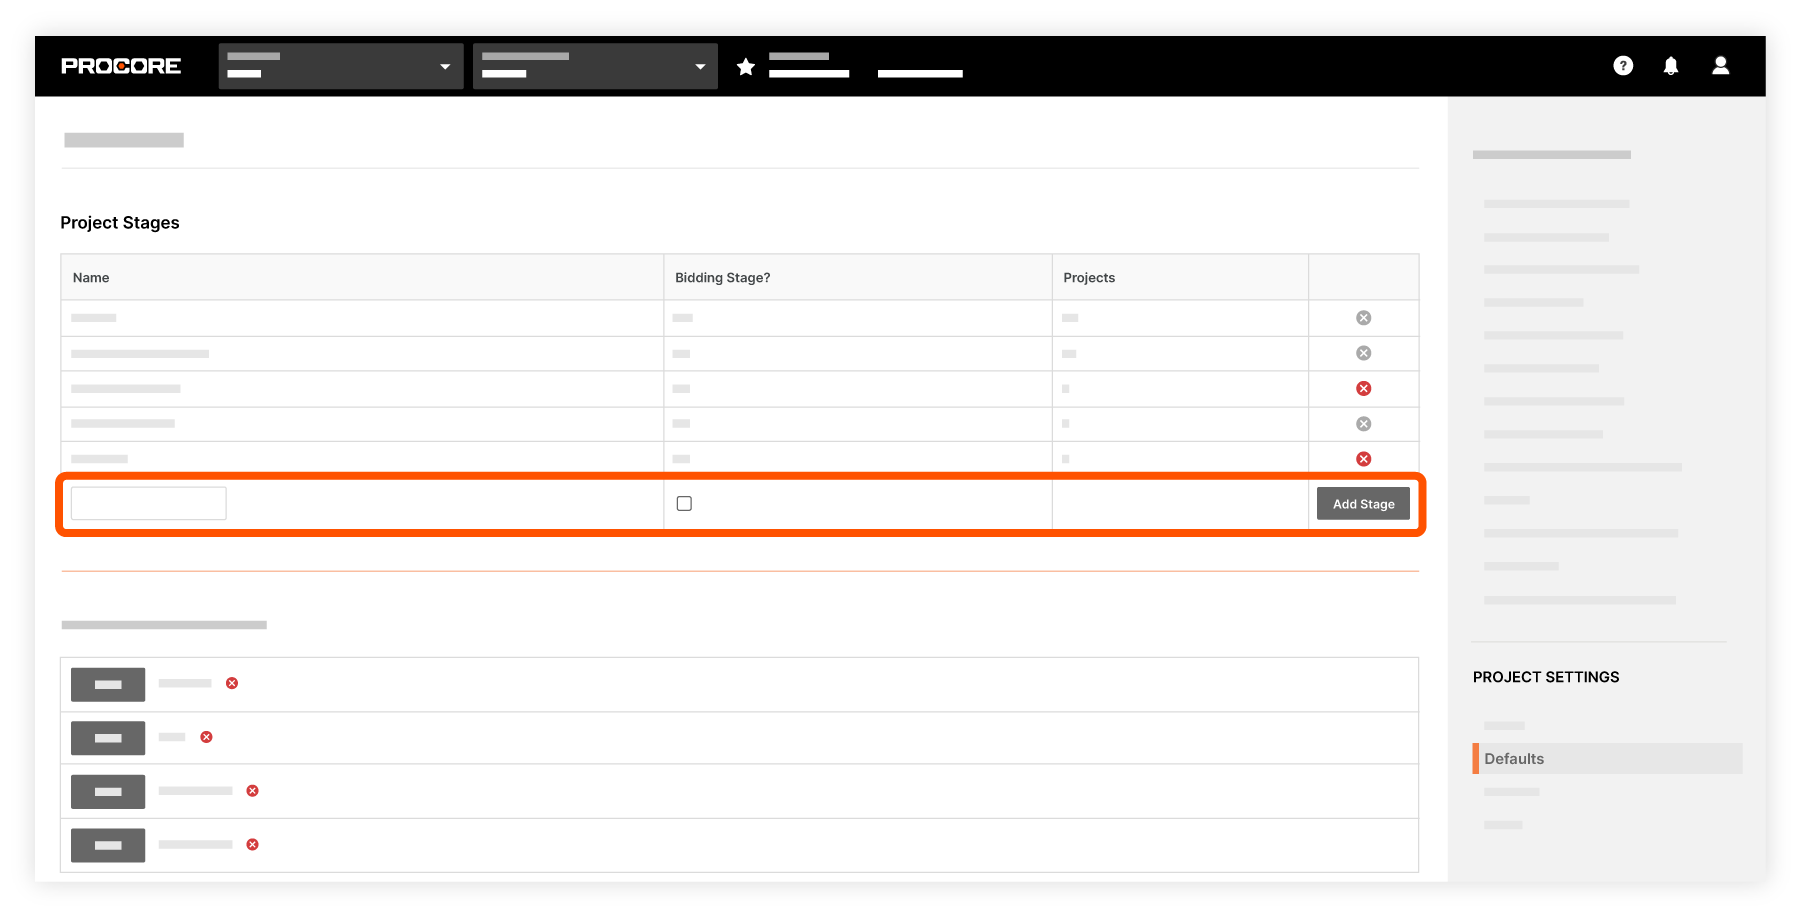
Stage Code
On the 'Defaults' page of the Company level Admin tool, review the 'Project Stages' section and add or remove stages as needed. These stages will show as options for the 'Stage' field.
![]() VIEW THE STEPS
VIEW THE STEPS
Overview
Background
Your team will easily know each document's author and purpose due to the consistent document naming standards across all your projects. Procore's Document Management tool uses each revision's attributes to automatically enforce naming standards and auto-populate metadata (attributes), simplifying the upload process. It determines whether an upload should be associated with previous revisions or become an entirely new document.
How it Works
The Document Management tool can use document attribute codes to enforce a document naming standard. When new revisions are uploaded with an identical name and format as what already exists, the system stacks those revisions together into a single document container with a unique name. This reduces the risk of file duplication and keeps everyone working with the latest information.

On the Configure Settings page for the Document Management tool, you can add or remove fields and rearrange them to create a customised naming standard that can be used for some or all of the documents on your project.
Important
Since the Document Management tool uses the document name and format (e.g. PDF) to automatically identify subsequent revisions, it’s important that your naming standards contain the full set of fields that uniquely identify a document container, but not each independent revision within it.
If you want revisions of the same document to be tracked within a single document container, your naming standard should NOT include revision-specific fields such as status, revision code, author or dates of any kind.
Best Practices
It’s important to set the structure of your document naming standard as early as possible on a new project. This avoids inconsistencies and refactoring down the road.
Before you set up the naming standard for the Document Management tool, consider the following:
- Which types of documents need a naming standard enforced?
- What combination and ordering of information in the name would help your team best understand the purpose of a document, especially in scenarios when they find the document without additional context?
- What combination of information in the name would ensure that individual documents are uniquely identified and do not accidentally overlap?
- For example, you might decide that on a less complex project only your drawings and technical submissions need to be named as Project-Type-Discipline-Number (e.g. ABC-DR-A-101 or ABC-TS-C-202), while all other documents, like reports or trackers, can retain their original file name.
Example
Imagine you're managing a project called "Duke Hospital (DH)" located in London, UK and your project adheres to ISO 19650 standards. You've established this structured naming convention for your drawings:
Project - Originator - Volume/System - Location - Type - Discipline - Number.
Let's consider an architectural drawing for the fourth floor with the volume/system designation "ZZ" and numbered as "401." This drawing has been issued by John Moore & Associates (JMA), the architect of the project.
In accordance with your naming convention, the file for this drawing would be labelled as follows: DH-JMA-ZZ-04-DR-A-401
If you had this naming standard set up in the Document Management tool, the system would require each of these fields on upload and then generate the name of the document for you. In addition, if this document was uploaded to the system with that name already intact, all of these document fields would be tagged to the revision automatically, without any manual effort.
This systematic naming approach ensures clarity and consistency, making it easy to identify and organise project documents, even in complex projects like Duke Hospital.
Next Lesson: Naming Standard - Set it Up
Set it Up
Now that you've learned about naming standards within the Document Management tool, you're ready to complete the following action in Procore:
ACTION ITEMS
Edit the Naming Standard
In the 'Upload Requirements' section of the Configure Settings page, review the 'Procore Default' naming standard and make changes as necessary.
Video
Note: In the next section of this guide, you'll decide which document types to associate with this naming standard.
Next Lesson: Upload Requirements - Overview
Overview
Background
As explained in previous lessons, the Document Management tool uses document attributes to control user permissions to individual revisions, generate a naming standard and organise your documents for easy retrieval. So if uploaded documents do not have enough attributes, there's a big risk you won't easily find them later. That's why it's incredibly important to set which fields are required before any files are uploaded. In addition, these upload requirements can be customised per document type and can specify whether a naming standard needs to be enforced.
Important
The Name, Type, Status and Revision fields are always required for every document.How it Works
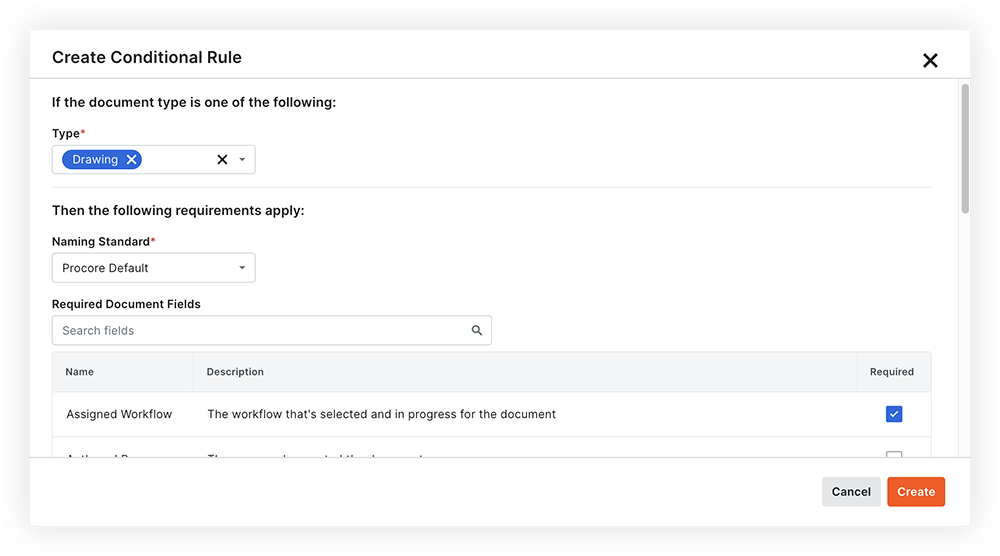
In the 'Upload Requirements' section of the tool's Configure Settings page, you can set a default rule that all documents must follow. You can also create conditional rules that override default rules and only apply to certain document types.
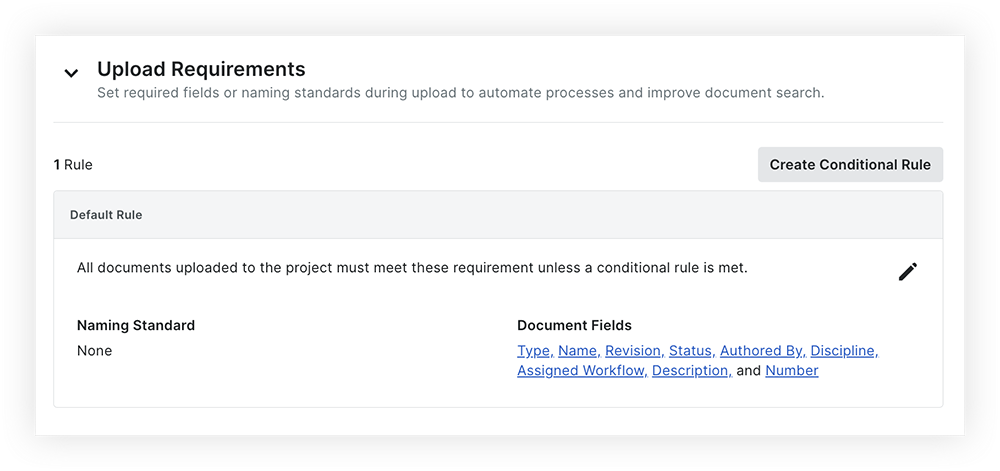
These rules determine which metadata fields must be filled in for uploaded documents as well as whether your project naming standard is enforced.
Best Practices
Before you set up upload requirements for the Document Management tool, consider the following:
- What attribute and naming requirements should exist on every revision uploaded to the system, regardless of its type?
- What requirements should vary based on the document type?
Note: You can only have one naming standard for the entire project, but you can decide whether to enforce it or not for each document type. - Will your project allow duplicate revision identifiers? By default the Revision field is set as an editable field while the Version field is always a non-editable unique identifier. Having the option to manually edit the Revision field to match a previous upload's Revision number allows users to upload a file that has minor edits without considering it a whole new Revision. However, Admins can require Revisions to be unique for certain document types, if preferred.
Next Lesson: Upload Requirements - Set it Up
Set it Up
Now that you've learned about upload requirements for the Document Management tool, you're ready to complete the following actions in Procore:
ACTION ITEMS
Video
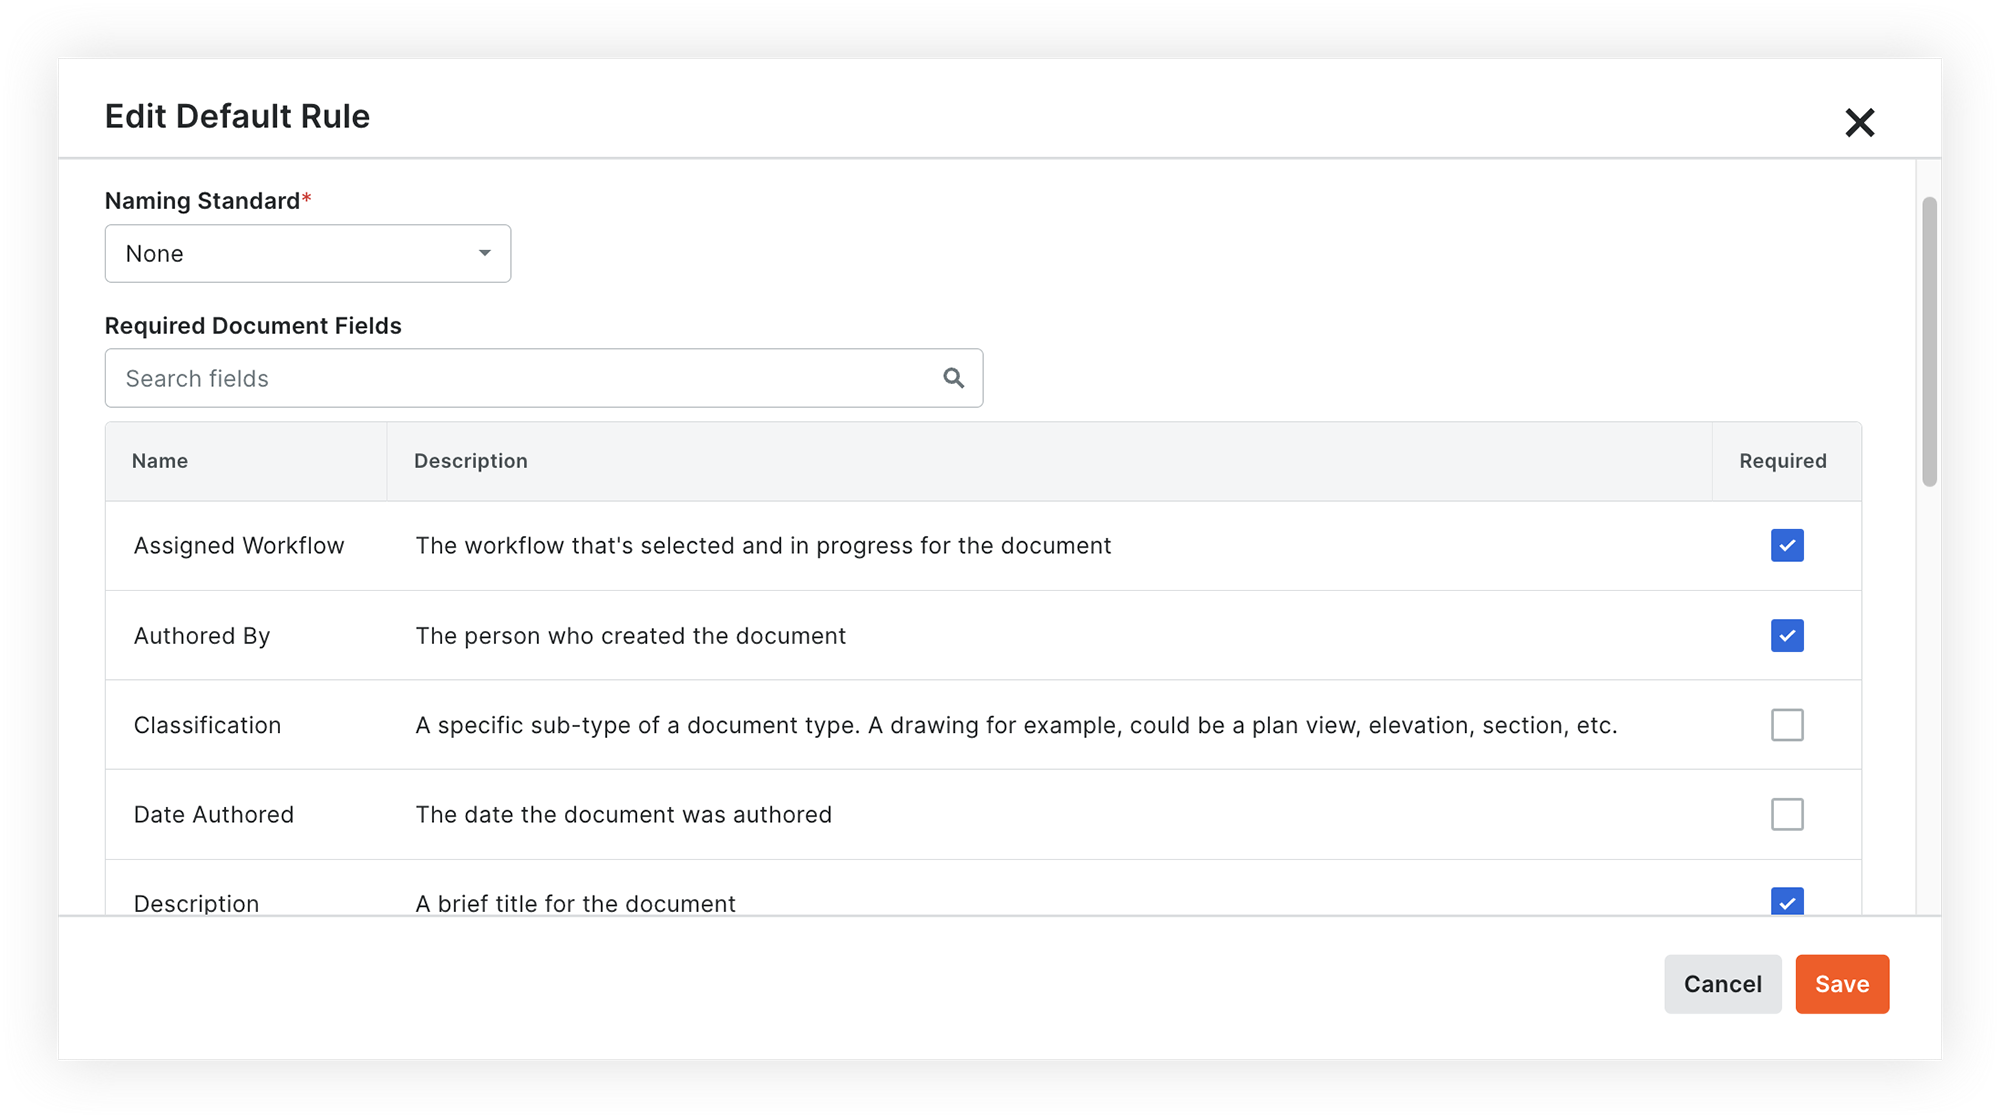
1. Edit the Default rule
In the 'Upload Requirements' section of the Configure Settings page, review the default rule and make changes as necessary. You can choose whether the naming standard should be enforced, select the fields that will be required for uploaded documents and decide if duplicate revision identifiers are allowed.
Note: The Status, Type, Revision and Name fields are always required as well as any other fields you decided to require within your company’s fieldset for the Document Management tool.
2. Create Conditional Rules
If certain types of documents need different requirements than the default rule, create one or more conditional rules in the 'Upload Requirements' section of the Configure Settings page. For example, choose different required fields or decide not to enforce the naming standard.
Next Lesson: Document Permissions - Overview
Overview
Background
A single construction document can have tens of revisions and hundreds of minor version updates throughout its life. Each of those revisions is suitable for a different stage, purpose and audience on the job. On many projects these revisions are scattered across different folders that require manual permissions management. However, with Procore's Document Management tool, you can automatically control permissions on each individual document revision within a “container.” The tool can use that revision's attributes, such as status, stage, type or discipline to automatically determine permissions.
How it Works
The Document Management tool uses two permission levels: General Procore tool permissions to grant access to the tool itself and flexible permission groups to grant access to individual document revisions based on their attributes.
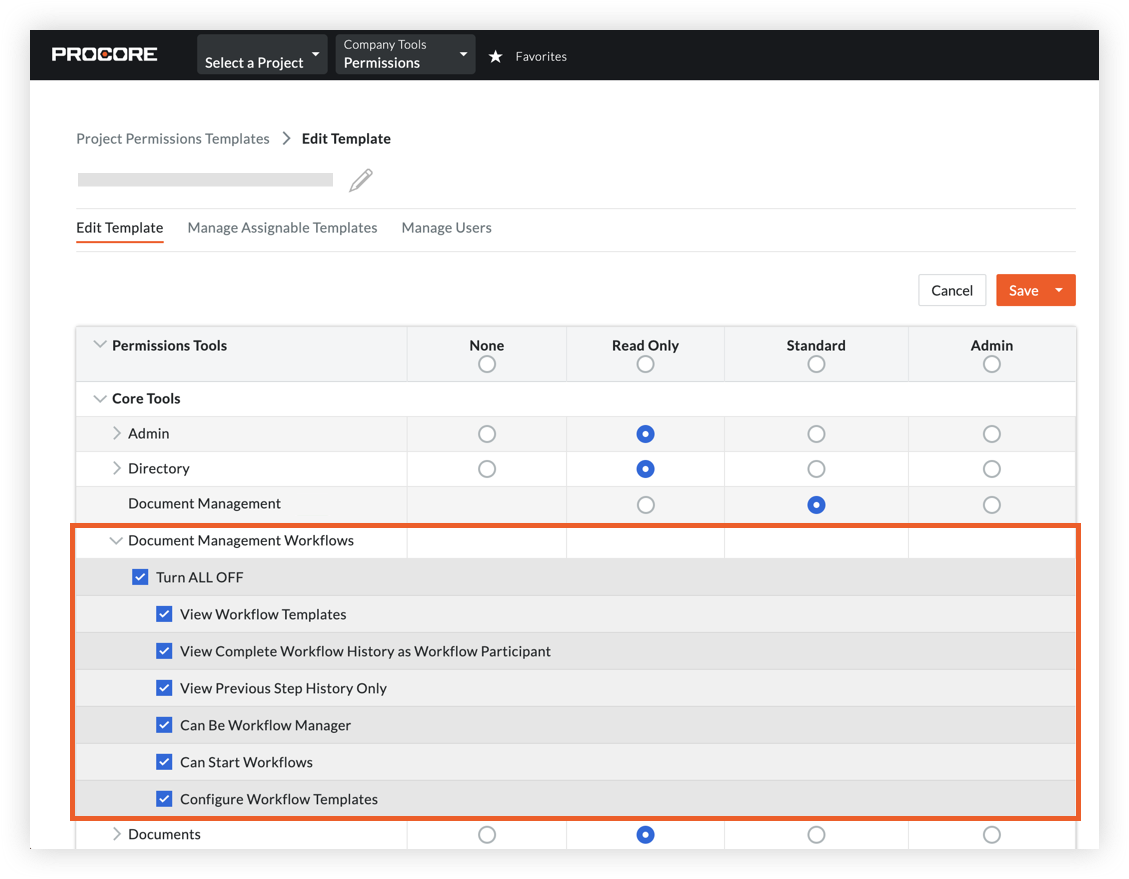
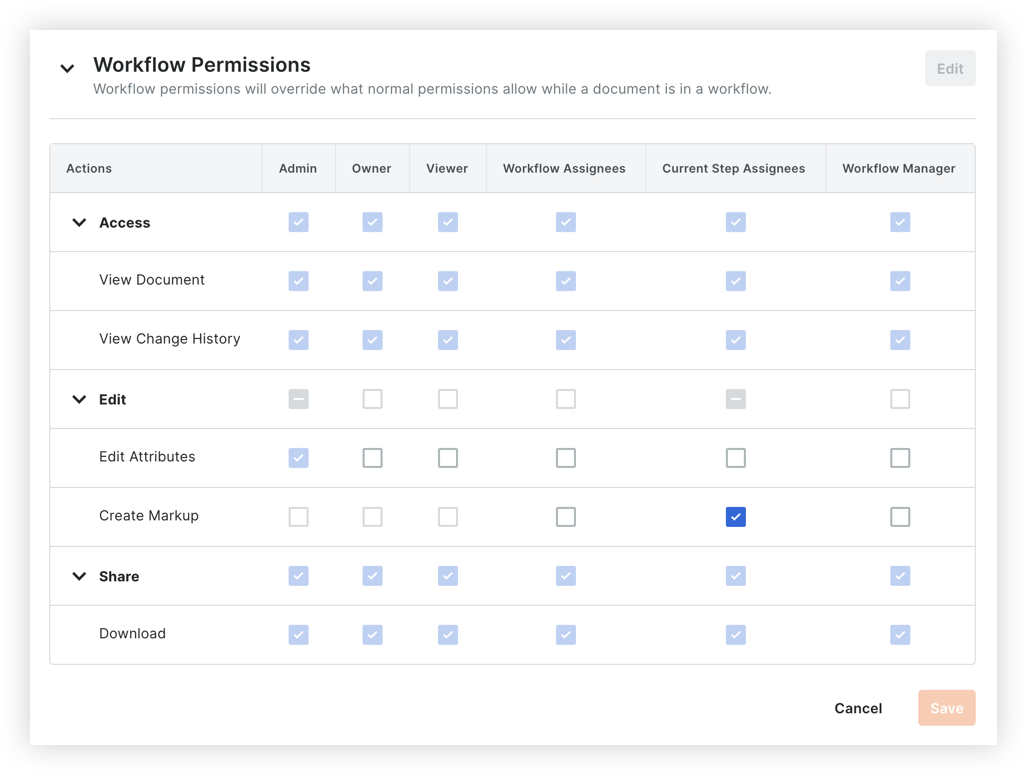
Permission groups can be created for different user roles or companies on the project and you can set specific rules to automatically control which document revisions these groups have access to and at what level they should have access (e.g. Viewer, Owner or Admin). Permissions can be further customised on the Permissions tab of the Configure Settings page and within permission templates for the Workflows tool.
Video
Note
Permissions related to Workflows will be covered in the next section of this guide.Best Practices
Before you set up permissions for the Document Management tool, consider the following:
- What are the distinct set of user roles on your projects that need different levels of access to project documents?
- What should these groups be able to access and which document fields are necessary to determine this access?
- For example, you might consider providing your project managers and document controllers with 'Admin' access to every document revision in the system, but only give your site team 'Viewer' access to approved project drawings.
- Who should be able to change the settings within the document management tool itself?
Example
Paul is a member of a document control team. He's assigning permissions for the following individuals at his company:
- Jake, another document controller at his company.
- Sarah, the project manager at his company.
- Matt, who serves as a foreman for the concrete subcontractor.
In the project's Directory tool, Paul chooses from 'Admin' or 'Standard' level permissions to assign to users for the Document Management tool:
- Paul assigns Jake and himself 'Admin' level permissions.
This grants them both full control over the tool and the ability to initiate and oversee document workflows. - Paul assigns Matt and Sarah 'Standard' level permissions.
They can use the tool with standard access and participate in document approval workflows. However, they won't have the authority to change any settings within the tool itself.
To refine permissions further, Paul uses two distinct permission groups in the Document Management tool:
- Paul adds Jake, Sarah and himself to the 'Document Controller' permission group.
They will be able to upload and submit documents, streamlining the document control processes. - Paul adds Matt to a 'Concrete Subcontractor' permission group:
He will be granted 'Owner' access to any document originating from his company, regardless of document status. In addition, he will have 'Viewer' access to issued-for-construction drawings and technical submissions associated with any other discipline.
Next Lesson: Document Permissions - Set it Up
Set it Up
Now that you've learned about permissions for the Document Management tool, you're ready to complete the following actions in Procore:
ACTION ITEMS
Note: Permissions related to Workflows will be covered in the next section of this guide.
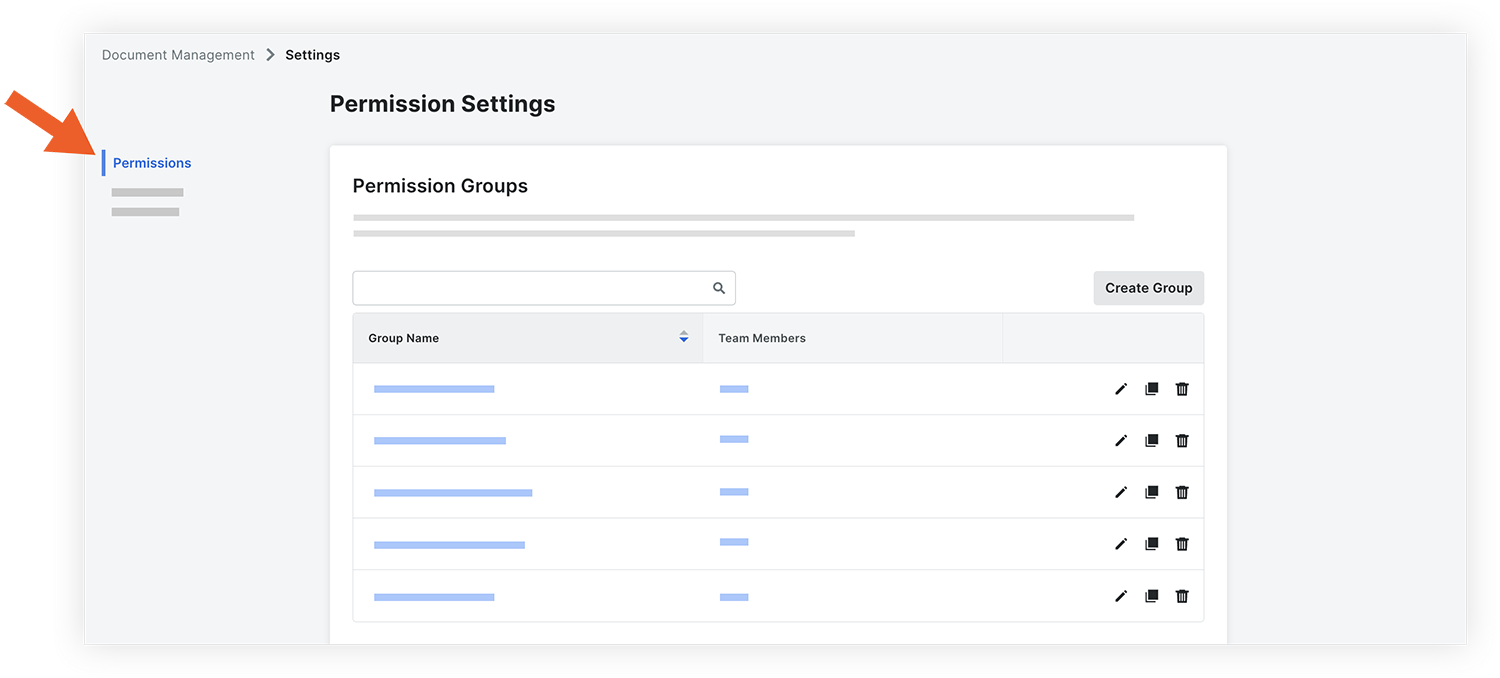
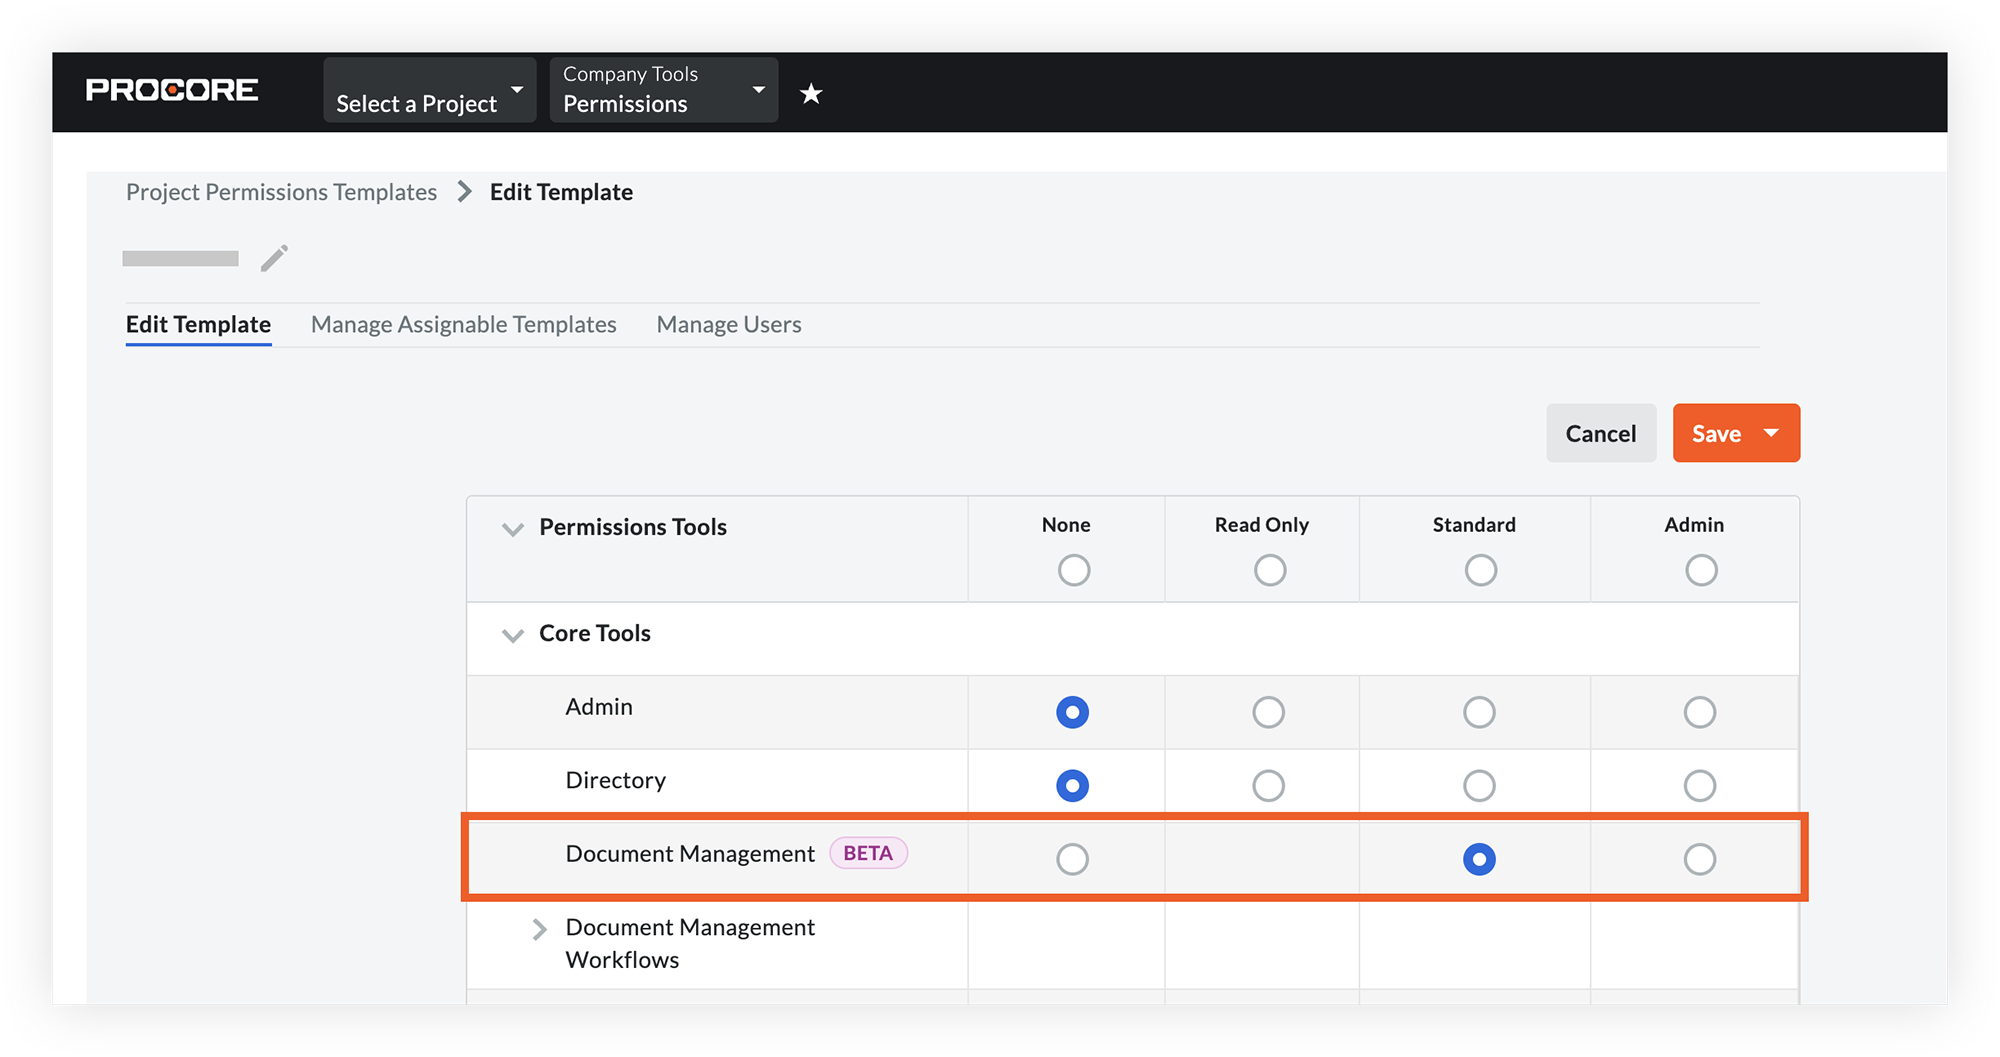
1. Assign General Tool Permissions
Assign 'Standard' or 'Admin' level permissions to the Document Management tool for people who will need access to the tool. You can assign this permission for users and groups in a project permission template in the Permissions tool or manually edit the permission for users in the Directory tool.
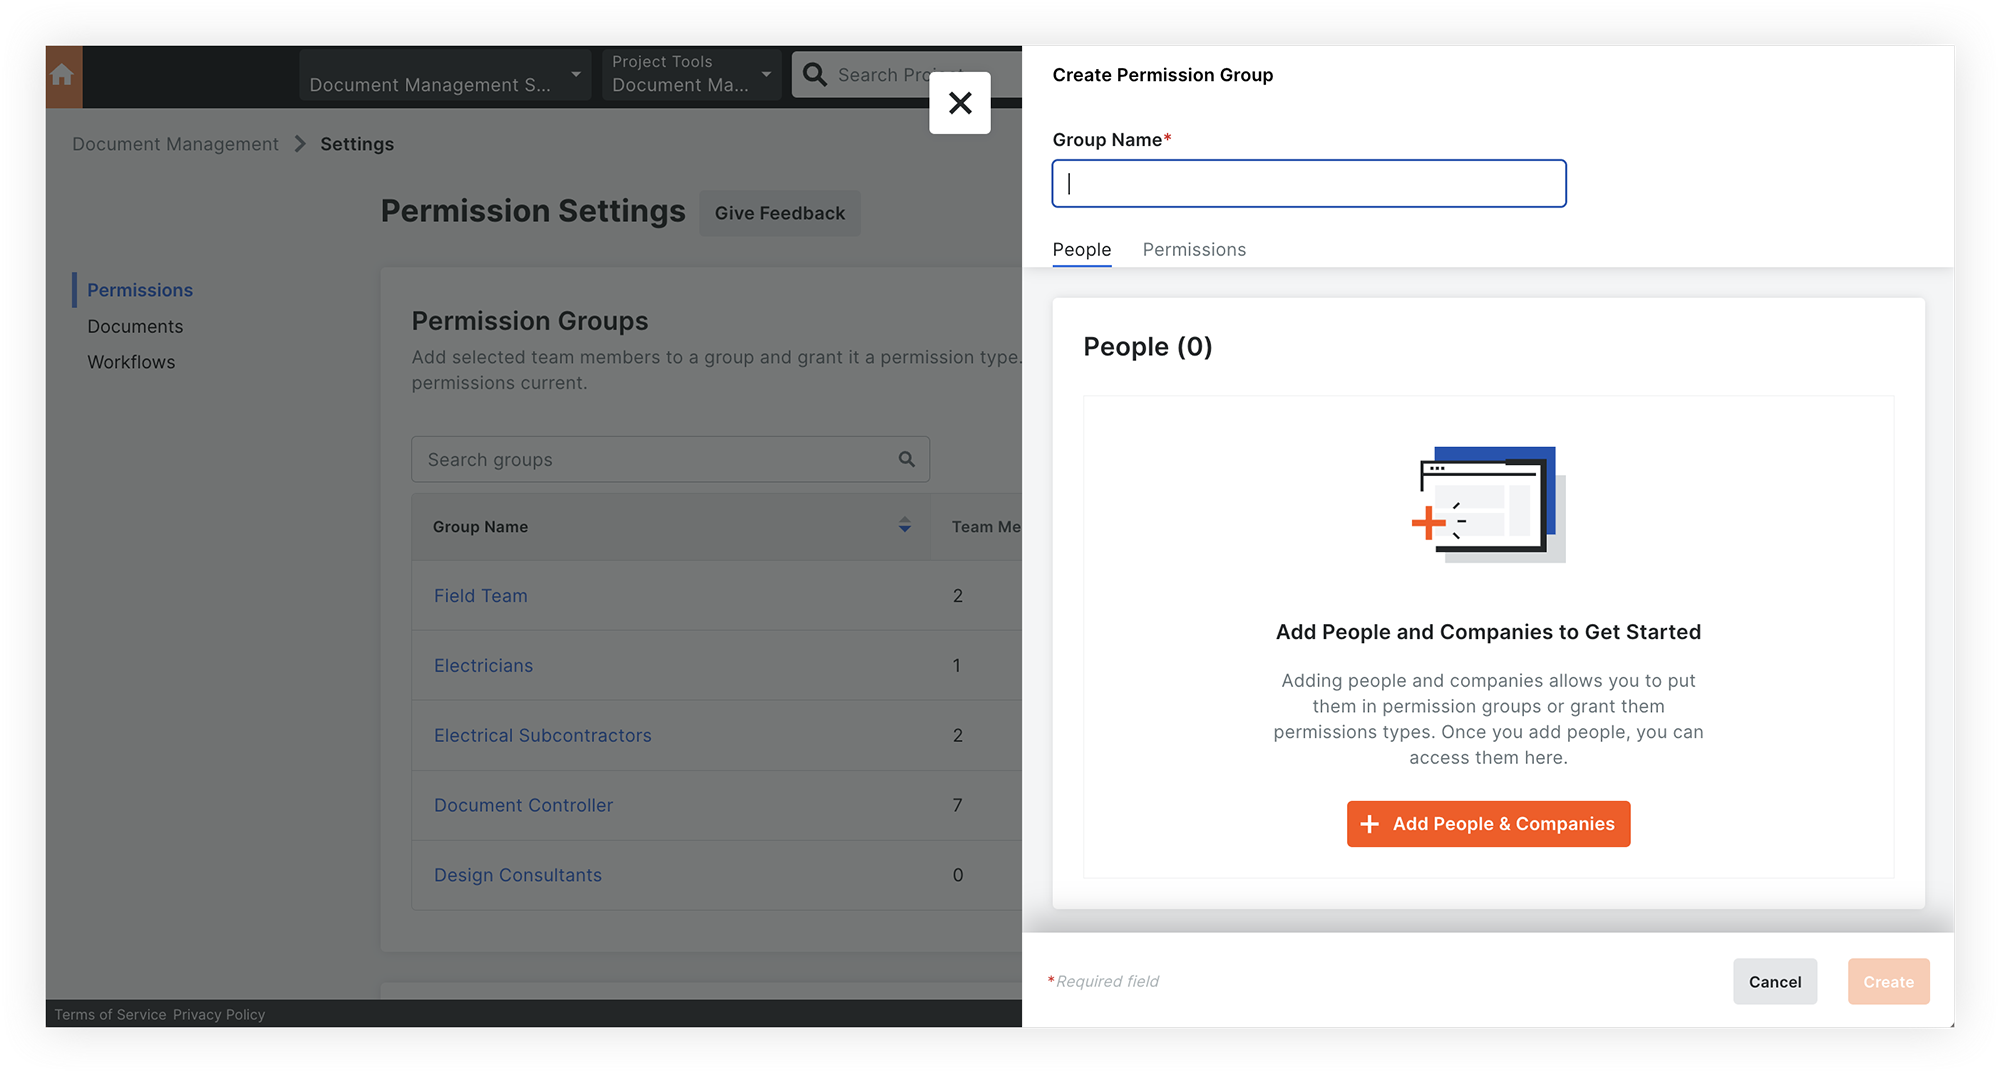
2. Create Permission Groups
Create permission groups for different permission types that you need and add people to them to automatically control their access to documents in the project.
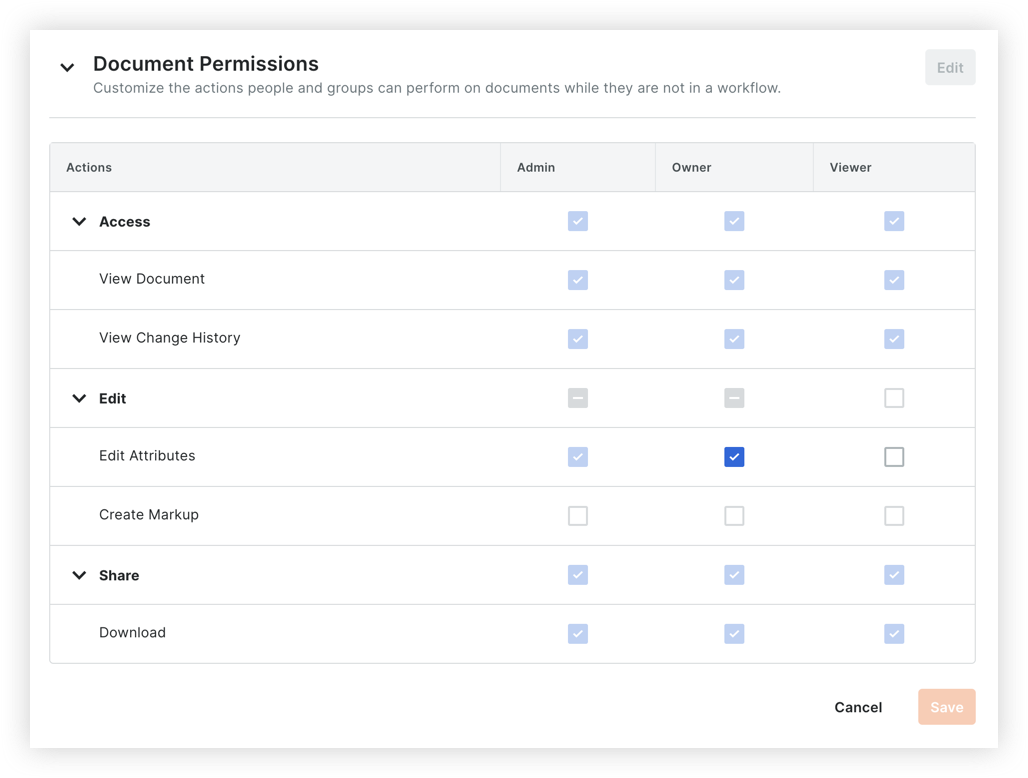
3. Manage Document Permission Levels
Further control permission to documents by specifying which actions should be available to three different levels: Viewer, Owner and Admin.
Note: This list is currently limited to controlling which levels should be able to edit document attributes, but additional customization will be introduced in the future.
Next Lesson: Document Approvals with Workflows - Overview
Overview
Background
It’s often the case that construction companies have to manually move construction documents between folders and siloed systems as their status moves from work-in-progress, to in-review, to approved. This creates a lot of overhead and leads to the potential for mistakes and rework. With Procore Document Management, you don’t need to move documents around as their status changes and access to revisions are changed automatically once an approval workflow has concluded. In addition, the workflow engine built into the Document Management tool is incredibly customisable and can suit simple and complex approval scenarios for any kind of document.
How it Works
You can create custom workflow templates that are then assigned to documents that are uploaded to the Document Management tool. Once a workflow has started, workflow participants are notified to review documents, optionally comment on them with markup and provide an approval outcome.
As a document revision gets reviewed and is either approved or rejected, the revision's status is automatically updated in Procore. This means you don't need to manually change permission settings or move revisions between folders or tools after a document is approved. When a workflow is created for a PDF document, workflow assignees can add markups directly to the PDF during their step in the workflow. After the workflow is complete, all workflow decisions, markups and additional file attachments are preserved so that they can be referenced later.
Video
Create Document Management WOrkflow Templates
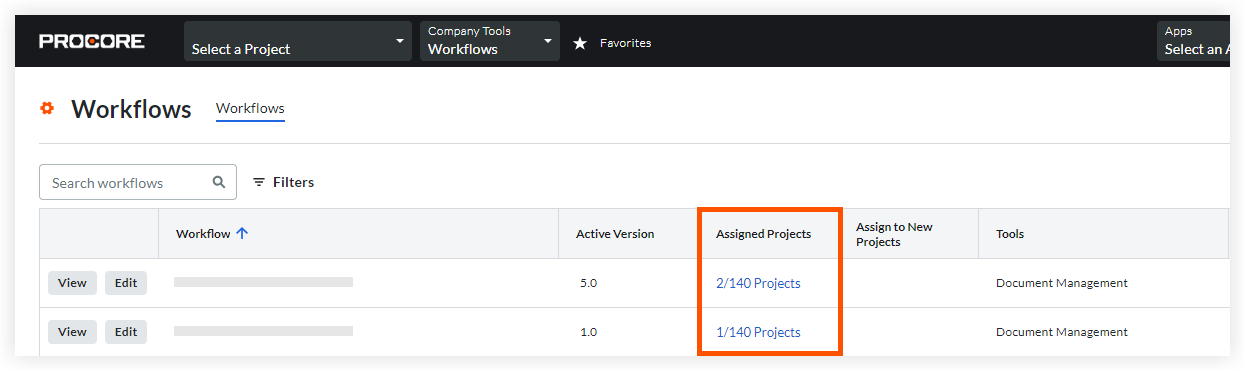
To use workflows for documents, you'll create one or more workflow templates in Procore's Workflows tool and then apply them to your projects.
After a workflow template is applied to a project, you'll need to configure it with correct assignees on the Workflows tab of the Document Management tool's Configure Settings page before it can be used.
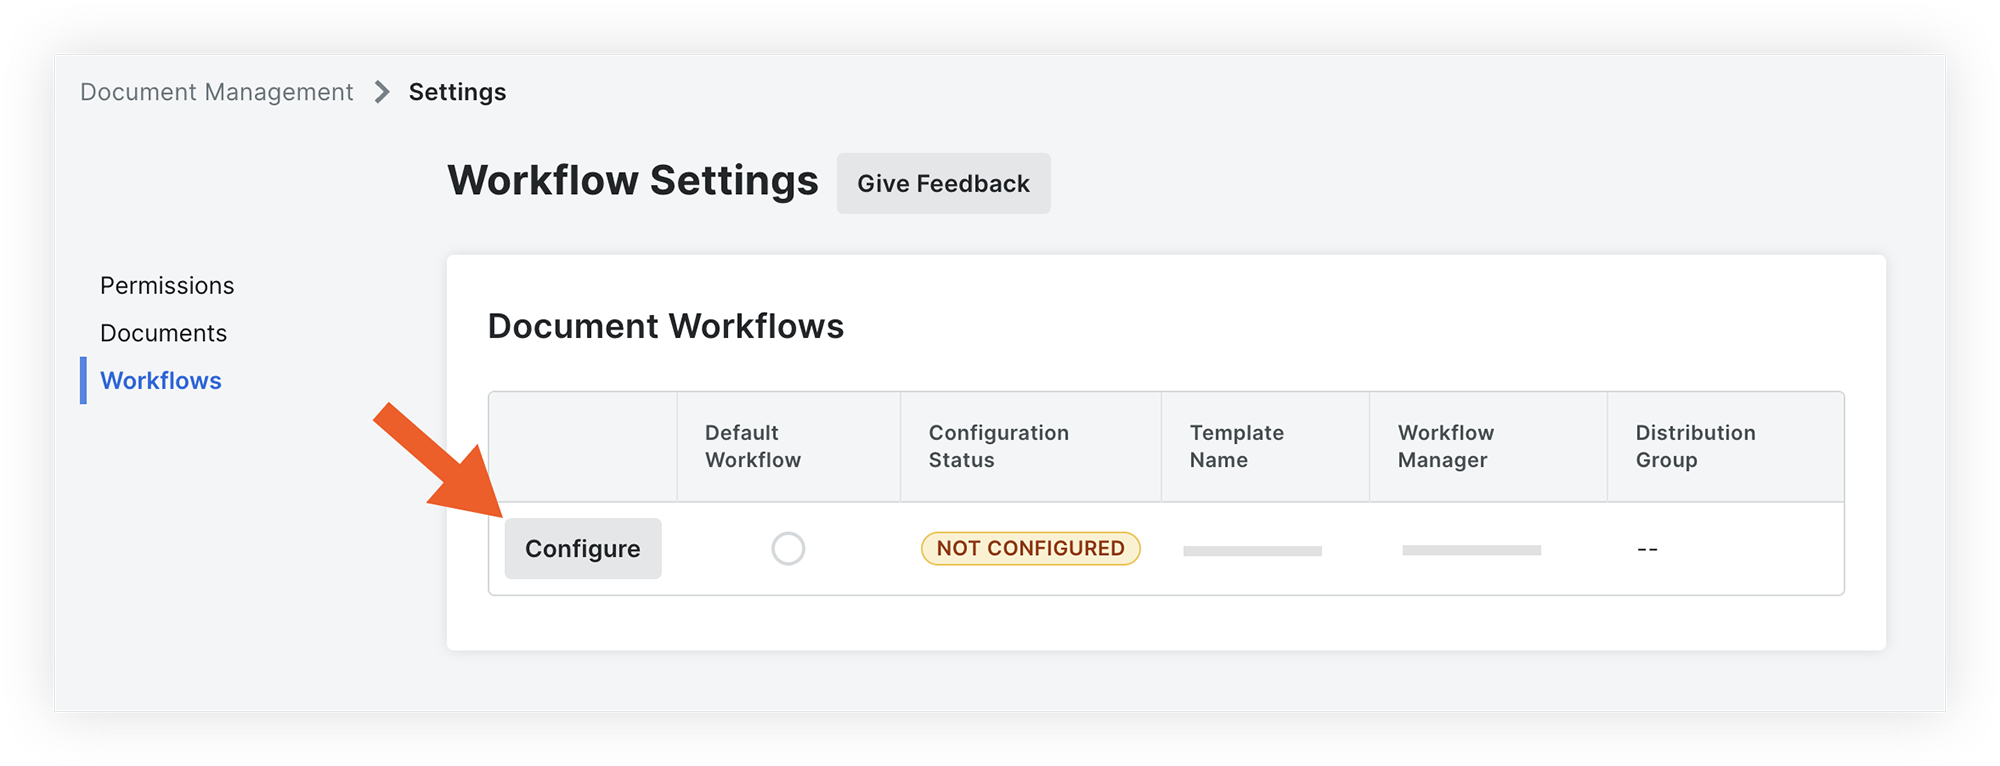
STart Workflows on Documents
After workflow templates have been configured for the project, workflows can be selected for documents in the 'Assigned Workflow' column. You can also assign a workflow to multiple documents at once using the Bulk Edit option.
Note: If you'd like to require a workflow selection for certain documents, like drawings, you can set this field as a requirement in your upload requirements.

Review and respond in a Workflow
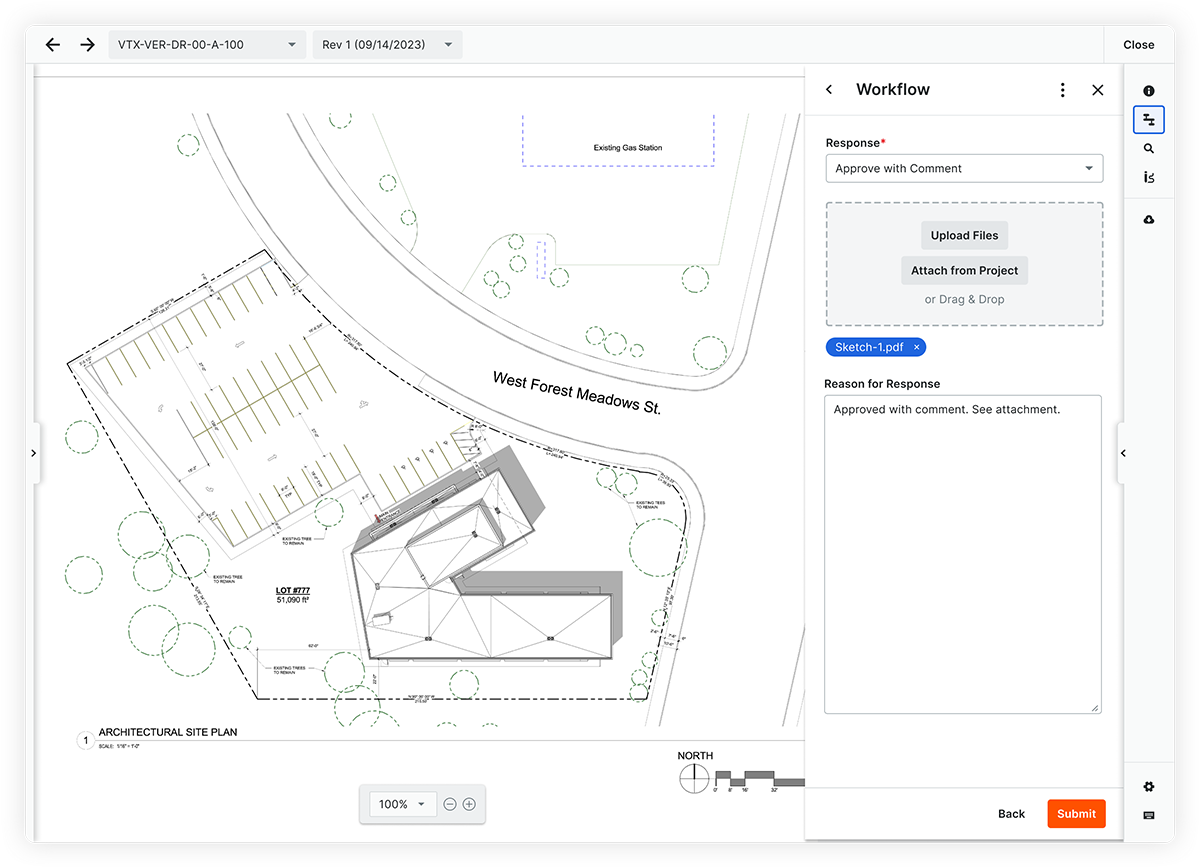
After a workflow for a document starts, a Workflow Assignee can review the document and respond in the workflow.
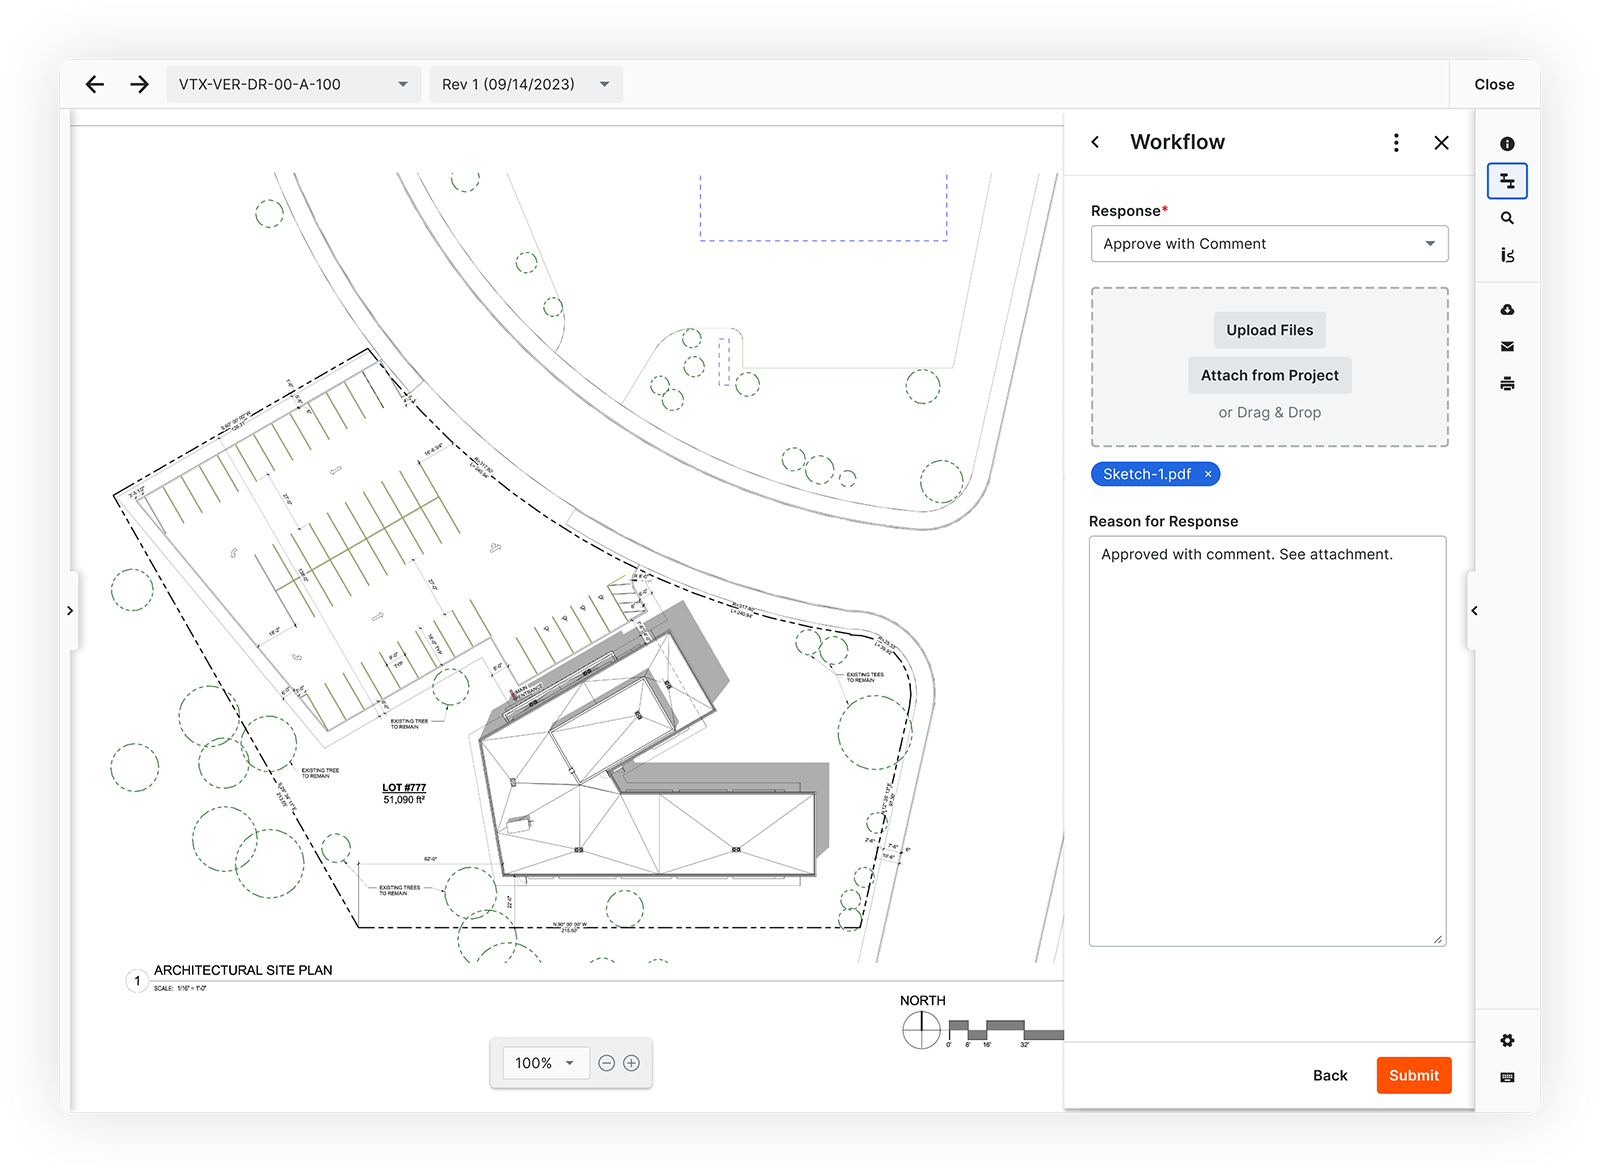
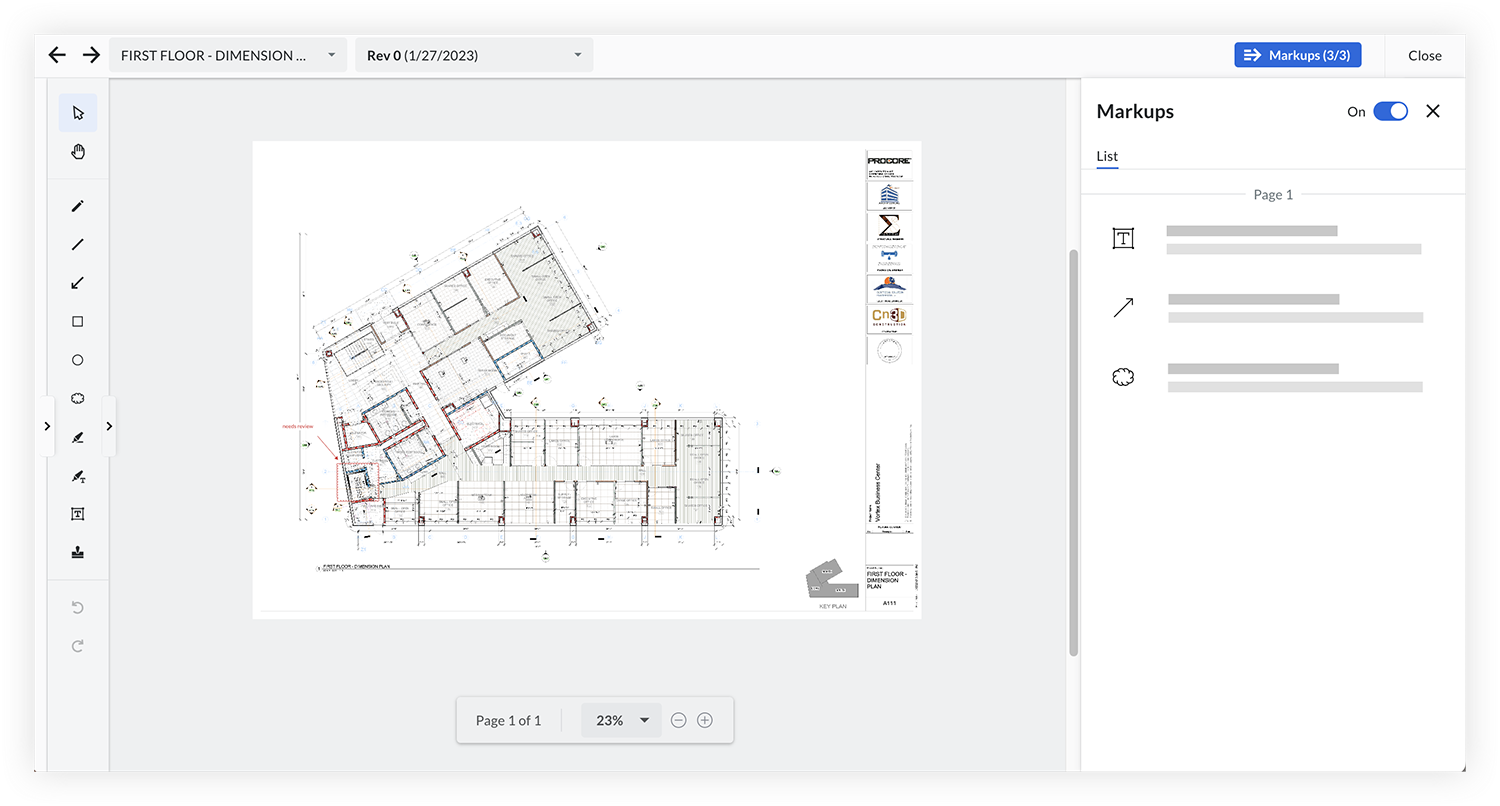
ADD MARKUPS
Workflow assignees can mark up documents as necessary as part of the response.
Best Practices
Before you set up workflow templates for the Document Management tool, consider the following:
- What document review and approval processes do you want to enforce and for which kinds of documents?
- How does the approval flow vary depending on the purpose, type or source of the document?
- What response options do you need on each step (e.g. approved, approved with comment, rejected)?
- Who should be allowed to create and configure document workflows?
- Who should be allowed to manage active document workflows (e.g. restart them or change assignees mid-flow)?
Example
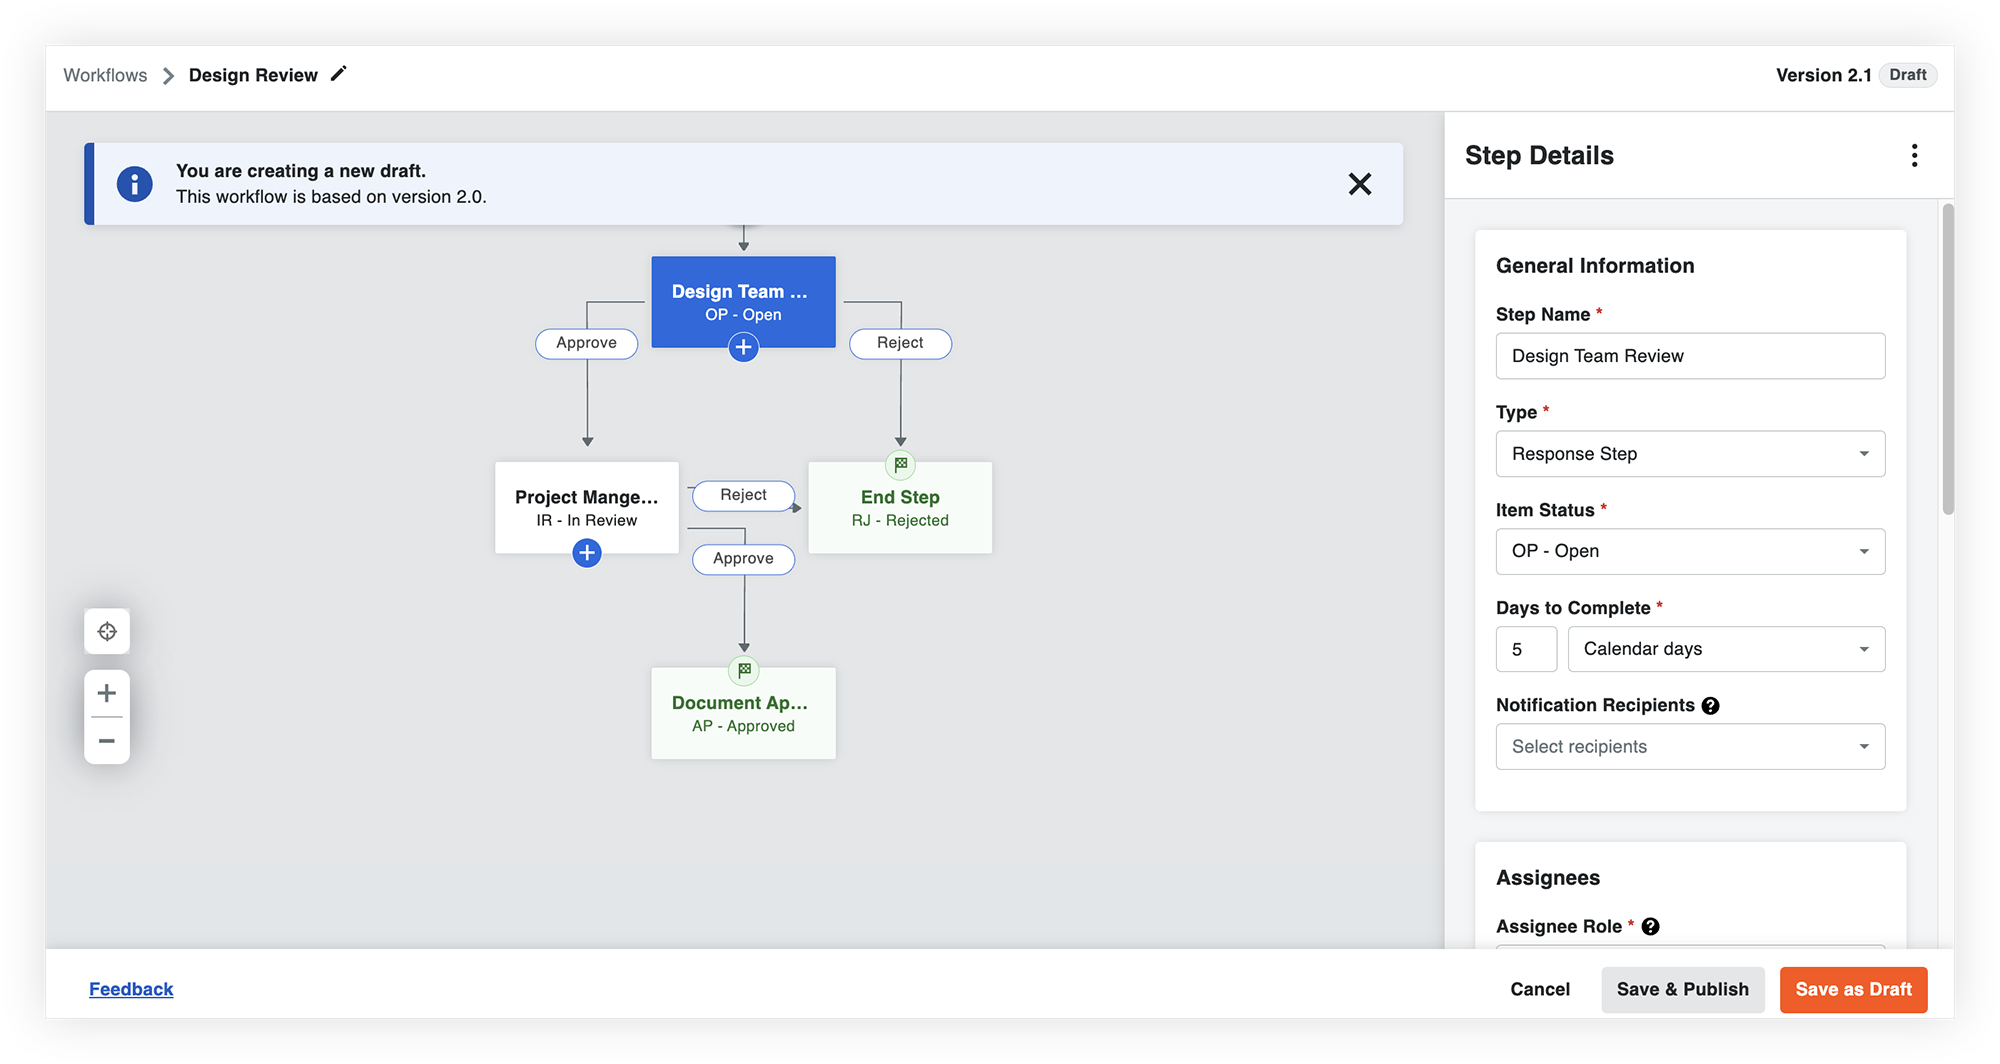
Below, you'll find an illustrative representation of a workflow for the mechanical drawing approval process. Each box corresponds to a specific step, while the arrows signify the decisions made at each juncture.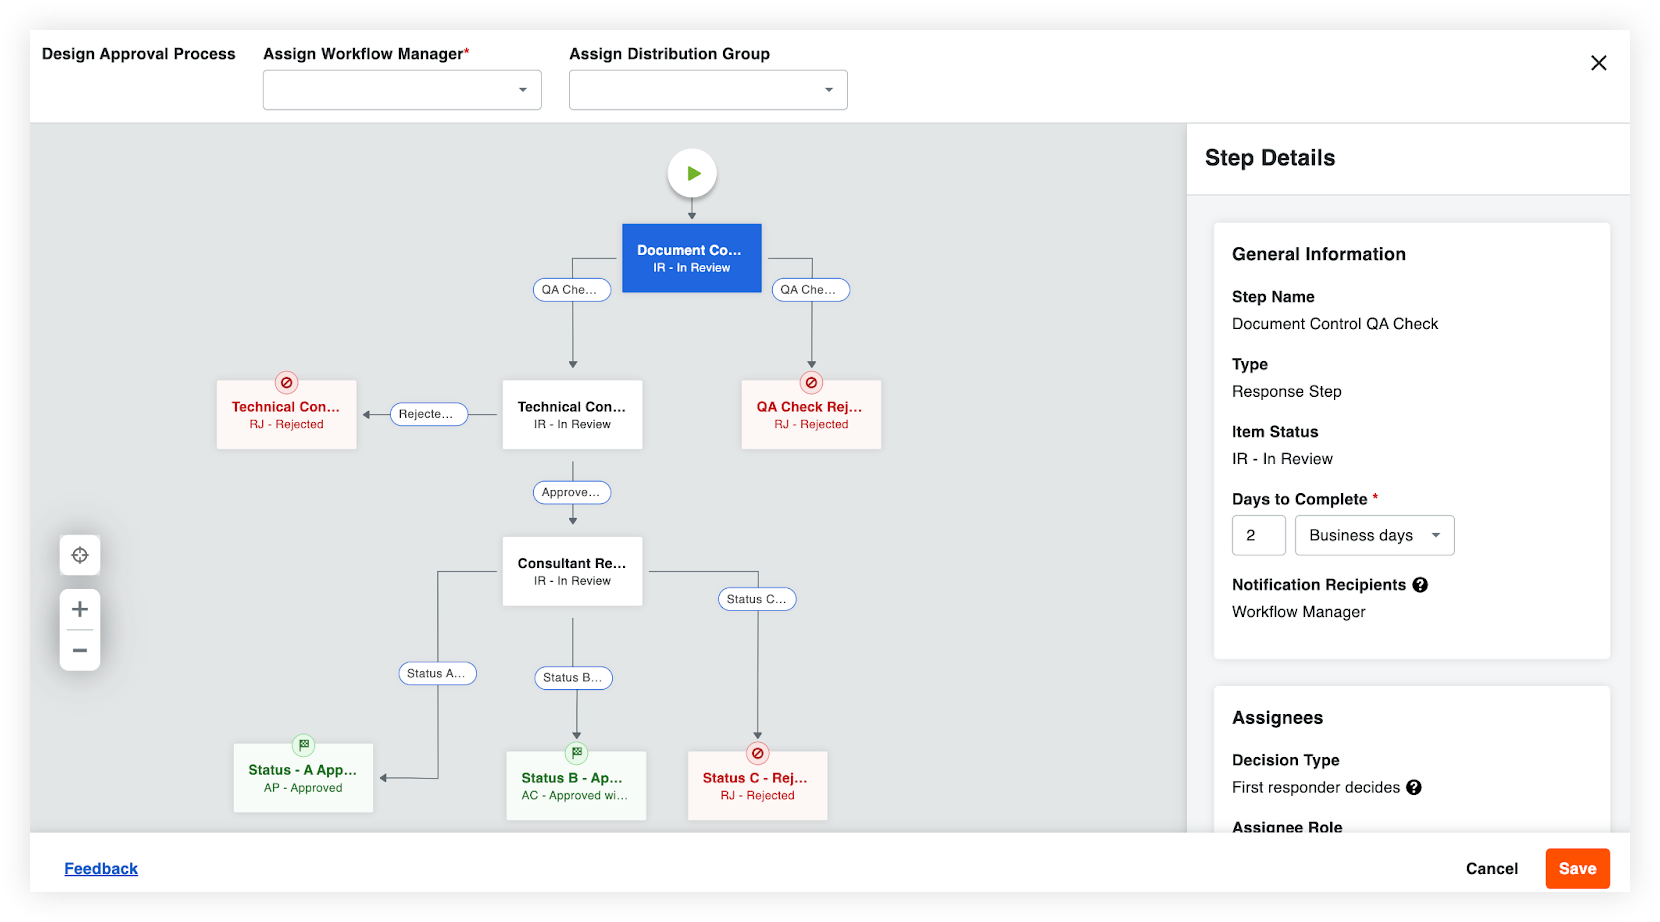
Let's consider a project where a mechanical subcontractor, M's Mechanical, submits drawings for Level 1. The initial destination for these drawings is the Document Controller, who conducts a Quality Assurance (QA) check.
- If the document receives a "Rejected" status during the QA check, it is labelled as "RJ-Rejected" and moves to the subsequent step titled "QA Check Rejected - Resubmit." In this scenario, M's Mechanical is promptly notified of the rejection and instructed to resubmit the document.
- If the document receives an "Approved" status in the QA check, it advances to the next phase, denoted as the "Technical Content Review."
- If the document receives a rejection, it proceeds to the following stage known as "Technical Content Rejected," and it is tagged as "RJ-Rejected."
- In the case of an approval within the "Technical Content Review" stage, the document progresses to the "Consultant Review."
- The outcome can be one of the following: "Approved," "Approved with Comments," or "Rejected." Depending on this decision, the document is assigned a final status of "Status A - Approved," "Status B - Approved with Comments," or "Status C - Rejected".
Note: Permission groups set in the Document Management tool determine who can view the document after its been approved.
- The outcome can be one of the following: "Approved," "Approved with Comments," or "Rejected." Depending on this decision, the document is assigned a final status of "Status A - Approved," "Status B - Approved with Comments," or "Status C - Rejected".
Next Lesson: Document Approvals with Workflows - Set it Up
Set it Up
Now that you've learned about approval workflows for the Document Management tool, you're ready to complete the following actions in Procore:
1. Assign Workflow Permissions
If you haven't already, set up permissions for Workflows.
For any users that will be part of an approval workflow, you'll need to assign granular permissions for the Workflows tool in your permission templates.
You can also customise the actions reviewers can take on documents within an active workflow, such as who should be able to mark up documents.
2. Create a Document Management Workflow Template
Next, you'll want to create workflow templates in the Company level Workflows tool.
3. Assign the Workflow to a Project
After the workflow template is created, you'll need to assign it to the projects that you want to use it on.
4. Configure a Workflow for the Project
Before being able to use workflows in the Document Management tool, you'll need to configure the workflow for the project, which involves assigning reviewers to individual steps. You can also set whether or not you'd like to use one of these templates as a default for newly uploaded documents.
5. Start a Workflow on Documents
When documents are uploaded to the project, a workflow can be assigned to documents in the 'Assigned Workflow' column. After a document is submitted, the assigned workflow will begin at the first step and reviewers will be notified.
Note: If you bulk submit documents together, reviewers will get a single email with all of the documents requiring their attention, rather than separate emails for individually submitted documents.
Next Lesson: Document Organisation with Saved Views - Overview
Overview
Background
Most document management tools use folders to keep documents organised and accessible. Folders can be problematic because each document revision actually has to exist within the folder and can’t exist within two or more folders at once. While this can work for work-in-progress documents with limited access, it becomes an issue once documents are submitted for review and then either rejected or published to a broader audience. In construction, it’s essential to maintain a single, traceable history of a construction document’s revisions and their status changes over time. If you have to manually copy or move revisions between folders meant for different purposes or audiences, you lose that traceability and risk teams operating off of outdated information.
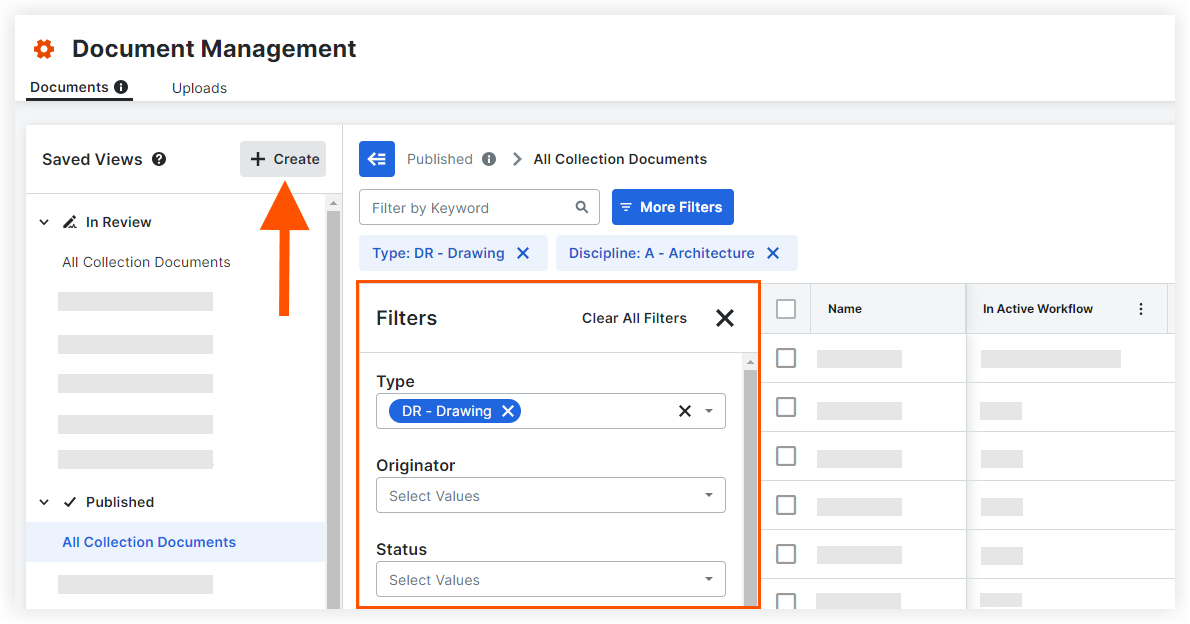
With Procore's Document Management tool, document revisions are tagged with attributes that describe them and search filters can be used to quickly find them. For example, you can use filters to find the latest approved architectural drawings or see rejected documents that originated from your company. You can save these search filters as “saved views” to make documents easier to find for you and your team, which provides the benefit of a standard project folder structure without the risks and drawbacks of file duplication.
How it Works
organisation based on Document Attributes
After document revisions have been submitted, users can access them on the Documents tab. Permission groups and rules that have been set up for the project automatically control which document revisions can be viewed by each person. The metadata associated with each document ensures that users can quickly access the documents they need and that they only see the documents they have access to.
Saved Views

Note: Admins can create saved views that everyone in the project can access and any user can create saved views for personal use.
Video
Best Practices
Before you get started configuring your saved views, consider the following:
- Do you typically use a standard folder structure for your projects? If so, you can create saved views to replicate the folder structure and efficiently control access to documents.
Note: Saved views are nested inside collections. - What type of documents do you want your team to have quick access to?
- What construction documents do you want to make available to site teams?
Example
Instead of needing to manually reorganise documents within folders, saved views are driven by filters. This means that the list of documents will update automatically.
Let's say that a document controller named Paul wants to create a saved view for Approved Electrical Drawings. Starting from the Published collection (which already filters for approved documents), Paul will select the following additional filters to create a new saved view:
- Discipline: Electrical
- Type: Drawing
Next Lesson: Document Organisation with Saved Views - Set it Up
Set it Up
Now that you've learned about how documents are organised in the Document Management tool, you're ready to complete the following action in Procore:
ACTION ITEMS
Create Saved Views
For categories an admin wants people to have quick access to, they can set the saved view's access to 'Everyone in the Project'. In addition, any user can create their own personalised views.
Note: Currently, project saved views must be created within each project individually, but in the future you'll be able to standardise saved views across multiple projects within your company.
Next Lesson: Document Distribution with Correspondence - Overview
Overview
Background
With so many ways to share documents and communications digitally, it can be difficult to keep a clear record of communications for a project. Manually attaching and emailing documents outside of Procore increases the risk of referencing outdated revisions and makes it difficult to find and refer back to communications when needed.
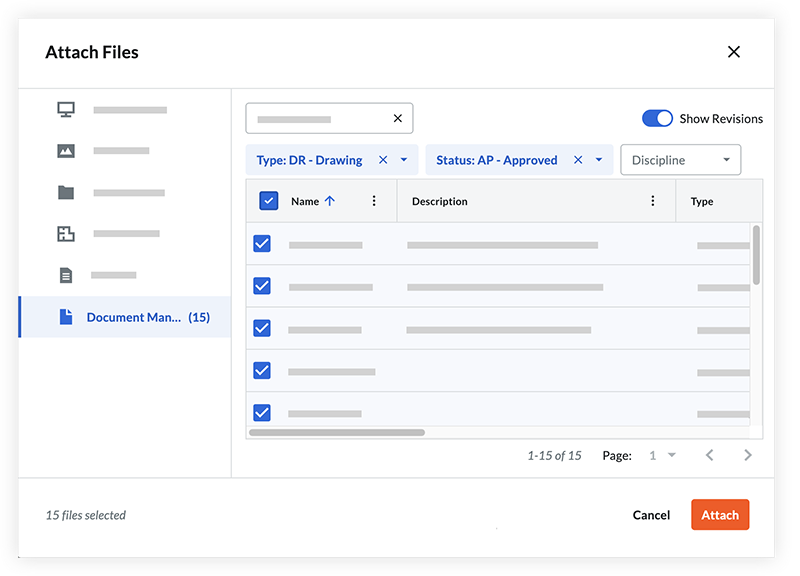
Procore's Correspondence tool serves as a central place to share project documents and maintain a formal record of communication. Document Management files can be directly attached and linked in a correspondence item from web or mobile, which provides easy access to the documents along with a clear history of communication.
How it Works
When you need to distribute or discuss anything related to your documents, you can use Procore's Correspondence tool to attach and share documents from the Document Management tool. For example, you might create a correspondence type for transmittals to share approved drawing packages.
Sharing documents through a correspondence item helps to ensure a formal system of record is kept through Procore. Attached files (not copies) are linked directly from the Document Management tool, meaning that the full history, context and permissions for documents are preserved.
Video
Best Practices
Before you configure correspondence templates for your project, consider the following:
- What types of formal communications about construction documents does your project team require and when might they need to issue them?
- Are you familiar with the Correspondence tool? If so, how are you using it today and how might that change once you start using the Document Management tool?
- Who should send and manage the communications?
- Consider the permissions that are required for the Correspondence tool: 'Standard' level permissions or higher on the item's correspondence type. OR 'Read Only' level permissions on the item's correspondence type with the 'Create Item' granular permission enabled on your permissions template.
Example
Let's consider M's Mechanical, a mechanical subcontractor who has successfully gained approval for a package of mechanical shop drawings. It's crucial for them to distribute this information to their site team. This ensures that all project members are well informed about the latest issued drawing and can work with the most current set of plans.
To accomplish this, M's Mechanical will create a new correspondence type in the Company level Admin tool for transmittals. After entering the details, they’ll assign this correspondence type to the project.
In the Correspondence tool, they’ll create a new correspondence item and select the Transmittal type. They’ll fill in the necessary information and attach the approved mechanical shop drawings.
After the correspondence has been created and issued, these newly approved drawings will be promptly distributed, via email, to every project team member who has the appropriate Document Management permissions. For example, correspondence assignees must have access to approved mechanical shop drawings to be able to access the attached documents.
Set it Up
Now that you've learned about distributing documents through the Correspondence tool, you're ready to complete the following actions in Procore:
Note:
- If you've already set up the Correspondence tool for your project in Procore, you can skip the first two action items.
- The Correspondence tool will not show in a project until at least one correspondence type has been created and a fieldset for at least one correspondence type has been applied to the project.
1. Create a Correspondence type
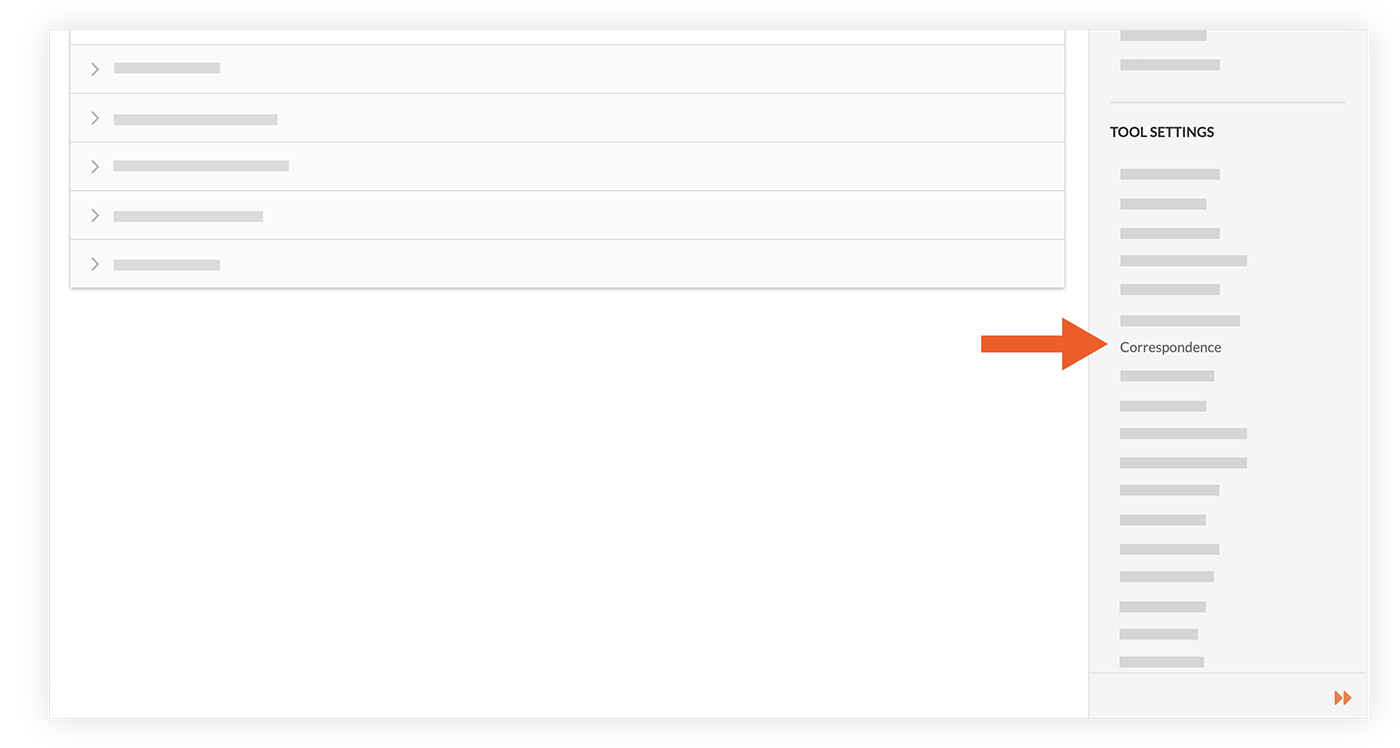
On the Correspondence page of the Company level Admin tool (under Tool Settings), create a correspondence type.
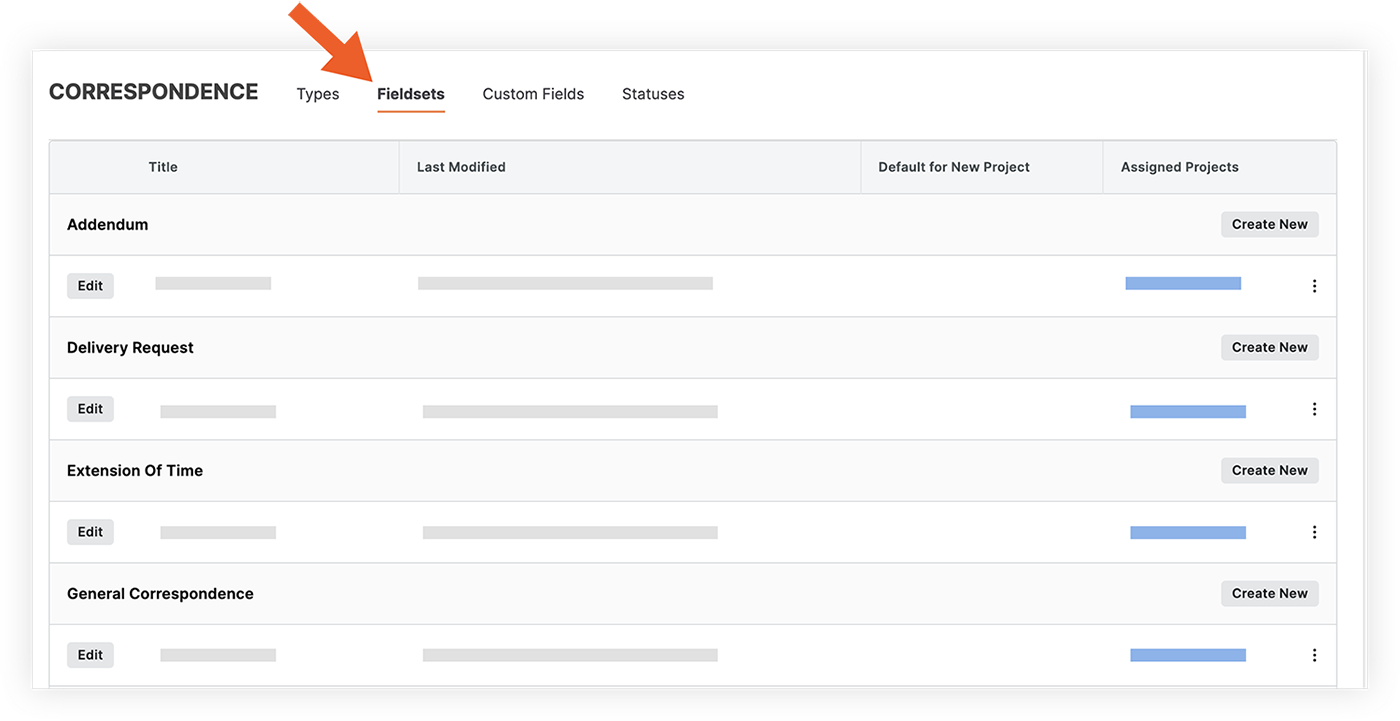
2. Create and Apply a Correspondence fieldset to a Project
On the 'Fieldsets' tab of the Correspondence page in the Company level Admin tool, create a new fieldset or edit an existing one. In the 'Assigned Projects' link for the fieldset, choose the projects that you want to apply the Correspondence fieldset to.
3. Create a Correspondence item
In the Correspondence tool for the project, create one or more correspondence items that you'll use to share files from the Document Management tool.

Next Lesson: Conclusion
Conclusion
 You've Completed the Guide!
We hope this guide helped you get a better understanding of how the Document Management tool works and how you'll be able to use it on your projects.
For a complete list of Document Management tutorials, FAQ, videos and more, visit the Document Management landing page.